Canon EOS 600D / Rebel T3i
-
-
Written by Gordon Laing
Intro
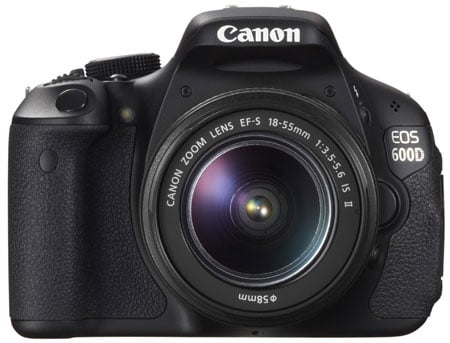
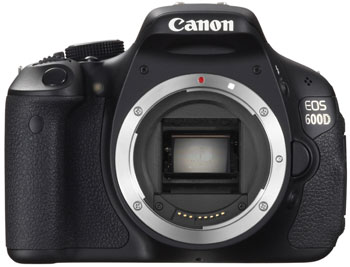
Canon’s EOS 600D – or Rebel T3i as it’s known in North America – is the company’s latest upper entry-level DSLR. Announced in February 2011, it’s numerically the successor to the EOS 550D / T2i, although the older model is expected to remain on-sale at a lower price point.
The EOS 600D / T3i is positioned between the EOS 550D / T2i and EOS 60D in Canon’s current DSLR lineup, but at first glance it’s much closer to the former. Externally the EOS 600D / T3i greatly resembles the 550D / T2i, with similar dimensions, weight, build, styling and controls. Internally it also shares the same 18 Megapixel sensor and core HD movie modes, not to mention the same viewfinder, AF system, continuous shooting, 3in 1040k pixel screen and metering, but as Canon tradition dictates, it inherits a number of key aspects from a higher-end model in the range (in this case the EOS 60D), along with at least one brand new feature.
From the 60D, the EOS 600D / T3i inherits the fully articulated screen, allowing you to compose and shoot or film at unusual angles. It also features the 60D’s multiple aspect ratios when shooting in Live View and Creative Filters which are applied during playback, along with manual control over audio recording levels in movies. The 600D / T3i additionally enjoys wireless flash control, albeit with a simpler implementation than the 60D. In terms of brand new features, the EOS 600D / T3i’s Movie mode now offers Digital Zoom and Video Snapshot capabilities, while the Auto shooting mode now employs scene detection. There’s also a new Mark II version of the EF-S 18-55mm kit lens.
 | |
The two most important updates over the earlier EOS 550D / T2i are undoubtedly the articulated screen and wireless flash control. Despite deploying articulated screens for years on selected PowerShot compacts, the EOS 600D / T3i is actually only the second Canon DSLR to feature one, following the EOS 60D. It’s a valuable feature for those shooting movies or at unusual angles in Live View.
Wireless flash control has been seen before on the EOS 60D and EOS 7D, but this is the first time it’s filtered-down to an entry-level EOS DSLR. Reflecting the target audience, Canon’s also simplified the interface with a new Easy mode for quick multiple flash setups. Great for anyone wanting to enhance their portrait or action lighting with minimal fuss.
While these are the major upgrades over the earlier EOS 550D / T2i, the EOS 600D / T3i additionally enjoys a number of smaller but worthwhile updates. It may not have in-camera RAW processing of the 60D, but it does have the Creative Filters which can be applied during playback, including one new effect. The Auto+ mode now employs scene detection to better identify the subject.
Those intending to use the camera for filming video will welcome manual adjustment over recording levels, along with the brand new Digital Zoom and Video Snapshot features. Both may seem like novelties at first glance, but as we discovered, each delivers compelling results which some may find invaluable.
So the new EOS 600D / T3i is more than just a 550D / T2i with a flip-out screen and wireless flash control. It’s also more than just a budget version of the 60D. In our full review we’ll detail the differences between the three models and take a close look at the new and existing features in practice, including in-depth reports on the image and movie quality.
Testing notes:
We tested a final production Canon EOS 600D / Rebel T3i running firmware version 1.0.0. Following our convention of testing cameras using their factory default settings unless otherwise stated, the EOS 600D / T3i was set to Large Fine JPEG quality, Auto White Balance, Evaluative metering and the Auto Picture Style; High ISO Noise Reduction and the Auto Lighting Optimiser were set to their default Standard settings, except in our High ISO noise tests page where the latter was disabled as it can introduce noise. Highlight Tone Priority was disabled apart from during our specific tests of the feature. Image Stabilisation was enabled for all handheld shots and disabled for tripod-based tests.
Many thanks to Queenstown Cameras for their support in this review. If you’re in Queenstown, New Zealand and need any photographic equipment, prints or advice, please head on over to their store on Camp Street.
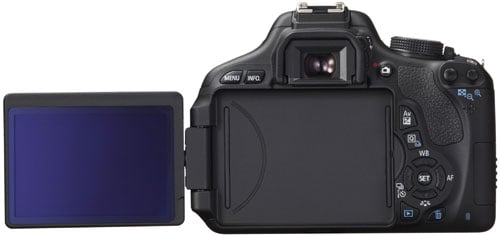
Canon EOS 600D / Rebel T3i design and controls
Externally, the Canon EOS 600D / Rebel T3i looks virtually identical to its predecessor, with the articulated screen being the only major difference. Accommodating the screen has however resulted in a few minor changes which we’ll discuss in a moment. But first lets discuss the size, weight and build quality.
 | |
The EOS 600D / T3i measures 133x100x80mm, which makes it between three and five mm bigger in every dimension than its predecessor. This is mostly to accommodate the articulated screen, and you’re unlikely to notice the difference in practice. Likewise for the weight, which while heavier at 570g compared to 527g when both are equipped with battery and card, is virtually unnoticeable in your hands. The build quality of both models is also essentially the same, although we preferred the coarser texture of the rubber surfaces on the new model
There’s a much bigger difference when comparing the EOS 600D / T3i against the next model up in the range, the EOS 60D. Measuring 145x106x79mm, Canon’s higher-end body is noticeably wider and taller, and comfortably heavier too at 755g with battery and card. In your hands, the EOS 60D feels like a much more serious camera, albeit not in the same league as the EOS 7D. The EOS 60D enjoys the ergonomic benefits of a taller grip with a pronounced groove for your index finger and indentation for finger tips, not to mention a rest for your entire thumb’s length while the EOS 600D / T3i leaves its tip dangling in mid-air. Of course while the EOS 60D is more comfortable to hold, many will prefer the smaller size and lighter weight of the 600D / T3i – it’s better-suited for hikers or even balancing on the end of a telescope.
 |
 |
 |
While the 600D / T3i is towards the smaller side of Canon’s DSLR range, there are smaller bodies available from rivals, most notably Sony’s Alpha SLT A33 and A55. Costing roughly the same price, the Alpha A55 is a natural rival for the EOS 600D / T3i and measures 124x92x85mm and weighs 500g including battery and card. The greater depth of the A55 is due to its protruding electronic viewfinder housing, but in every other respect the camera looks and feels much smaller – and impressively the SLT A33 and A55 also include built-in stabilisation which works with any lens you attach.
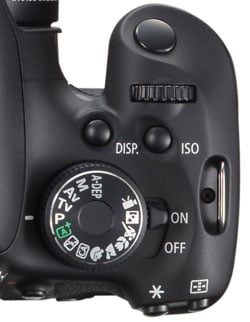
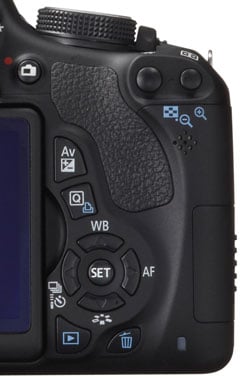
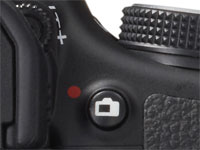
In terms of controls, the EOS 600D / T3i is essentially the same as its predecessor with only a handful of tweaks, mostly to accommodate its articulated screen. The upper left side is again left bare, with the bulk of the controls located on the right side of the body. Starting on the upper right surface, there’s the main Command Dial, rotary power switch, finger dial, shutter release button, and dedicated buttons for ISO and DISP; the latter is new to the 600D / T3i and is used to switch the screen on and off in the absence of proximity sensors which used to be between the viewfinder and screen on the old model. Like most entry-level models, there’s no thumb dial or wheel.
The mode dial is also virtually unchanged, featuring the same P, A, S and M modes, Canon’s Green Auto, Creative Auto and A-DEP modes, along with the Movie Mode and direct access to the same five scene presets or flash-off option.
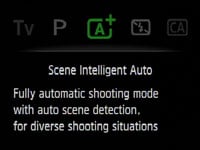
The Green Auto option is now nudged-up against P on the dial and relabelled A+ for Auto Plus. This mode now employs scene detection to determine things like whether the subject is in motion, but don’t expect the same degree of sophistication of a camera employing scene detection with live view as this really does allow the camera to better analyse the subject.
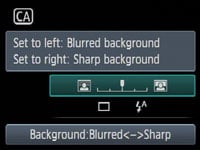
Creative Auto, or CA for short on the dial, remains a beginner-friendly version of Aperture Priority, albeit with a redesigned interface over the 550D / T2i. So instead of dialling-in an f-number, the CA mode presents an on-screen slider labelled Background Blur to adjust the depth of field. Interestingly the exposure compensation slider of the 550D / T2i’s CA mode is now absent, with the 600D / T3i only allowing you to adjust the ‘ambience’, self-timer and flash options. As before though, it remains a friendly approach to controlling depth-of-field which will appeal to beginners wanting a little more control than full Auto.
 |
The AE / AF lock and AF point selection buttons remain in the top right corner of the rear and as before double-up as zoom controls during playback – along with manual focus assist controls in Live View and Digital Zoom controls in the Movie mode. Like other recent Canon DSLRs, there’s no need to press the AE / AF lock button to autofocus in Live View. This was never an intuitive option, so we’re pleased to find the 600D / T3i using a half-press of the shutter release to autofocus in Live View.
The rear of the camera remains dominated by the 3in screen, although the thicker surround required for the articulated mounting has resulted in a few minor changes. Most obviously there’s no longer room for the proximity sensors which used to sit between the viewfinder and screen on the 550D / T2i. As mentioned above, you’ll now need to use the new DISP button to manually switch the screen on and off on the 600D / T3i. The dedicated Live View button remains to the right of the viewfinder.
The controls to the right of the screen remain identical in number, position and function to the 550D / T2i, but the wider screen mounting has seen them reshaped and squashed a little closer together. Starting at the top you’ll find the AV exposure compensation button, followed by the Q button to enter the Quick Access menu, which again doubles-up as the Direct Print control.
Below these are the traditional four cross-keys which share the same functions as the earlier 550D / T2i. Push up for White Balance, right for AF mode, down for Picture Style and left for the drive modes. Below these are buttons for Play and delete / trash. A final point worth noting is Canon has kept the depth-of-field preview button which can be found just below the 600D / T3i’s lens release button; this works when composing with either the optical viewfinder or in Live View.
Canon EOS 600D / Rebel T3i flash
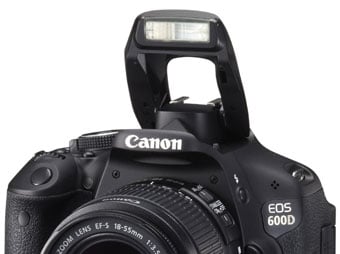 |
The EOS 600D / Rebel T3i is equipped with the same internal flash as its predecessor, which pops-up 55mm above the top of the lens mount (clearing the optional EF-S 18-135mm kit lens) and has a guide number of 13. As before, there’s also a hotshoe for mounting external Speedlite flashguns and the fastest sync speed remains 1/200. As you’d expect for a consumer model, there’s no PC Sync port, but then the EOS 60D didn’t have one either. So far so similar to the earlier models, but Canon has enhanced the flash functionality of the 600D / T3i with support for wireless control and the latest video light equipped Speedlites.
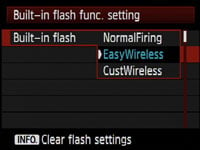
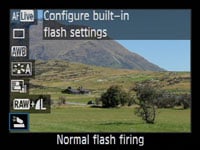
Starting with the former, the EOS 600D / T3i follows the EOS 60D and EOS 7D to become the third Canon DSLR to support wireless flash control. The built-in flash can be used as a Master to wirelessly trigger compatible Speedlites, although the implementation is a little simpler and more consumer-friendly than the EOS 60D and EOS 7D.
If you enter the Built-in Flash Func menu, you can now choose from NormalFiring, EasyWireless and CustWireless. EasyWireless greys-out all the advanced options, simply leaving the control channel and exposure compensation settings. This means all you need to do is match the channel of the slave unit and you’re ready to go, which allows beginners to enjoy the benefits of wireless flash control without the complications. You can trigger multiple units sharing the same channel, although without separate control over their output.
 |  |
 |  |
More advanced photographers will however be pleased to find greater control under the CustWireless option, which unlocks the options to set the Wireless Function and the ratio between built-in and external units. Slave units can also be divided into two groups and the ratio between them set.
The EOS 60D and EOS 7D may offer more advanced wireless options with up to three groups and compensation applied in a broader range of +/-3EV, but the facilities offered by the EOS 600D / T3i remain more than sufficient for all but the most sophisticated setups, and the new EasyWireless option allows lighting beginners to make the first step into wireless control with the least hassle. Overall they’re a valuable addition to the xxxD / Rebel line.
Like its predecessors, there’s also control for compatible Speedlites mounted directly to the hotshoe, allowing you to adjust the compensation, bracketing, sync, zoom and wireless options without touching the flash.
New to the EOS 600D / T3i is support for the latest Speedlites which include LED lamps for illuminating video. Under dim conditions with the Movie exposure mode set to Auto, the camera can automatically turn the light on when required.
Canon EOS 600D / Rebel T3i viewfinder
The EOS 600D / T3i is equipped with a similar penta-mirror optical viewfinder to its predecessors with 95% coverage, although Canon now quotes the magnification as being 0.85x compared to 0.87x on the older models, although in use you wouldn’t notice any difference between them. The coverage is the same as most DSLRs in the same class, including the Sony Alpha A580 and Nikon D5000, although all employ different magnifications (and varying sensor sizes), making their viewfinder experiences a little different.
 | |
Nikon’s D5000 has a relatively small viewfinder magnification of 0.78x, which in practice makes its viewfinder image appear the smallest in the group, although not by as much as the figures imply. The Sony Alpha A580 comes-in fractionally larger than the D5000 at 0.8x, but again the difference between them is minor.
So with 0.85x magnification, the 600D / T3i would appear to deliver the biggest viewfinder image, but once you take its fractionally smaller sensor size into account, the difference between it and, say, the Sony A580, becomes virtually imperceptible in side-by-side comparisons.
For a better optical viewfinder experience, you’ll need to go for a model with a larger pentaprism system, such as the EOS 60D, which delivers 0.95x magnification and 96% coverage. Pentaprism viewfinders may add weight to the body, but also deliver a brighter image. So if you’re really into composing and manually focusing with the viewfinder, you’ll definitely find the EOS 60D preferable in this regard.
An interesting alternative are the electronic viewfinders on models like Sony’s SLT cameras which deliver a much larger image with 100% coverage and the benefit of super-imposed colour graphics. The downsides are a (current) inability to present a live view between frames when shooting very quick continuous bursts and the finite detail and tonal range of an electronic image. Traditionalists (and action shooters) may remain unconvinced, but the electronic viewfinder experience of models like the SLT-A33 and SLT-A55 is very good indeed and presents a unique alternative to conventional optical solutions.
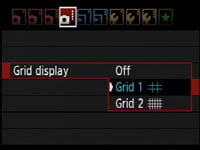
In terms of markings, the 600D / T3i’s viewfinder is unchanged from its predecessor. You’ll see the same nine focusing points with the centre-point circled to indicate the spot-metering area. As you’d expect for a camera at this price point, you can’t swap the focusing screen, and unlike Nikon’s D5000 and D90, not to mention Canon’s higher-end EOS 7D, there are no on-demand LCD grid lines.
There is however detailed information running along the bottom of the image, and in large, clear characters. The details and layout are the same as the 550D / T2i, including the ISO value displayed at all times, and icons indicating whether B&W or Highlight Tone Priority modes are enabled.
Canon EOS 600D / Rebel T3i Screen
The Canon EOS 600D / T3i follows the EOS 60D to become Canon’s second DSLR to feature a fully-articulated screen. The screen is hinged on the left side of the body (as viewed from the rear), allowing it to flip and tilt in any direction for easier composition at high or low angles, while also being able to turn to face the photographer or back on itself for protection. At first glance it appears identical to the screen on the EOS 60D, although there’s very subtle styling differences: our EOS 60D sample had two small screws visible on the inner hinge and one on the inner body plate which were all absent on the 600D / T3i. The latter also had two rubber strips on the inner area compared to one on the 60D. But beyond these minor changes, the screen panel and hinge system appears identical.
 |
The articulated screen is the single biggest new feature of the EOS 600D / T3i over its predecessor, and one which will be welcomed by videographers, along with anyone who takes pictures at unusual angles.
In use the articulated mounting feels very smooth and robust; there’s obviously some concerns over potential damage, but the literal flipside is being able to protect the screen by folding it back on itself. We should also note in all our time testing cameras, we’ve never experienced any issues with the mechanisms used by Canon on its articulated screens. We should also mention we much prefer the side-hinge system used by Canon and Panasonic compared to the lower hinges of the Nikon D5000 and a number of Sony models. A side-hinge allows greater freedom, especially when the camera’s mounted on a tripod and to us simply feels more intuitive.
As mentioned above, the most obvious application is when shooting movies, and it’s certainly nice to hold the camera at waist height or high angles when filming. But it’s useful when taking stills too. Beyond being able to take images at high, low or discreet angles, it’s also a considerable relief not to strain your neck when the camera’s mounted on a telescope – indeed we can see many astro-photographers selecting the EOS 600D / T3i just for this aspect alone. Macro photographers or anyone else who finds their cameras in unusual positions will also love it. The only downside is the screen flips out by 175 degrees rather than 180, which means it’s slightly tilted in relation to the direction of the camera. This can feel a little odd at times, but is far from a deal-breaker.
The articulated mount isn’t the only thing which makes the EOS 600D / T3i’s screen special, as it also inherits the superb TFT panel first seen on the EOS 550D / T2i. This panel measures 3in and employs a wider 3:2 aspect ratio which perfectly matches the shape of its images. The vast majority of other cameras use squarer 4:3 aspect ratio screens which mean 3:2 images in Live View or playback have black bars above or below when the entire frame is viewed. Not so on the EOS 600D / T3i, which like the EOS 550D / T2i and EOS 60D before it, fills its screen in Live View or playback.
 |
Like those models, the EOS 600D / T3i’s screen also sports a slightly higher resolution of 1040k dots compared to the 920k of many cameras. While this may not sound like a big leap, the crucial difference is the entire vertical resolution can now be devoted to the image. When viewing 3:2 images on earlier 4:3 shaped / 920k screens, letterboxing meant the actual image only occupied a portion measuring 640 pixels wide by 427 pixels tall. Now on the EOS 600D / T3i, the full 720×480 pixel resolution of the screen can be used to display images, giving it almost 15% more detail in each axis. And while framing wider 16:9 HD video will still involve some letterboxing, the 3:2 shape is a better fit than previous 4:3 models, again with the image filling more of the screen.
In use, this actually makes a big difference. Previous VGA screens already looked very good, but having the image filling the screen without letterboxing makes for a much preferable composing and viewing experience. Indeed you wonder why it’s taken so long for DSLR manufacturers to fit screens which match the shape of their sensors – we know 4:3 shaped screens are more commonly available, but that hasn’t stopped Panasonic from fitting 3:2 shaped screens for some time now, albeit – ahem – on cameras with 4:3 shaped sensors.
The Canon screen itself is bright and crisp, but like most is not immune to the effects of bright sunlight. With the Sun shining directly on the screen, the image can be hard to see, and any smears or fingerprints become obtrusive. But the ability to twist the screen out to a different angle allows you to minimise the effect and keep the image visible.
Overall the quality of the panel along with the articulated mounting is a real highlight of the EOS 600D / T3i. The panel is the best we’ve seen on a DSLR and the uncompromised articulation, not hindered by the hinge position or a single axis design is genuinely useful. This is a major selling point of the EOS 600D / T3i over its predecessor and the competition.
Note the earlier EOS 550D / T2i employed proximity sensors below the viewfinder to automatically switch the screen off as you brought the camera to your face for composition, but these have been squeezed out to make room for the articulated screen mount. In their absence, you’ll need to press the new DISP button on the camera’s top surface to turn the screen on and off.
Canon EOS 600D / Rebel T3i Live View
The EOS 600D / T3i is equipped with Live View facilities which allow you to compose with the main screen. The implementation is essentially the same as the EOS 550D / T2i before it, with a couple of minor alterations.
 |  |
Entering Live View is the same as the EOS 550D / T2i: simply press a dedicated button to the side of the viewfinder and start composing a couple of seconds later. To autofocus, just half-press the shutter release.
Like the EOS 550D / T2i, the default AF mode in Live View on the EOS 600D / T3i is the contrast-based Live Mode option (see below), which again matches the defaults of its main rivals. While this remains the slowest of the Live View AF modes, the lack of noise and interruption to the image – not to mention optional support for face detection – makes it the most sensible choice, at least in a lower-end model.
Once you’re in Live View, the EOS 600D / T3i delivers 100% coverage and exploits the full resolution of the screen, with a smooth refresh rate of 30fps. The effect of different apertures can be previewed by pressing the depth-of-field preview button below the lens release, and under most conditions the camera will temporarily brighten the screen to maintain a consistent image; if the subject’s already quite dark though, the screen will become noisier during the preview.
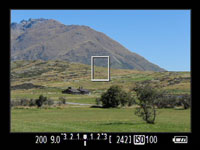 | 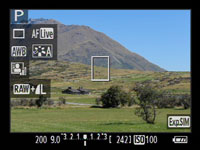 | 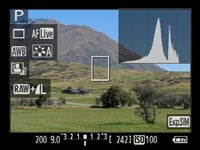 |
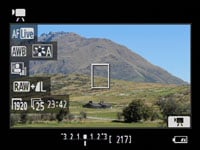
Pressing the Info button cycles between four views: a clean image, one with basic shooting information at the bottom, one which adds additional information down the left side of the image, and finally one which places a live histogram in the upper right corner. The option of a live histogram is a key advantage Canon DSLRs have over most of Nikon’s range; strangely Nikon continues to reserve a live histogram for its top-end pro models only.
 |  |
 |  |
The Info view which adds details to the left side of the image indicates the current settings for the Drive Mode, White Balance, Auto Lighting Optimizer, Quality, AF Mode and Picture Style in two columns. Like the EOS 550D / T2i before it, these can all be adjusted on-screen by pressing the Q button. This rearranges the icons in a single taller column (with the addition of flash control) and allows you to highlight the required detail using the rocker, before then turning the finger or thumb wheels to adjust it. Meanwhile the AF, Drive and White Balance cross keys along with the dedicated ISO button on the top fire-up dedicated menus for each.
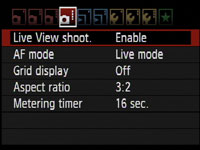
Canon also offers the choice of two alignment grids in Live View, although like the 550D / T2i you’ll still need to enable them in the Live View menu; while this means you can see a grid and histogram at the same time, we’d prefer it simply appeared as an option when cycling through the Display views. As you’d expect for a camera in its class, the EOS 600D / T3i also doesn’t share the virtual horizon facilities of the higher-end EOS 60D and EOS 7D.
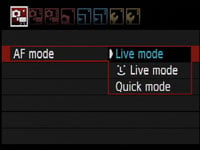
Looking at autofocus in more detail, the EOS 600D / T3i inherits the same three modes as the 550D / T2i: the default contrast-based Live Mode, followed by Live Mode with face detection and finally Quick Mode which uses the traditional phase-change AF system. As described above, all three are activated with an intuitive half-press of the shutter release.
With the EOS 600D / T3i set to its default Live Mode, a white rectangle is shown in the middle of the frame, which can be moved around using the cross-keys. Half-press the shutter release and the 600D / T3i will focus on whatever’s in the frame using a contrast-based system. Like other DSLRs, contrast-based autofocus in Live View is relatively slow, but operates very quietly without the sound or interruption of the mirror flipping.
 |  |  |
|

Like earlier Canon models, Live Mode adjusts the lens roughly at first before slowing down to fine-tune the focus. At best this could take around two seconds, but it’s not uncommon to find it taking as long as four. Beyond a lack of interruption, the technical benefit is taking a focus reading direct from the sensor’s image, so Live mode doesn’t suffer from the potential AF inaccuracies of a traditional phase-change system; this is of particular benefit since the EOS 600D / T3i lacks the AF micro-adjustment of higher-end models which allow you to calibrate lenses to minimise front and back focusing issues.
The EOS 600D / T3i’s Live Mode with face detection (indicated by a smiley icon) uses the same contrast-based system as normal Live Mode, but if it recognises a human face, it’ll frame it with a box and focus on that instead when you half-press the shutter release; if there’s more than one face in the scene, you can use left and right cross keys to select the one to focus on.
As you might expect, the 600D / T3i’s processor can recognise and track faces as quickly as a compact, but the actual focusing process itself remains the same speed as normal Live Mode – as such it can take several seconds. If you’re lucky, the camera will lock on and confirm within a couple of seconds, but if it ends up being longer, it’s easier to exit Live View and frame a portrait shot through the viewfinder instead. If you want quick contrast-based face detection you’ll need to go for one of the mirrorless cameras like Panasonic’s Lumix GH2.
Finally, the EOS 600D / T3i’s third AF option, Quick Mode, employs the traditional 9-point phase-change AF system used when composing through the optical viewfinder. As such, the camera shows a graphical representation of the nine AF points on-screen in the same diamond configuration, with the active point(s) now illuminating green for consistency with the Live mode. An adjustable white frame remains in the middle for magnified focusing assistance – see below.
Like other phase-change AF modes in Live View, the camera needs to flip its mirror down to take a reading before flipping it back up again to continue the live feed. There’s obviously some noise and an interruption to the image during this time, but it remains the quickest if the three AF modes in Live View – indeed, if the AF system locks onto the subject without a problem, the entire process can take less than a second.
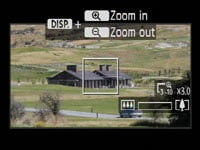
At any time during the Live or Quick AF modes, you can press the magnify button to show a 5x view, then a 10x view. The 600D / T3i will zoom-in on wherever the white frame is positioned on screen, which can be moved before or during using the cross-keys. At 10x, the EOS 600D / T3i shows an area that’s one tenth the width of the full image as you’d expect, but then scales this 518 pixel wide crop to fill the 720 pixel width of the monitor. So the 10x mode actually appears to be operating at greater than 1:1 magnification.
 | 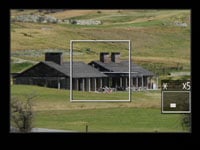 | 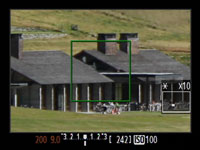 |
For purists it may be a little annoying not to have an exact pixel-mapped 1:1 viewing mode, but at 10x there’s little evidence of scaling or fuzziness; indeed the image looks pin-sharp and allows you to confirm auto-focusing or make very precise manual focus adjustments.
Live View on the EOS 600D / T3i is also available at a higher resolution when the camera’s connected to an HDTV using the HDMI port, or connected to a PC or Mac and using the supplied EOS Utility – see our Features page for more details on the latter.
Finally, while the EOS 600D / T3i doesn’t inherit the Silent Shooting Live View options of the EOS 60D, it does gain its multiple aspect ratios: you can now shoot in 3:2, 4:3, 16:9 or 1:1 shapes, the last three involving a crop.
So all-in-all, there may only be minor changes to the Live View experience on the 600D / T3i over its predecessor, but you’re still getting intuitive operation with a great-looking articulated screen and easy magnified focusing assistance. The main contrast-based AF system hasn’t become any faster though and like most equivalent systems, you still can’t continuously autofocus for tracking action. To be fair, Nikon’s attempts at continuous AF during Live View and Movie Modes haven’t exactly been all that useful either. If you want a big sensor camera which can quickly track moving subjects in Live View or Movie Modes, you’ll really need to go for one of the EVIL models like Panasonic’s Lumix GH2 or Sony’s Alpha SLT-A33 / A55.
Canon EOS 600D / Rebel T3i shooting information and menus
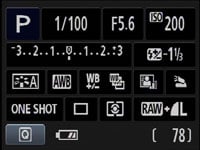
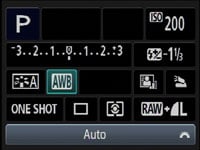
Like its recent predecessors, the EOS 600D / T3i uses its main colour screen to display all shooting information and the high resolution allows the fonts to look very smooth. At first glance the details displayed look the same as the earlier 550D / T2i, but there’s a couple of minor changes.
 |  |
 |  |
On the top row you’ll now find the Shooting mode, followed by the shutter speed, aperture, ISO sensitivity and a D+ icon indicating whether Highlight Tone Priority is enabled or not. On the second row there’s the exposure compensation scale in a +/-3EV range, and flash compensation value. Next down on the third row are the Picture Style, White Balance mode, icons for White Balance compensation, White Balance bracketing, Auto Lighting Optimiser and the built-in flash function setting. On the fourth row you’ll find the AF, drive and metering modes, followed by the image quality, leaving a four-segment battery indicator and the shots remaining at the bottom. This lower strip also indicates the transmission status of an Eye-Fi card if present.
Also at the bottom, in the lower left corner is a box labelled Q, indicating that pressing the new Q button will activate the camera’s Quick Control mode. Inherited from the EOS 550D / T2i, this allows you to move a highlighter over many of the options listed above, before then turning the finger dial to directly adjust it, or pressing SET to present a dedicated menu for that item.
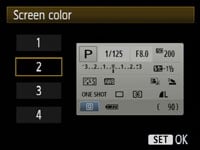
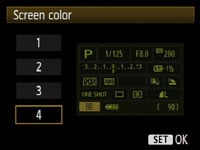
It’s similar in practice to other on-screen adjustment systems like those pioneered on Olympus DSLRs, and like its predecessor you can also choose from four different colour schemes. Sadly unlike the Nikon D5000 and the entire Sony Alpha range though, the new Canon still won’t rotate its information to remain upright when you turn the camera. Note: in the absence of proximity detectors below the viewfinder (squeezed-out by the articulated screen), you’ll need to press the new DISP button on the camera’s top surface to turn the screen on and off.
 |  | 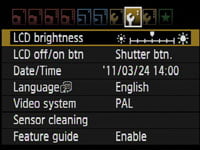 |
The menus are essentially identical to the earlier 550D / T2i, exploiting the high resolution monitor and processing for smooth fonts, colourful icons and fading transitions between pages; it’s a good-looking system. As before you can exclusively use the cross-keys for navigation, or use the finger dial to switch pages.
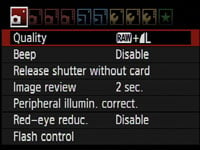
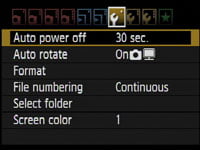
The number of pages and their content varies depending on the shooting mode, but in the ‘Creative Zone’ PASM modes there are four for Shooting, two for Playback, three for Setup and one for My menu; within Setup you’ll find the Custom settings menu with the same 12 Functions as the 550D / T2i before it. Note to find the Movie Mode options, such as the recording quality, you’ll first need to turn the Mode Dial to Movie; this switches round the menus, adding new pages dedicated to the video and audio capabilities; we’ll detail these in the Movie mode section under the Features tab.
 | 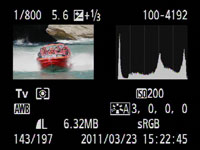 | 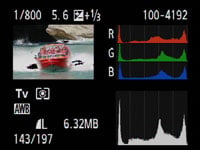 |
In playback mode, pressing the Disp button cycles between a clean image, one overlaid with basic information, followed by a thumbnail with extended shooting information and a brightness histogram, and finally a thumbnail with less shooting information, but both brightness and RGB histograms. You can also use the magnify buttons to zoom-in on an image or zoom out to display either four or nine thumbnail views. Images played on the sharp and bright screen look great.
If you’re directly connected to a PictBridge-compatible printer, the 600D / T3i also allows you to perform a number of manipulations including trimming and fine rotation, along with manual Levels adjustments.
Canon EOS 600D / Rebel T3i Battery and connectivity
The Canon EOS 600D / T3i is powered by the same LP-E8 Lithium Ion battery pack introduced on its predecessor. This has an 1120mAh rating and with essentially the same internal components, it’s not surprising to find Canon quoting exactly the same battery life as the 550D / T2i: 440 under CIPA conditions with 50% flash usage, or 550 without. The number of shots understandably falls considerably when composing with the screen. If you exclusively use Live View (admittedly unlikely), each charge should be good for around 180 shots with 50% flash usage, or 200 without. Switch to movie mode and you should be able to film approximately 100 minutes worth of footage per charge. Either way if you regularly compose in Live View or shoot movies, you’ll find your battery depleting sooner rather than later, so we’d definitely recommend carrying a spare.
Sadly there’s still only four levels on the battery life indicator, compared to the accurate percentage remaining shown by Sony’s Info Lithium models. If you require longer lifespan not to mention something more to hold onto, the optional BG-E8 battery grip (same as the 550D / T2i) can take two LP-E8 packs or six AA batteries, while providing portrait controls and grip. Alternatively if you prefer mains power, there’s an optional ACK-E8 adapter.
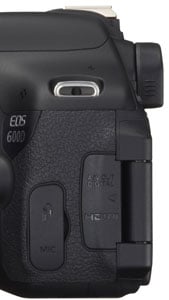 |
|
In terms of connectivity, there’s now two flaps on the left side of the body, each covering two ports. The outer flap opens to reveal a socket for the optional RS-60E3 remote switch and a 3.5mm jack for external microphones; we tried the EOS 600D / T3i with both the Rode Stereo Video Microphone and VideoMic Pro with no problems.
Behind the inner flap, which is pressed right up against the screen hinge, you’ll find the combined USB / TV output and a mini HDMI port which supports CEC for remote control with compatible TV sets.
Standard TV and USB cables are provided, and the latter can be used in conjunction with supplied software to remote trigger the camera, rendering the remote switch redundant – so long as you have a computer in close range of course. If you prefer wireless remote control, the optional RC-6 can trigger the shutter via infra-red.
An HDMI cable isn’t supplied, but any standard model with a mini-jack at one end will work. Note while the 600D / T3i will deliver a great-looking high-resolution version of its Live View over HDMI, the output will be temporarily switched to a lower resolution (or disabled) while recording a movie. If you need to monitor the signal while filming though, the standard definition composite TV output remains active.
Like the models preceding it, the 600D / T3i unsurprisingly sticks with the SD memory card format, and as always you’ll need to supply your own. There’s support for large SDXC cards, and if you want to record HD movies, Canon recommends using a card rated as Class 6 or higher; we used a Lexar Professional 16GB SDHC 133x model in our tests which is rated as Class 10 and worked fine with all the movie modes. SanDisk’s Extreme III cards are also rated as Class 10, so should be a great match for the 600D / T3i; note the cheaper Ultra II cards are only Class 4, so while fine for still photography on this camera, will be too slow to support the HD movie modes for longer recording times.
Now let’s head-onto the Canon EOS 600D / Rebel T3i Features section where we’ll detail the lenses, anti-shake, focusing, the sensor, image processing, continuous shooting, PC-based remote control, and of course the improved movie mode.
Canon EOS 600D / T3i lenses, focusing, sensor & drive
 | |
|---|---|
The Canon EOS 600D / Rebel T3i employs an EF lens mount and is fully compatible with both Canon EF and EF-S lenses. Thanks to its APS-C sensor size, all lenses effectively have their field of view reduced by 1.6 times.
The EOS 600D / T3i is available as a body alone or in a choice of kits with stabilised zoom lenses. Most geographic regions will be offered the cosmetically-updated EF-S 18-55mm IS II kit lens, which offers a basic 3x optical range that’s equivalent to 29-88mm, although some will alternatively bundle the recent EF-S 18-135mm IS model which offers a much longer range equivalent to 29-216mm.
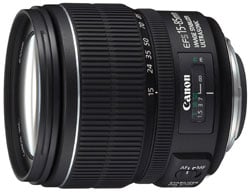 |
The new EF-S 18-55mm IS II is a fairly basic lens with a rotating front section which will annoy users of polarising filters. It’s also this thin section you’ll need to turn to manually focus the lens, and a certain amount of play in the barrel means the image can shift a little while making adjustments during filming.
The EF-S 18-135mm IS is a decidedly superior option for the EOS 600D / T3i without breaking the bank. It delivers a very flexible range which takes you from wide-angle to decent telephoto, along with sporting a smoother manual focusing ring and a non-rotating front section.
Like most lenses with long ranges, there’s geometric distortion and vignetting at both ends of the range (although the latter can be effectively corrected in-camera on the 600D / T3i), and the corners are also soft at larger apertures, but close it down to f8 and it can deliver pretty respectable results for the money. See our Canon EF-S 18-135mm IS review for more details.
Alternatively if you have a bigger budget and fancy something much classier from day-one, consider buying the 600D / T3i as a body alone and equipping it with the EF-S 15-85mm IS USM lens. This may not have the reach of the EF-S 18-135mm IS, but it zooms comfortably wider, is sharper in the corners at larger apertures, and features quicker and quieter USM focusing.
See our Canon EF-S 15-85mm IS USM review for more details, and if you’d like any recommendations for specific styles of photography, like portraiture, sports or close-ups, please check out our Canon lens buyer’s guide.
Canon EOS 600D / Rebel T3i focusing
The Canon EOS 600D / T3i employs the same 9-point AF system as the EOS 550D / T2i and several models before that. As before these are arranged in a diamond pattern, with only the middle point being a cross-type sensor. This is one of the very important differences between the 600D / T3i and EOS 60D, as the latter may share the same diamond-arrangement for its AF points, but all nine of them are cross-type sensors, making it more responsive with a variety of subjects.
A further difference is the way each AF point is represented in the viewfinder. Like its predecessors, the 600D / T3i has a small rectangle representing each AF point, with a red dot in the middle of each illuminating when active. The EOS 60D, like earlier xxD models, also has a rectangle for each AF point, but with these models, the edges of the actual rectangle itself illuminate red when active.
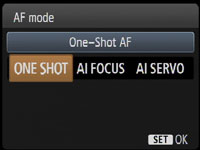
The 600D / T3i’s three AF modes remain the same as before: One Shot for use with still subjects, AI Servo for moving subjects, or AI Focus which lets the camera decide between the two.
 |  |
Press the focus area button and you can use the cross-keys to manually select a single focus point or use the finger dial to cycle through the options. Under dim conditions, the flash will popup and flicker to provide AF assistance, but if you find this alarming, you can disable it or only request AF assistance from an external flashgun in a custom menu. And while the EOS 600D / T3i inherits a number of features from the higher-end EOS 7D, AF Micro-adjustment isn’t one of them. So if you’re experiencing front or back focusing issues, you’ll need to return the offending item for calibration.
Fitted with the EF-S 18-55mm IS II kit lens, focusing felt the same as its predecessors, with the camera locking-on during most situations in less than a second. To put the AI Servo AF system to the test we photographed Queenstown’s famous Shotover Jet boats using the EF-S 18-55mm IS II lens. These boats race along the Shotover river in Queenstown New Zealand, approaching at high speed before suddenly executing 360 degree spins. As such they represent a challenge to any AF system.
 |  |  |  |  | ||||
 |  |  |  |  |
In this particular circumstance we found the EOS 600D / T3i’s AI Servo tracked the boats fairly effectively at the modest focal length of 55mm, although switching to longer lenses revealed some tracking errors. Either way, the modest continuous shooting speed and buffer size ultimately let the camera down for serious action photography; if you want snappier focusing and quicker continuous shooting, you’ll need to go for the EOS 60D or higher. To put it into perspective, a ten frame burst from the 600D / T3i covered a jet boat turning almost a complete revolution (see above), whereas the quicker speed of the 60D saw its ten frames cover just half a turn. The bottom line is a faster camera will capture finer increments of motion and therefore have a greater chance of capturing the pose or composition you desire.
Canon EOS 600D / Rebel T3i metering, exposures and bracketing
 |
The Canon EOS 600D / T3i offers the same four metering modes as its recent predecessors: TTL Evaluative, Partial (9% of v/f area), Spot (4% of v/f area) and Center-weighted; the viewfinder also indicates the spot metering area with a circle. It also inherits Canon’s latest 63-zone Focus Colour Luminance (iCFL) metering system introduced on the high-end EOS 7D. This employs dual layers allowing it to take colour information into account, and finally bringing Canon’s latest DSLRs more in line with Nikon’s legendary 3D Colour Matrix Metering system.
 |
And it really works too. We used Evaluative metering for all our sample images and found few if any occasions when we’d want to apply any compensation. It certainly seems more effective than the earlier 35-zone system of the 500D / T1i, and we felt more confident on relying on it for our day-to-day shots.
The EOS 600D / T3i offers shutter speeds from 1/4000 to 30 seconds plus a Bulb option; the fastest flash sync speed is 1/200. Exposure compensation is available in a range of +/-5EV. Like most non-pro bodies, there’s no figures quoted for the longevity of the shutter block.
Exposure bracketing is available with three frames up to 2EV apart in 0.3EV increments, which puts it in line with most cameras at this price-point. White balance bracketing is also available on the 600D / T3i, again with three frames, and at +/-3 levels in one level increments.
Canon EOS 600D / T3i sensor and processing
The Canon EOS 600D / T3i features an 18 Megapixel CMOS sensor which delivers the same resolution as the EOS 60D, EOS 550D / T2i and the high-end EOS 7D. Indeed we understand the only difference between the sensors in each body is the data readout: four channels on all but the EOS 7D, which boasts eight, allowing it to support quicker continuous shooting for RAW files. Speed aside, Canon describes the image quality on all three models to be essentially the same.
The physical size and pixel count is identical across the four models: the EOS 600D / T3i’s sensor measures 22.3×14.9mm and generates 3:2 aspect ratio images with a maximum resolution of 5184×3456 pixels. This gives it around 400 more pixels horizontally and 300 more pixels vertically than the 15.1 Megapixel EOS 500D / T1i and EOS 50D, allowing 300dpi prints to be made at 17.3×11.5in compared to 15.8×10.5in on thsoe older models.
The 600D / T3i’s JPEGs can be recorded at four lower resolutions (8, 4.5, 2.5 and 0.3 Megapixels) and with the choice of Fine or Normal compression; the two lowest resolutions are inherited from the EOS 60D. RAW files are of course offered, at the maximum resolution and you can choose whether to record them individually or accompanied by a Large Fine JPEG. The multiple size and compression combinations of the 60D and 7D aren’t however available here. Best quality Large Fine JPEGS typically measure around 6.4MB each, while RAW files weigh-in around 24MB each. If you shoot in Live View, you can also choose from four aspect ratios: along with the native 3:2 shape, are 16:9, 4:3 and 1:1 options.
Like its predecessor, the EOS 600D / T3i employs 14-bit analogue to digital conversions, and this 14-bit tonal detail is also recorded in the RAW images. See our Results pages for examples comparing the camera’s JPEG and RAW output. Like the models before it, copyright data can also be added to images: author and copyright details can be entered in-camera.
With the same physical sensor characteristics as its predecessor, it’s not surprising to find the EOS 600D / T3i also inheriting the same sensitivity range which runs from 100 to 6400 ISO, with a maximum of 12800 ISO (H) available if ISO expansion is enabled in the Custom settings. Note: if Highlight Tone Priority is enabled, the 600D / T3i’s sensitivity range is reduced to 200-6400 ISO.
There’s also an Auto ISO setting, and the option to set the maximum sensitivity allowed between 400 and 6400 ISO. The PASM and A-DEP modes operate between 100 ISO and the maximum sensitivity set in this menu. The scene presets operate between 100 and 3200 ISO, apart from the Portrait setting which is fixed at 100 ISO. If you’re using Auto ISO with the flash, the sensitivity is fixed at 400 ISO, unless this results in an over-exposure in which case it’s reduced to 100 ISO.
On previous Canon DSLRs, the sensitivity would stick at 400 ISO when the ISO was set to Auto in Manual or Bulb; this remains the case for Bulb or flash exposures, although sensibly Manual mode now works with Auto ISO in the same way as Program and the other exposure modes. You can of course also simply set the ISO manually to your preferred value.
 |  |
 |  |
Like the EOS 550D / T2i, two noise reduction modes are available in the Custom Functions menu: Long Exposure Noise Reduction is applied to exposures longer than one second and can be set to Auto, On or Off, while High ISO Noise Reduction is available in the choice of four settings, Standard (the default), Low, Strong or Disable. Note Strong NR will reduce the maximum burst during continuous shooting.
Pressing the White Balance button allows you to choose from Auto, Daylight, Shade, Cloudy, Tungsten, White Fluorescent, Flash and Custom. White Balance correction and bracketing are also available, but unlike the EOS 60D an higher, there’s still no opportunity to manually enter a colour temperature.
Sharpness, Contrast, Saturation and Colour Tone are applied using a number of Picture Styles: for colour photography, you have the choice of Auto, Standard, Portrait, Landscape, Neutral, Faithful and three User Defined options, while a further Monochrome option offers four filter and four toning effects. Contrast, Saturation and Colour Tone can be adjusted in a range of +/-4, while Sharpness is offered from 0 to 7. While it’s possible to tweak these presets or configure your own, software supplied with EOS 600D / T3i lets you create and edit precision Picture Styles to your absolute requirements.
We used the default Auto Picture Style for all our sample images, and found it delivered fairly lively-looking JPEGs similar in style to its predecessors. It’s a consumer-friendly approach that’s well-aimed at its target audience.
 |
Leveraging the EOS 600D / T3i’s 14-bit A-D conversion is the Highlight Tone Priority (HTP) option, inherited from recent models but still buried away in one of the custom function menus and disabled by default. According to Canon, this improves the highlight detail by expanding the dynamic range from the standard 18% grey to bright highlights. This option is only available between 200 and 6400 ISO and Canon warns noise could be increased in shadow areas. ‘D+’ icons in the viewfinder or on the screen indicate when Highlight Tone Priority is enabled, so there’ll be no surprises.
Below you can see crops taken from our main results image, taken with and without Highlight Tone Priority, HTP. If you have a fairly good monitor, you may able to spot subtle tonal differences in the bright roofing on the HTP version which has become burnt-out on the version without HTP. It’s pretty subtle though and when measuring actual values in Photoshop, you’re only looking at a difference of around 10 levels. Looking at the image as a whole, the histogram of the HTP version has been compressed a little at the highlight end, like a Levels adjustment, albeit made at the point of exposure. As with previous HTP tests, it remains a subtle effect, but one which could still benefit subjects with bright highlights, such as snowy scenes, or wedding dresses.
Canon EOS 600D / T3i JPEG Highlight Tone Priority Disabled (default) | Canon EOS 600D / T3i JPEG Highlight Tone Priority Enabled | |
 |  | |
 |  | |
100% crop, 1/1600, f5.6, 200 ISO | 100% crop, 1/1600, f5.6, 200 ISO |
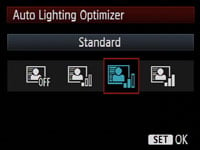 |
The EOS 600D / T3i additionally inherits the Auto Lighting Optimizer from recent models, which adjusts the brightness and contrast of images with dark areas (such as backlit portraits). The camera offers the same four settings as the EOS 550D / T2i: Standard, Low, Strong and Disable. The Standard setting is always applied when the 600D / T3i is set to Auto or the Scene presets, and is also applied by default in PASM modes, although you can adjust it to one of the other three settings if preferred.
Like its predecessor, the Auto Lighting Optimizer settings can be accessed on the second page of the recording menu. The camera also indicates the current setting on-screen, so again there’s no surprises.
| ||||||||||||||||


Above you can see two examples of the same composition taken with the Auto Lighting Optimizer disabled (above left) and with its Strong setting (above right). In this particular example which includes dark shadow areas and blown highlights, we can see very little evidence of the Auto Lighting Optimiser in action, beyond a very slight boost in the wooden roofing in the top right corner of the image; certainly the bright window highlights remain saturated. Lest you think it’s the same image, we’ve included histograms of each which reveal a slight reduction in the shadow values and a minor boost in upper mid-tones on the version with Strong Auto Lighting Optimization, but little difference overall.
Following our policy of using default settings when testing cameras, most of the same images you’ll see in this review were taken with Highlight Tone Priority off and the Auto Lighting Optimizer set to Standard. Since both can result in artificially higher noise levels though, we ensured both were disabled for our High ISO Results pages.
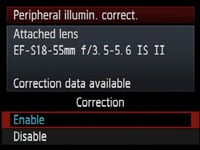 |
The EOS 600D / T3i also inherits the Peripheral Illumination Correction of its predecessor and recent semi-pro models. This is optionally applied to JPEG images to reduce the effect of vignetting where the image darkens towards the corners. The EOS 600D / T3i contains a database of 26 Canon lenses (including data for the new EF-S 18-55mm IS II) and allows you to enter a further 14 models or swap existing ones for other models if preferred. If the lens model is recognised, the correction will be applied by default to JPEG images, although you can switch the option off if preferred. Canon describes the resulting effect as similar to that offered on RAW images in recent versions of its Digital Photo Professional (DPP) software, although DPP itself can offer additional corrections.
 |
Any lens for which DPP offers corrections can be entered into the 600D / T3i’s internal database using the supplied EOS Utility. Again, the latest version includes correction data for the new EF-S 18-55mm IS II kit zoom. DPP also offers data for each lens fitted with a 1.4x or 2x Extender, although these will count as additional entries in the camera’s 40-model internal database.
Since Peripheral Illumination Correction is enabled by default, you’ll see the effect of it on our JPEG sample images throughout this review taken with the EF-S 18-55mm IS II lens. In our tests, it proved very effective at reducing the effect of vignetting, although in extreme cases with certain lenses there can still some darkening in the extreme corners. It remains a improvement over the versions without though, but remember any digital brightening will result in potentially greater visible noise in the applied areas – especially if the ISO was already high on the original.
Unfortunately the EOS 600D / T3i still doesn’t offer in-camera reduction of coloured fringing, nor the in-camera RAW processing of the EOS 60D; it’s especially frustrating as we know the internal database of lens corrections includes data for both peripheral illumination and chromatic aberrations, not to mention distortion. In this respect it’s falling behind Nikon’s DSLRs which effectively eliminate fringing on JPEGs automatically. To be fair Canon does offer a fringing reduction facility, but only through the supplied Digital Photo Professional software. This is very effective, but we’d still like to see it performed in-camera.
While the 600D / T3i doesn’t share the EOS 60D’s in-camera RAW processing, it does inherit its Creative Filters, and again they’re applied after the event during playback. The EOS 600D / T3i offers five Creative Filters which can be applied to RAW or JPEG files, then saved as new JPEG files. You can choose from the ever-popular Grainy Black and White or Soft Focus, opt for Toy Camera (which darkens the corners and applies a colour cast), or choose the increasingly common Miniature effect (which simulates a tilt and shift lens). New to the EOS 600D / T3i over the 60D is the additional Fisheye effect. Each filter offers a selection of options to tweak the effect.
So once again it’s over to our standard real-life resolution test shot with four of the five filters applied.
Canon EOS 600D / T3i JPEG Grainy B/W Creative Filter | Canon EOS 600D / T3i JPEG Fish-eye Creative Filter | |
 |  | |
Canon EOS 600D / T3i JPEG Toy Camera Filter | Canon EOS 600D / T3i JPEG Miniature Creative Filter | |
 |  |
|
Canon EOS 600D / T3i drive modes and remote control
 |
The Canon EOS 600D / Rebel T3i offers one continuous shooting mode rated at 3.7fps, exactly the same speed as its predecessor. With a sufficiently quick card, you should be able to shoot up to 34 Large Fine JPEGs, although again like the 550D / T2i before it, the RAW buffer is good for just just six frames here.
To put these figures to the test we fitted the EOS 600D / T3i with a formatted Lexar Professional 133x 16GB Class 10 SDHC card. In Large Fine JPEG mode and at 100 ISO, the 600D / T3i fired-off 18 frames in five seconds before stalling; further tests confirmed the stalling-point at between 15 and 20 frames, after which the camera would continue to shoot, but at a much slower and irregular speed; this corresponds to a speed of 3.6fps.
With the camera set to RAW, we fired-off the quoted six frames in 1.8 seconds before the camera stalled, corresponding to a speed of 3.3fps. So in practice, the JPEG rate essentially delivered the quoted speed, although the camera consistently slowed down after between 15 and 20 frames, whereas its predecessor happily shot at this speed until you ran out of memory.
In short, the EOS 600D / T3i isn’t best-suited for serious action photography, and falls behind much of the competition in this respect. Nikon’s D5000 delivers 4fps in practice, while Sony’s Alpha SLT-A55 boasts a whopping 10fps at much the same price point, albeit with a fixed mirror design. Canon clearly positions its DSLRs in this regard, and while the EOS 600D / T3i features the same resolution and video modes as the high-end EOS 7D and EOS 60D, its continuous shooting speed remains firmly in the entry-level category.
In Canon’s world, if you want faster continuous shooting, you’ll need to go for a semi-pro model. This is becoming an increasingly dangerous strategy though as rival models pounce on this shortcoming with quicker models at the same or lower price points.
But back to the EOS 600D / T3i’s other drive modes. In terms of the self-timer, you have the choice of a two second countdown, a continuous option which fires between two and ten shots after 10 seconds, and a mode designed to work with the optional IR remote control. A mirror lockup option is also available in the custom menu, which applies to either normal or self-timed shots. Unlike the Nikon D5000, there’s no built-in Intervalometer, but in its favour, the 600D / T3i can achieve this and more when connected to a computer with supplied software.
In a feature which first made its debut on the EOS 40D, the 600D / T3i can be remote-controlled by a PC or Mac using the supplied EOS Utility and USB cable. Still images can be recorded to your computer’s hard disk, the internal memory card or both, and there’s Intervalometer facilities for programmed shoots.
 |
The EOS Utility lets you remote control and adjust pretty much any setting that doesn’t involve the physical turn of a dial or flick of a switch. So you can’t change the exposure mode from, say, Aperture to Shutter Priority using the software, but you can adjust the aperture or shutter value, the image quality, white balance, metering and sensitivity or even set the mirror-lockup. Impressively the software also lets you see the Live View on your computer monitor and even lets you manually or autofocus the lens with a magnified view for assistance.
The latest version 2.10.0.0 which comes supplied with the EOS 600D / T3i looks essentially unchanged from the previous version with the EOS 60D. As such there are separate controls to enter either Live View or Movie mode, both supplying live images to your computer’s screen. As before, while you can start and stop recording a video from your computer, the video file itself is only stored on the camera’s internal memory card – there’s still no means to record video direct to your computer’s hard disk. There’s also no means to turn new the digital movie zoom on or off remotely, which could be inconvenient as the utility won’t show you a live image if the digital zoom had been previously enabled on the camera; you can still start and stop recording remotely, but not see the actual live image on yuor computer screen until you go to the camera and manually disable digital zoom.
You’ll also see an option introduced with the EOS 7D to automatically popup the internal flash if desired, although you’ll need to push it back down again yourself. The Flash Function settings popup menu also lets you configure the wireless flash control, including the new options described on the previous page.
Anyone coming from the EOS 550D / T2i will notice a subtle change in the description of one of the Shooting Menu options: what used to be described as ‘Peripheral Illumination Correction’ is now known as ‘Lens aberration correction’. As before, this lets you populate the camera’s internal database with correction data for up to 40 lenses from the entire Canon catalogue (or at least those already supported in the latest version of Digital Photo Professional). The difference this time is the correction data is not just limited to peripheral illumination, but now also includes chromatic aberration and distortion information. Annoyingly though the camera will still only apply peripheral illumination corrections to JPEGs, and as we understand it, ignores the additional correction data.
Software-based remote control is a wonderful feature to have and if you have a laptop handy, it could even eliminate the need for certain photographers to invest in a cable release. It would be nice to be able to record video direct to your computer’s hard disk, but considering other manufacturers charge for software-based remote control, or don’t offer the facility at all, it seems churlish to complain.
Indeed remote control with the EOS Utility is now supported by and supplied with every single DSLR in the current EOS range, including the entry-level EOS 1000D / XS. So while Canon can be a bit mean about not supplying lens hoods with its non-L models, it certainly doesn’t skimp on the bundled software. Similar remote control software – often without the Live View capabilities – is an optional extra from other manufacturers, and Canon also bundles decent RAW processing software with its Digital Photo Professional program.
Now let’s find out about the new video recording capabilities in our EOS 600D / T3i Movie Mode section!
Canon EOS 600D / Rebel T3i Movie Mode
The EOS 600D / T3i becomes Canon’s latest DSLR to offer HD video recording, and shares the same core modes as the EOS 60D, EOS 550D / T2i and EOS 7D before it. It also features an external microphone input and the ability to manually set audio levels, while the icing on the cake is the fully-articulated screen which allows you to film comfortably at unusual angles. New to the 600D / T3i are a digital zoom facility and video snapshot compilation facility which we’ll describe later.
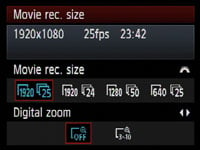
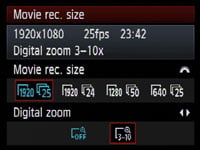
Starting with the actual video quality, the EOS 600D / T3i gives you have the choice of filming at either 1920×1080, 1280×720 or 640×480 pixels.
The Full HD 1080p mode can be set to record at either 30fps (29.97 actual) or 24fps (23.976 actual) when the Video System is set to NTSC, and 25 or 24fps (23.976 actual) when set to PAL. The 720p and VGA modes record at a higher frame rate of either 60fps (59.94 actual) when set to NTSC or 50fps when set to PAL. The screen-grabs below show the quality page when the video system is set to NTSC or PAL.
 |  |
The inclusion of a 24fps option at 1920×1080 pixels will delight independent film makers who were frustrated with the fixed 30fps speed of earlier models. Anyone wanting to integrate footage into PAL projects will also be pleased to find a 25fps option which matches their video standards. And remember while the EOS 5D Mark II can shoot 1080p at a choice of three frame rates, there’s still no 720p options for that model.
Before going any further, let’s pause for a clip filmed with the EOS 600D / T3i’s best quality 1080p / 30fps mode under bright conditions with the camera mounted on a tripod. We used the Canon EF-S 18-55mm IS II lens zoomed-out to 18mm and with IS disabled. Registered members of Vimeo can download each video for closer examination.
| |
|---|---|
|
Note if you’re downloading the files from Vimeo using Internet Explorer, you may find the file extension is MP4 rather than the original MOV. Don’t worry, the file is otherwise identical, and you can rename the extension to MOV if necessary. As with other Canon cameras employing the same encoding system, the playback may be jerky under QuickTime for Windows; we recommend playing the files under Windows using VLC Player, but even then you’ll also need relatively quick hardware for smooth results.
|

 |
 |
 |
Like the EOS 60D, EOS 550D / T2i, EOS 7D and EOS 5D Mark II, there’s a built-in mono microphone and, impressively for a camera of its class, a 3.5mm stereo mini jack to connect an external microphone. The use of an external microphone, like the Rode VideoMic Pro, can transform the audio quality and is highly recommended over the internal microphone.
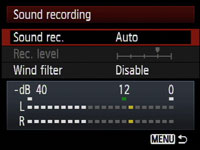
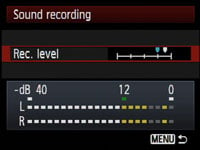
In a welcome update over the EOS 550D / T2i, the EOS 600D / T3i now lets you manually set audio recording levels. Go to the Sound recording page and you’ll find stereo level meters (with peak holds) and the option to switch between Auto or Manual, the latter offering 64 levels of adjustment. This is a very welcome feature to find on the EOS 600D / T3i and a valuable upgrade over its predecessor.
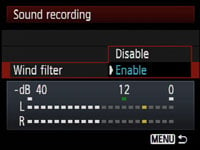
The Sound recording page is also where you’ll find a wind filter, which can be applied to the internal or external microphones. In our tests around windy Queenstown, the filter certainly cut down on noise, but the result sounded quite artificial and echo-ey like over-zealous digital noise reduction. It’s handy to have in emergencies, but much better to use an external microphone with a wind cover where possible.
As before, video is encoded using H.264 with uncompressed PCM audio (at 16 bit 48KHz), and stored in a QuickTime MOV wrapper – and as before, while the mild video compression ensures great quality, the encoding format remains a challenge to edit (or even play) smoothly on many computers. You’ll also need a Class 6 (or higher) SD card to support the maximum recording times.
The maximum time per file remains 29 minutes and 59 seconds or 4GB, whichever happens first. You’re looking at about 330MB per minute in any of the HD movie modes, with the 720 option consuming the same as the 1080 due to its higher frame rates. So that 4GB file limit will actually be reached after approximately 12 minutes, regardless of the HD quality setting. A fully charged battery should last for about two hours worth of recording.
|
Entering the Movie mode and recording a clip is the same as the 550D / T2i before it. You’ll first need to turn the mode dial to the Movie Mode position. This flips open the mirror and shutter to deliver a live feed to the screen, after which you simply press the dedicated Live View button (with a red dot next to it) to start and stop recording.
With the movie mode running, you’ll see the image framed with black bars above and below for the 16:9 HD modes and to the sides for the 4:3 SD modes. Like the EOS 550D / T2i before it, the borders when shooting in HD are thinner than on most models thanks to the wider 3:2 aspect ratio of the screen, although this also explains the vertical bars for narrower 4:3 footage.
It is possible to take a high resolution photo while filming by fully depressing the shutter release, and doing so will interrupt your video by about one second. The photo will share the same aspect ratio as the current movie mode – so if you’re shooting HD video, any still photos will be 16:9 in shape. They will still be much higher resolution than the video frame, but not 3:2 in shape.
 |  |  |
Pressing the Info button cycles between a clean view, one with basic shooting details superimposed along the bottom of the frame, and a third which overlays further settings running down the left side in two columns. Options in the menu allow you to superimpose one of two alignment grids, although there’s no live histogram, nor the 60D’s virtual horizon.
Like normal Live View, you can directly adjust a number of settings by pressing the Q button, then using the rocker to highlight the desired setting before turning the finger dial or thumb wheel to change it. Here you have the ability to adjust the AF mode, White Balance, Picture Style, Auto Lighting Optimizer, Quality (for stills), Quality for video and an option to enable or disable the new video snapshop feature.
The same options and more besides are available by pressing the Menu button. This presents three new menu pages dedicated to movie options which aren’t visible with the camera set to any other mode. So while it can be initially confusing not to find any movie options when casually browsing the menus in other modes, it does at least avoid potential conflicts.
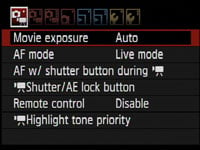 | 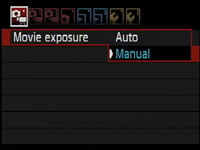 |  |
The first option on the first page is where you can switch the exposure mode from Auto to full Manual. In Auto, the movie mode will automatically adjust the aperture, shutter and sensitivity, and like previous Canon DSLRs, it has a preference for selecting very small apertures and high ISOs even under bright light, in an attempt to maximise the depth-of-field and maintain a stutter-free shutter speed. As such it’s not unusual to find the camera shooting at f22 under bright sunlight which has the undesirable side-effect of making any dust marks on the sensor quite visible. In Auto mode you can hold the AV button and turn the finger wheel to adjust exposure compensation in a broad +/-5EV range. You can even do it while recording, although the stepped design of the finger wheel will result in quite audible clicks and even minor vibration.
The Manual exposure option allows you to take control and deliberately select large apertures to minimise the depth-of-field, or lower ISOs to maximise the quality. Just like Manual for still photos, the shutter speed is adjusted with the finger dial, while the aperture is adjusted by the thumb wheel. Shutter speeds from 1/4000 to 1/60 (in all the VGA and 720p modes) or 1/30 (in all the 1080p modes) are available, as are sensitivities from 100-6400 ISO, while any aperture offered by the lens can be selected.
It’s wonderful to have manual control over exposures from day-one, as the automatic mode often chooses very small apertures and thereby eliminates any chance of enjoying a nice shallow depth-of-field – one of the major benefits of using a DSLR for video in the first place.
The next clip below demonstrates a shallow depth of field and selective focusing that’s possible with the EOS 600D / T3i and its basic EF-S 18-55mm IS II kit lens. We zoomed the lens to 55mm and selected the maximum aperture of f5.6 in Manual mode. We then adjusted the manual focusing ring to focus from a close to a distant subject and back again. If this effect appeals, you can achieve much greater blurring with lenses like the EF 50mm f1.4 and EF 85mm f1.8, and if you get really addicted to it, Canon’s f1.2 options at the same focal lengths beckon to those with deeper pockets.
| |
|---|---|
|
Like the EOS 60D, EOS 550D / T2i and EOS 7D before it, the EOS 600D / T3i offers auto-focusing while filming, but before you get too excited, it’s fairly useless. First of all, it doesn’t operate continuously like a camcorder. Instead it only refocuses when you half-press the shutter release and worse, takes several seconds to do so using the contrast-based Live mode. So while you can refocus while filming, you’ll just end up recording the leisurely adjustment process. To be fair, it’s occasionally handy for ensuring the subject is in focus without manually adjusting the lens or exiting to make an automatic reading, but it’s a process you’ll definitely want to edit out later. You can disable autofocus while filming if desired. Sadly AF during movies on traditional DSLRs remains a tricky thing to achieve, with Nikon’s D3100 and D7000 continuous AF option also suffering from slow, noisy and visually distracting adjustments. If you demand a large sensor camera with respectable continuous AF while filminmg, you’ll need to go for a hybrid design like the Sony Alpha SLT-A33 / A55 or the Panasonic Lumix GH2.
Digital Zoom
 |
 |
 |
As mentioned earlier, one of the new video options on the EOS 600D / T3i is its Digital Zoom facility, which replaces the Movie Crop function of its predecessor and the EOS 60D. The earlier Movie Crop function exploited the large native resolution of the sensor to grab a small 1:1 area in the middle for video, effectively cropping and magnifying the image. On the EOS 550D / T2i and EOS 60D this operated in VGA mode only, taking a 640×480 pixel crop from the middle of the 5184×3456 pixel sensor and delivering an effective boost in magnification of 7.2x. It worked well in practice, but we felt the restriction to VGA video rendered it fairly useless in today’s HD world.
With an 18 Megapixel sensor offering 5184×3456 pixels, there’s certainly latitude for cropping an HD image from the middle, albeit with a lower effective magnification. Assuming the full sensor width was available for normal filming, a Full HD 1920 pixel wide frame could be cropped from the middle, delivering 2.7x magnification, which a 720p frame (1280 pixels wide), could boost further to 4x.
The EOS 600D / T3i however takes an unexpected approach with its new digital zoom facility. First it’s only available for Full HD 1080p footage. Secondly, rather than just offering a simple crop, it additionally scales the image and allows you to adjust the magnification using a slider between 3 and 10x. It really is a digital zoom – although as we discovered, the minimum setting will delight pixel-purists.
Under the Movie rec. size quality menu you’ll find two new options for the digital zoom, one disabling the feature and the other enabling it with a range of 3-10x. Once enabled and returned to the live image, you’ll notice it’s magnified by 3x and showing a much tighter frame. To adjust the zoom level, push and hold the DISP button on the top of the camera while pressing the magnify in and out buttons on the rear. It’s a slightly fiddly combination in practice, but you get the hang of it.
If the initial 3x zoom looks much tighter than normal, prepare for a shock when fully zoomed-into 10x. Even modest lenses like the EF-S 18-55mm IS II find themselves delivering a maximum equivalent focal length of 880mm, while perfectly normal 70-300mm lenses boast up to a whopping 4800mm. Yes that’s right, an effective focal length of 4.8m with nothing more exotic than a 70-300mm zoom lens.
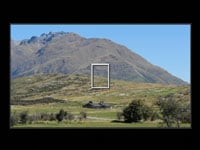
To illustrate this we filmed the Moon using a 70-300mm lens at 300mm. With the camera’s cropped sensor, this lens effectively works at 480mm when fully zoomed-in, and the video below is what you’ll see. look closely and you’ll also see the Moon moving a little due to the rotation of the Earth. Note: we filmed this in Manual exposure mode at f5.6 and 1/200 at 100 ISO.
| |
|---|---|
|
Our next clip below shows the exact same configuration, but with the minimum 3x digital zoom applied. As we’ll explain later, we believe this is actually performing a 1:1 pixel crop from the middle of the sensor frame, and thereby delivering closer to 2.5x magnification. This may be slightly shorter than the quoted 3x, but involves no digital scaling for a clean image. The video quality below certainly looks pretty good and the boost in magnification at an effective focal length of 1440mm is greatly beneficial to the subject. Note the shimmering you can see in the clip is due to heat rising in the atmosphere.
| |
|---|---|
|
Our third clip below shows the output from the same configuration with the maximum 10x digital zoom applied. With this degree of scaling, there’s understandably a loss in quality and resolution, but for this particular subject, most of that is masked by atmospheric variations. The final output, at an effective 4800mm (yes, 4.8 meters!) delivers a massive close-up of the Moon, and for the sheer impact, most would be willing to forgive the corresponding drop in quality. Remember this footage was achieved with nothing more exotic than a 70-300mm zoom.
| |
|---|---|
|
To be fair, the Moon is a fairly forgiving subject as like any very distant object, its ultimate resolution is greatly impacted by atmospheric variations – again you can see this as shimmering in the clips above. It’s hard to see how well the scaling is working in this example, although it does allow us to verify the magnification applied by the zoom mode. By grabbing 1:1 frames of the original and ‘3x digital zoom’ footage and measuring the relative diameter of the Moon, we discovered it wasn’t three times bigger, but closer to 2.5 times. Since the normal video mode can’t quite use the full width of the sensor, this would pretty much correspond to a 1:1 pixel crop without any digital scaling.
Canon was unable to confirm our findings, but from the evidence above, we believe the 3x digital zoom setting is actually performing a 1:1 pixel crop from the middle of the frame, thereby offering a genuine magnification with no loss in quality through scaling. If this is the case, it’s effectively the same as the earlier Movie Crop function, but for 1080p video. It may ‘only’ be a 2.5x zoom as a result, but we’re very happy to have what appears to be 1:1 mapping.
For a closer look we grabbed more video frames, first with no digital zoom, next with 3x and finally with 10x. We did this for the Moon sequence filmed with a 70-300mm at 300mm, and again for our standard resolution test chart filmed at close range with the EF-S 18-55mm IS II at 55mm.
Canon EOS 600D / Rebel T3i 100% video grab from 1080p footage Digital zoom disabled | Canon EOS 600D / Rebel T3i 100% video grab from 1080p footage Digital zoom at 3x | Canon EOS 600D / Rebel T3i 100% video grab from 1080p footage Digital zoom at 10x | ||
 |  |  | ||
100% crops, 70-300mm at 300mm, 100 ISO 480mm effective | 100% crops, 70-300mm at 300mm, 100 ISO 1440mm effective | 100% crops, 70-300mm at 300mm, 100 ISO 4800mm effective | ||
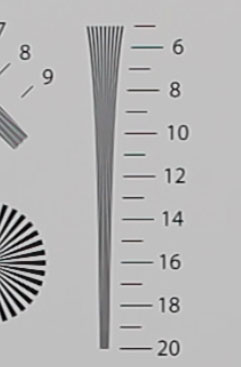 |  |  | ||
100% crops, 18-55mm at 55mm, 100 ISO 88mm effective | 100% crops, 18-55mm at 55mm, 100 ISO 264mm effective | 100% crops, 18-55mm at 55mm, 100 ISO 880mm effective |
As you can see from the 100% crops above, the 3x digital zoom is resolving much finer detail. This is clearly not the same result you’d get if you simply scaled the original image in software. It’s a valuable facility to have when filming when you need extra reach and effectively transforms normal zooms into monster telephotos with no loss in quality.
Meanwhile at the 10x end of the zoom, the camera is clearly applying scaling with no extra resolution recorded in the image over the 3x version – what you’re seeing is simply an interpolated version of the 3x zoom. The scaling is still quite effective though, but isn’t doing anything you can’t do by enlarging a clip using editing software. But the novelty of massive magnification can still be fun. Take the 10x clip of the Moon above for example. You could use this as a short clip in a sequence and enjoy the impact of the high magnification but cut away before anyone had time to take a really close look.
But again it’s the minimum setting which is a triumph, delivering approximately 2.5x magnification in practice with no degradation in the image. It’s a genuinely useful facility the 600D / T3i has over the previous models in the range, not to mention the competition. We’re still not sure why it’s only offered for 1080p video though and not the lower resolution modes…
Video Snapshot
The second new movie feature on the EOS 600D / T3i is the Video Snapshot. This captures a very short clip lasting two, four or eight seconds which is then stored in an album. Subsequent clips can be appended to the previous ones in the same album, allowing you to gradually build up a sequence. Each new clip can be reviewed after filming, allowing you to choose whether to append it to your existing sequence or delete it.
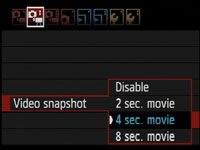 |
This could be handy for real estate or tourism, allowing a tour of a property or facility to be easily created without editing software or rendering. Equally it can be great fun for creating little movies, especially with the shorter clip lengths as they force creative use of the limited capture times. Canon also supplies some music files on CD which can be copied to your memory card to accompany Video Snapshots if desired.
The camera can be turned off and on again and still let you append new clips to the previous album you were working on, but you can’t change the clip length during an album. So if you started at two seconds and fancied a few four second clips, these would be stored as a new album. Once a new album has started, you also can’t return to an older one. But of course you can always stick multiple albums together in editing software later if desired. Also beware that opening the card or battery compartments – even if you don’t remove the contents – will result in a new album being started.
The following movie gives you an idea of what’s possible. We set the EOS 600D / T3i to its two second Video Snapshot mode and filmed a series of clips arriving at Shotover Jet in Queenstown. The narrative loses its way somewhat towards the end, but it’s just a quick demonstration!
| |
|---|---|
|
Finally, the EOS 600D / T3i completes its movie experience with another feature inherited from previous models: the ability to trim clips at either end during playback. The shorter file can then overwrite the original or be saved as a new movie. We used this process to trim the clip demonstrating the 10x Digital Zoom above.
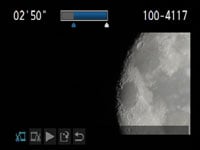 | 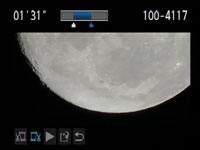 | 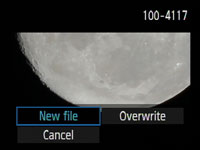 |
The filming experience
As for filming with the EOS 600D / T3i, the experience and results are unsurprisingly similar to the models which came before it, especially the EOS 60D. As such, the EOS 600D / T3i is capable of delivering superb-looking results in both bright and low light. It’s easy to enter the movie mode and start filming, the choice of resolutions and frame rates allows you to integrate footage into almost any project, the manual exposure control gives you the creative freedom which typical camcorders can only dream of, and the external microphone input allows far superior audio quality. The addition of manual control over audio levels is also very welcome. As discussed above, the new Digital Zoom, especially at 3x, delivers a useful extension to long telephoto shots and the Video Snapshot will be enjoyed by amateur movie makers and estate agents alike.
|
Where the EOS 600D / T3i really scores over its predecessor though is its articulated screen. DSLRs aren’t the easiest things to handle for filming and the necessity to hold them relatively high in order to see the screen is far from ideal. Like the EOS 60D before it though, you can simply flip the screen out and angle it upwards for comfortable framing at waist-height. Equally you can film comfortably with the camera on the ground or held high over your head. Discreet filming is also possible thanks to the adjustable screen.
Of course DSLRs with articulated screens aren’t new to other manufacturers: Nikon, Sony, Panasonic and Olympus all offer them, but it doesn’t diminish from the delight of using one on the EOS 600D / T3i – and again making it even more pleasant is the excellent quality panel.
So unless you demand (or desire) the full-frame sensor of the EOS 5D Mark II, we’d say the EOS 600D / T3i boasts the best movie recording experience of any Canon DSLR to date. The quality is known from previous models, but adding manual audio recording levels, an articulated screen and uncompromised cropping have taken it to a new level.
As with all DSLR video modes though, there are caveats. First, there’s no continuous autofocus while filming. Second, without optional mountings, the DSLR form factor isn’t particularly comfortable to handle for filming, and it’s tricky to pull focus or adjust the zoom without twisting or wobbling the camera. Professional film makers who are interested in monitoring or recording over HDMI should also note that while the port outputs a 1080i signal while framing, it’s downgraded to 480p once you start recording.
But to be fair, these criticisms apply to most traditional DSLRs offering video. Nikon may boast continuous movie AF for its D3100 and D7000, but neither are quick or discreet in this process. As you can see in our sample videos for both models, there’s constant focus hunting which is both visually and audibly off-putting – indeed they’re essentially doing nothing more than triggering the refocusing process every few seconds, which you can match on the Canon bodies by simply half-pressing the shutter release on regular occasions.
If you want quicker continuous AF during movies, you’ll need to go for a hybrid model like Sony’s Alpha SLT-A33 / A55 or Panasonic’s Lumix GH2. Both deliver far superior experiences in this regard than a traditional DSLR, but equally have compromises in other areas. See our reviews of both for full details.
|
 |
In terms of handling, DSLRs and hybrid cameras alike suffer from a form factor that was designed for stills not video. As mentioned above, dedicated rigs can alleviate the problem, although most come at considerable cost. We have however enjoyed similar results – at least in terms of holding the camera – by mounting an affordable Gorillapod and bending the legs back on themselves as handles. You can see this in the photo opposite, with the EOS 600D / T3i and Rode VideoMic Pro. We’d recommend using the sturdiest of the Gorillapod range, the Focus.
This configuration allows you to hold the camera much more securely, while also folding back for easy storage. While it won’t let you mount focus-pullers or cinematic lens hoods, this ‘Gorilla-rig’ has greatly improved our handheld filming. We have a dedicated thread for the Gorilla-rig in our forum if you’d like to discuss it further.
Ultimately the continued lack of continuous AF means it’s the independent film makers or very serious amateurs who’ll really appreciate the EOS 600D / T3i’s movie capabilities. They’ll already be used to working around the caveats to achieve great-looking footage. The EOS 5D Mark II’s bigger sensor may offer greater potential for shallow depth-of-field effects and low light performance, but by matching the EOS 7D’s output with the addition of manual audio levels, an articulated screen and digital zoom capabilities, the EOS 600D / T3i arguably becomes Canon’s most confident and flexible movie camera yet. Now let’s see how the still image quality compares in our Canon EOS 600D / T3i Real-life results.