The OMD EM1 is the new flagship camera from Olympus. It joins the hugely popular OMD EM5 in the range, but is positioned higher, providing not just an upgrade path for EM5 owners, but also those who use the earlier E5 DSLR. Indeed the headline feature is much improved AF with older Four Thirds lenses, thanks to integrating phase-detect AF points on the sensor. The EM1 is dust and splash proof, but now also freeze-proof and inherits the built-in 5-axis stabilisation, tilting touch-screen, Wifi, 1/8000 shutter and focus peaking of the EP5. It also features the superb viewfinder of the VF4 along with 10fps continuous shooting.
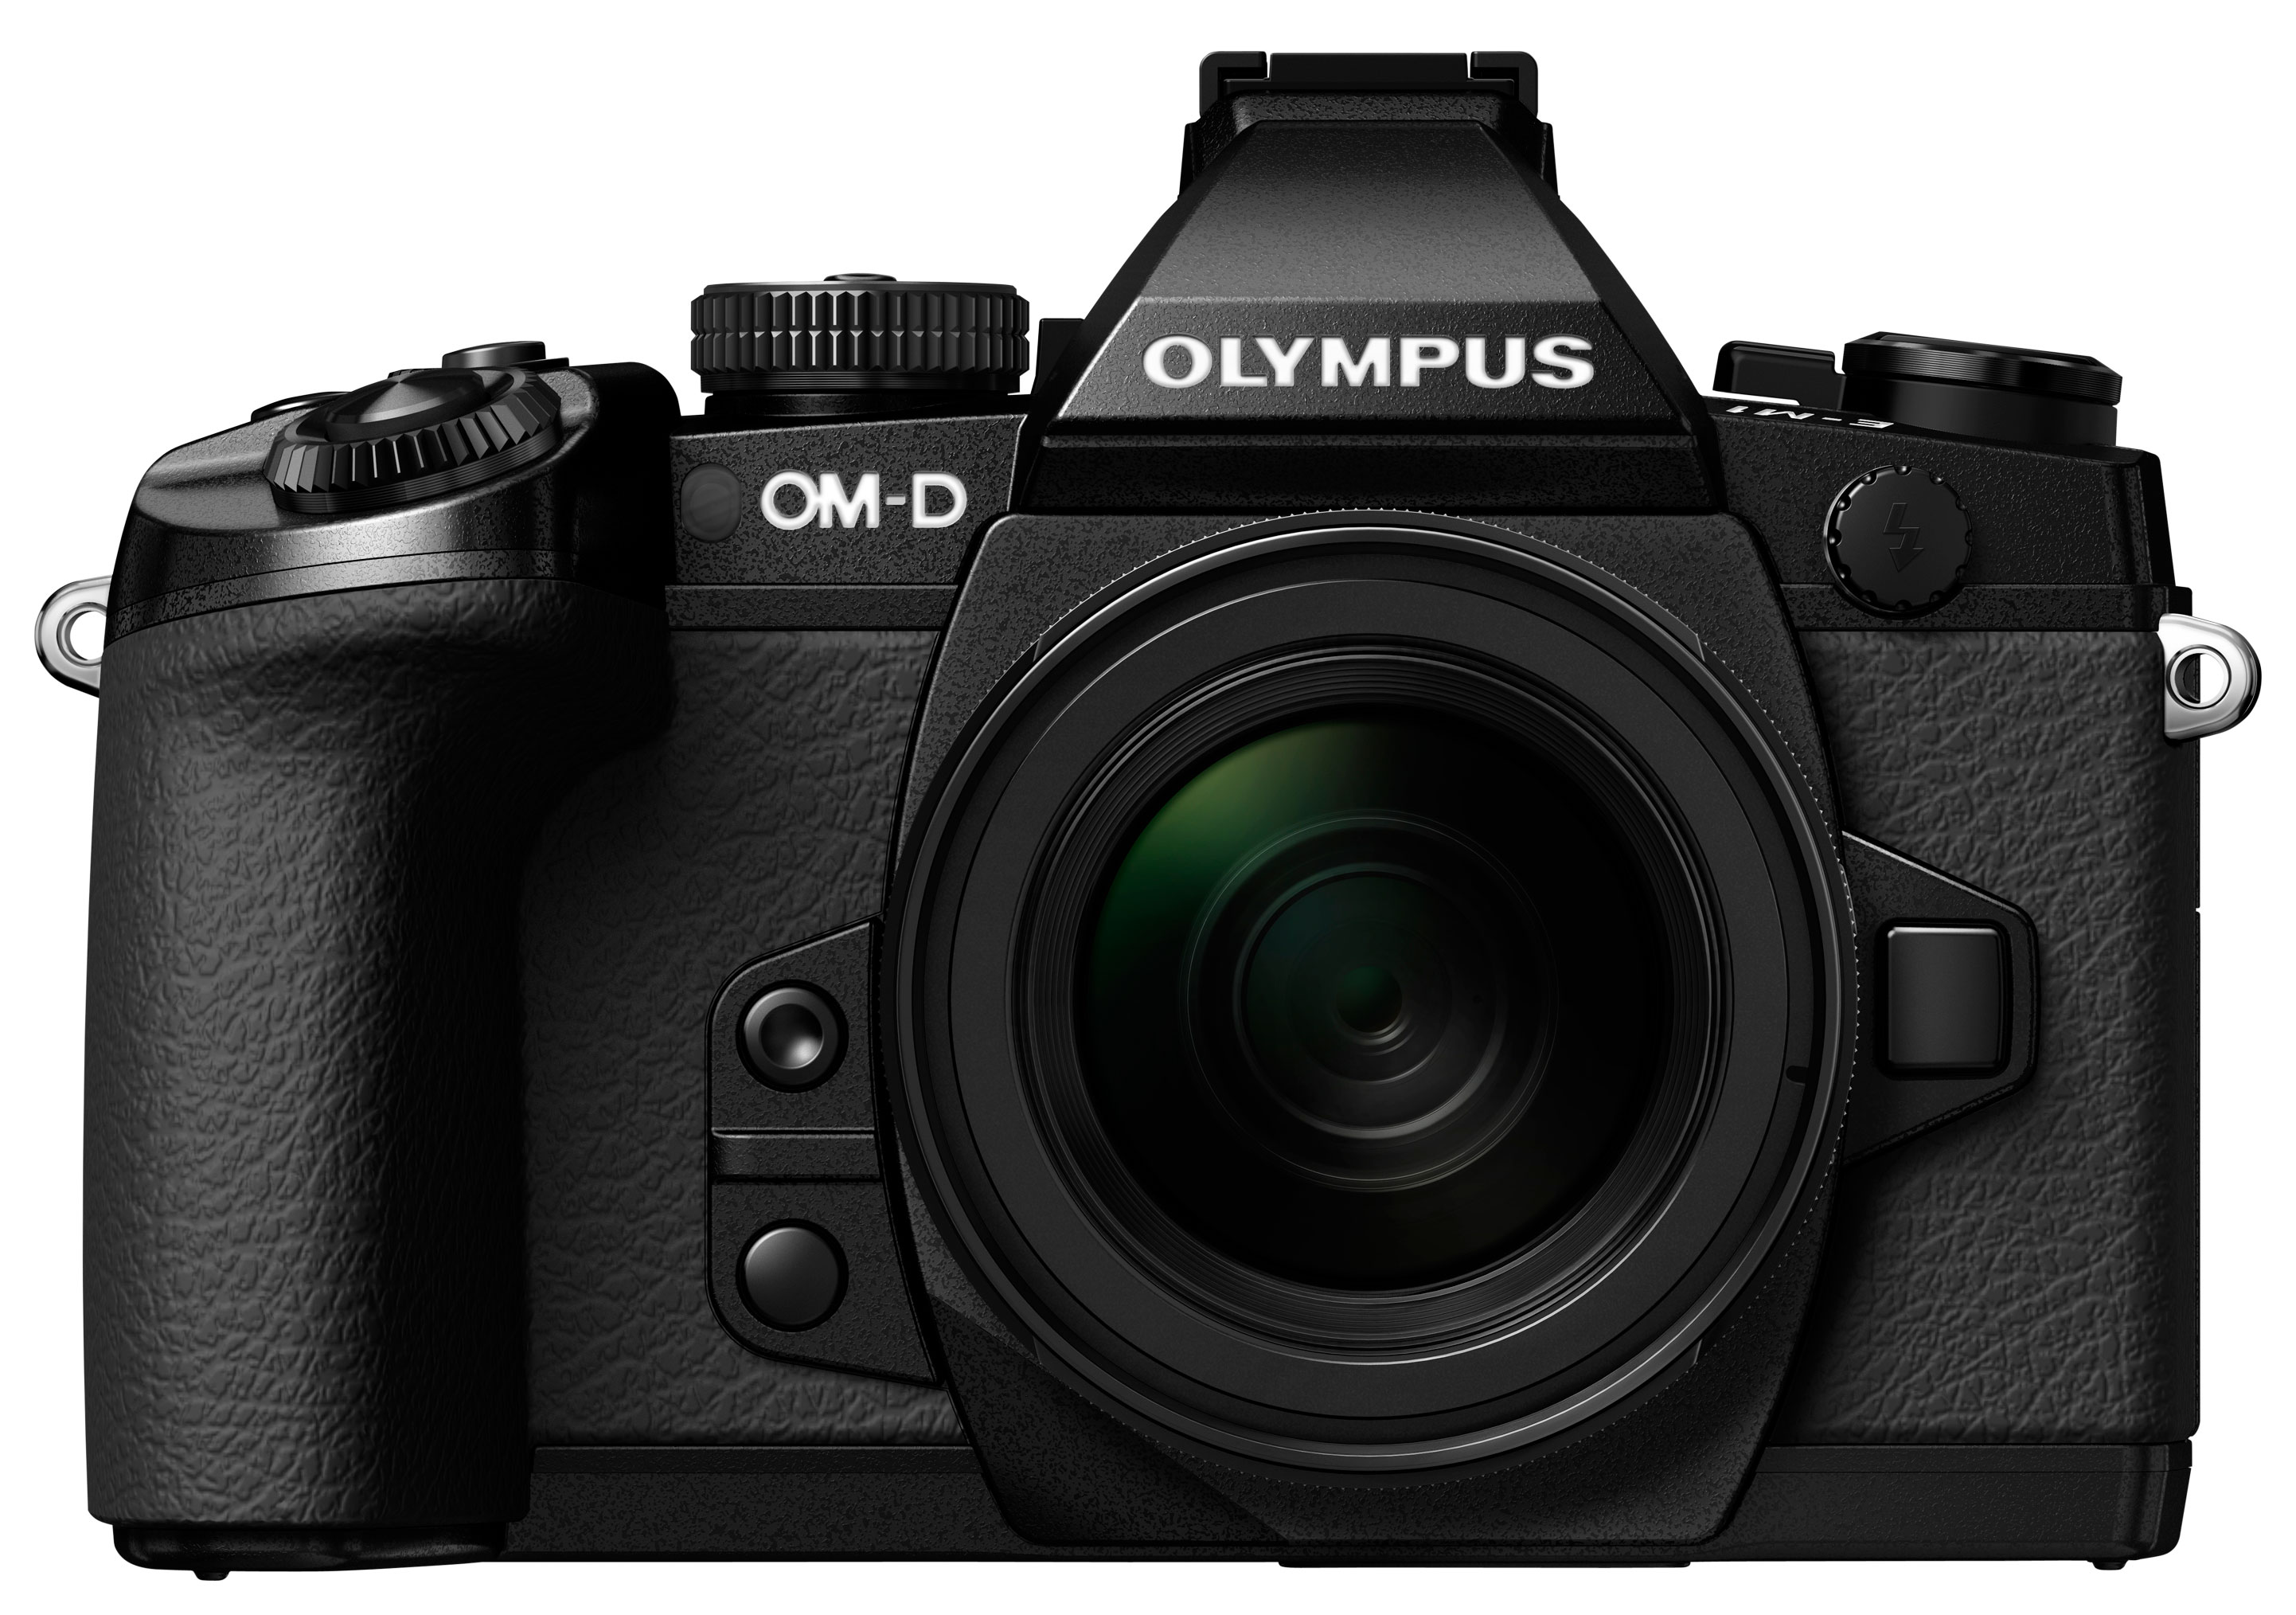
Olympus OMD EM1 review
-
-
Written by Gordon Laing
Intro
The OMD EM1 is the new flagship camera from Olympus. Announced in September 2013 it’s a mirrorless camera based on the Micro Four Thirds standard, but it does not replace the existing OMD EM5 – instead it’s pitched at a higher level, while the hugely popular EM5 remains on sale.
The new OMD EM1 is in fact the long-awaited successor to the E5, which Olympus followers may recall was a high-end DSLR based on the original Four Thirds standard. Olympus produced 23 lenses for the Four Thirds standard, many of a very high standard, but since the launch of the E5 three years ago, it’s fair to say the company’s focus has been entirely on Micro Four Thirds. Original Four Thirds lenses may work on Micro Four Thirds bodies with an adapter, but the autofocus performance has always been disappointing, leaving owners of Four Thirds DSLRs and lenses wondering what their upgrade path should be.
The OMD EM1 is Olympus’ answer. A new 16 Megapixel sensor with on-chip phase-detection, allows the EM1 to quickly autofocus when fitted with old Four Thirds lenses via an adapter. But as a native Micro Four Thirds body with quick contrast-based AF, the EM1 is equally at home with the latest Micro Four Thirds lenses. So the EM1 performs double duty, surpassing the performance of both the EM5 and the E5 (not to mention the quality of the latter too), and therefore providing upgrade paths for owners of both, while also tempting owners of rival formats. The sensor is also the first from Olympus that fully dispenses with the optical low pass filter.
Highlights include a weather-sealed body with built-in 5-axis stabilisation, a large and detailed viewfinder, tilting touch-screen, built-in Wifi, a 1/8000 shutter, focus peaking for stills and 10fps continuous shooting; it’s also launched alongside a new 12-40mm f2.8 lens. I’ve spent almost two months testing and comparing the EM1 to the EM5, along with Panasonic’s GX7 and Sony’s A7, so I can now bring you one of my most detailed reviews to date! If you’re interested in a semi-pro camera with great overall performance, you’ve come to the right place!

Olympus OMD EM1 design and controls
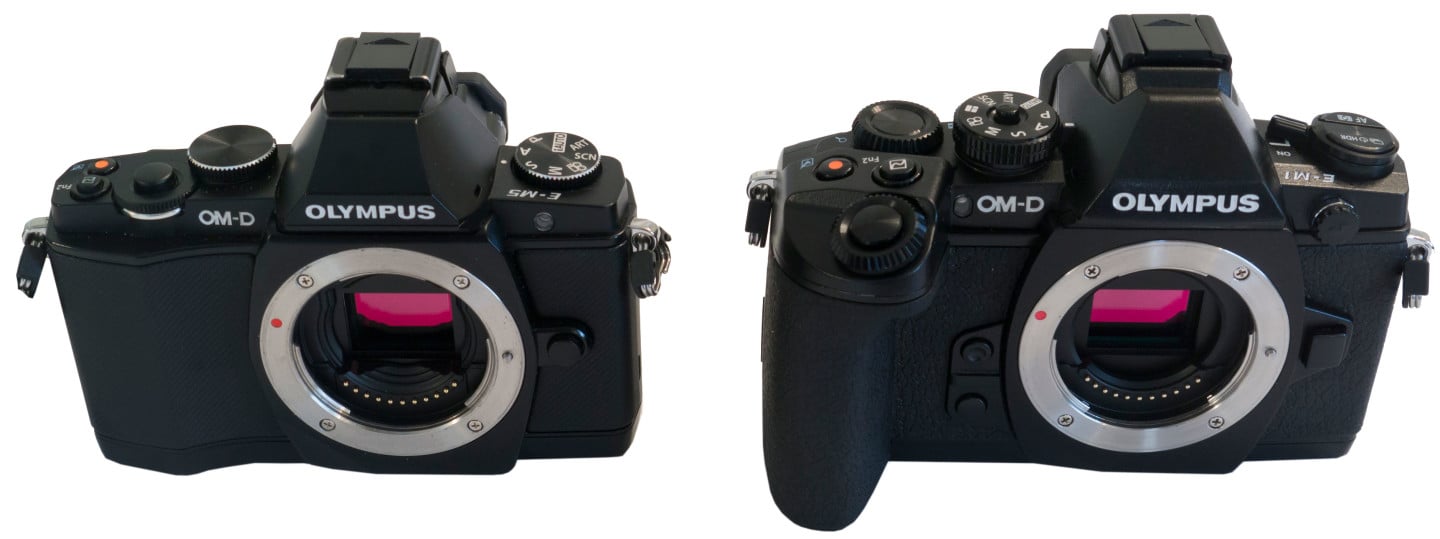
The OMD EM1 is immediately recognizable as an Olympus OMD camera, looking like a beefed-up version of the OMD EM5 with a chunkier grip as standard. As a brief reminder, the OMD series are styled like DSLRs with built-in electronic viewfinders, while the PEN series are smaller, with screens as their default means of composition and viewfinders as accessories.
Measuring 130x94x63mm and weighing 496g with battery, the EM1 is larger in every dimension than the OMD EM5, which measures 121x90x42mm and weighs 425g with battery. The biggest difference is the thickness thanks to the considerably chunkier grip, although of course the EM5 can become taller and thicker when fitted with its optional two-stage grip.
The EM1 is roughly the same size as Panasonic’s flagship Lumix GH3 and both share a deep generous grip. Interestingly Sony’s full-frame A7 and A7r also share essentially the same dimensions from the front, but are thinner thanks to a slimmer grip. All three are within 75g of each other at around the half kilo mark when fitted with a battery, but no lens.
But while the EM1, GH3 and A7 / A7r are larger than most mirrorless cameras to date – and indeed remind you just how tiny the EM5 is – they remain pretty compact for a high-end camera and are noticeably smaller and lighter than a DSLR pitched at a similar level. For example Canon’s semi-pro DSLR, the EOS 7D is considerably larger at 148x111x74mm and weighs almost twice as much, 900g with battery. Even the mid-range EOS 70D is comfortably bigger and heavier at 139x104x79mm and 755g.
 |
In your hands, the OMD EM1 feels great with much more to hold onto than the earlier EM5, even when the latter was fitted with its optional grip. The camera’s large enough to attract existing DSLR owners who’d previously dismissed mirrorless on grounds of being too small, yet not too big to alienate lovers of the compact Micro Four Thirds format. In short I reckon the size is just right for a high-end mirrorless body, and a refreshing change from lugging around a semi-pro or even a mid-range DSLR. It’s always a personal thing, but to me the EM1 feels better than the GH3 or A7 / A7r in my hands and the controls are better-placed too.
There’s no compromise in build quality either – the EM1 features a magnesium body that’s dust-proof and splash-proof like the EM5 before it, but now additionally freeze-proof down to -10 degrees Celsius. Of course for full protection you’ll need an equally-sealed lens and for now there’s only a handful of dust and splash-proof models in the Micro Four Thirds catalogue, but if low temperatures are your thing, I have good news for you: all Olympus Micro Four Thirds lenses are already freeze-proof down, so are ready for action. Who knew? Note the GH3 and A7 / A7r also share weather-sealing, although most DSLRs at this price point or size do not.
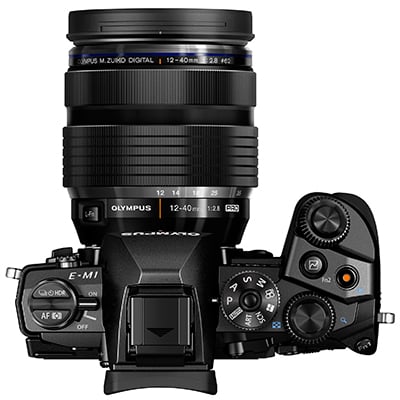
Olympus has also taken its usual care over controls, providing the EM1 with a wealth of dials, buttons and levers. Like the OMD EM5 before it, there’s two customizable control dials on the upper right side of the body, although they’re now larger and more knurled on the EM1, and obviously further separated due to the shutter release being towards the front of the larger grip. Their positions fall directly under my thumb and index finger, allowing me to easily turn either even when holding the EM1 with one hand – in contrast I can’t comfortably reach either of the dials on the EM5 unless I’m holding the body with two hands.
In a really neat bit of thinking, a satisfyingly clicky lever on the rear just beside the viewfinder allows you to switch the function of the two wheels. By default, the two wheels normally adjust, say, the aperture or shutter in their respective priority modes along with exposure compensation, but by flicking the switch they change the function of the dials to adjust, say, the ISO or White Balance instead. Then once you’re done, just flick the switch back to adjust the exposure again. This novel approach, described by Olympus as 2×2, maximizes the flexibility of the dials and feels like you have four at your disposal rather than two. It’s a key control upgrade over the earlier EM5, and eliminates the need for an additional wheel on the rear of the camera.
Like the EM5, there’s two labeled Function buttons, one in much the same place on the top surface next to a dedicated movie record button, and the other shifted a little to the top right corner where it sits under your thumb. In addition there’s two extra buttons on the left side of the lens mount as you view the camera from the front, which are easily accessed by your middle and fourth fingers. All four of these buttons, along with the movie record button, the AEL button and even each of the four direction buttons on the rear can be customized to control whatever you want. At first the degree of customization can be quite overwhelming, especially when you delve into the menus and discover almost anything can be changed, but by default Olympus has configured the controls to the most sensible and useful options for most people, allowing you to get started straightaway; indeed you may never change them from the defaults, but the important point is you can if you’d like to.
 |  |  |
The mode dial has been relocated to the upper right side, and now features a neat push-in-and-out lock button which feels like using the button on a ballpoint pen. The relocation leaves room for a new control on the upper left side which, at first glance, looks a lot like the rewind dial and lever on old 35mm film SLRs. Look again though and you’ll see it houses buttons for the drive and AF modes, with a new power switch around the outside. The power switch will undoubtedly confuse some existing EM5 owners who are used to having it on the back, but it makes sense and again feels satisfyingly clicky in use.
Overall I’d say the controls on the OMD EM1 are an absolute triumph. There’s loads of them (without becoming intimidating to the target owner), they’re all customizable and the ergonomics are superb, at least in my hands. Everything falls exactly under my thumb and fingers, whereas on the earlier EM5 I often found myself stretching to reach some controls, or having to hold it with both hands for more involved configuration. Better still, while most of the buttons on the EM5 are small and spongey, they’re larger and clickier on the EM1 while still supporting full weather-proofing. Many EM5 owners will look at the headline specifications as reasons to upgrade, but to these they should also add the control system which is one of the best I’ve used. For me it’s up there with professional DSLRs, and superior to the control systems on the Lumix GX7, GH3 and Sony A7 / A7r.
The OMD EM1 is powered by the same BLN-1 Lithium ion battery pack as the OMD EM5, so if you have any spares you’ll be able to use them. Olympus quotes 330 shots with 50% using Live View, but aren’t all the shots with the EM1 with Live View? I’m a bit confused by this, but certainly found the EM1 lasted roughly the same length of time as the EM5 before it – which coincidentally is also quoted as squeezing 330 shots per charge. Typically I’d get a day or two of heavy shooting out of it including a number of long exposures and Wifi transfers before it needed recharging. Olympus provides a separate mains recharger, but unlike the Sony A7 / A7r there’s no USB charging in-camera.
For comparison the Lumix GH3 squeezes an impressive 540 shots per charge, while the Sony A7 / A7r offers just 270, although the Sonys can be topped-up over USB. A typical DSLR of this class should last for at least 800 shots when composing with the viewfinder and may even push to 1000, although if you switch them to Live View, the charge may last for less than 300 frames – for example, Canon quotes 920 shots for the EOS 70D with the optical viewfinder or 230 in Live View.
Like the EM5, there’s an optional battery grip with portrait controls which allows you to use two BLN-1 packs, although as a different shaped camera, it’s a different model. Unlike the EM5’s unique twin-piece grip, it’s a traditional design in a single piece.
Like the EM5 before it, the SD memory card slot is housed in the side of the camera, not underneath, meaning it’s not blocked when mounted on a tripod. Unfortunately though there’s only one slot, when many had hoped for twin slots for automatic backup or switchover. Is this a deal-breaker at this end of the market? Only you can decide. I think dual slots are certainly nice to have and hoped Olympus had included them here, but their absence doesn’t put me off buying it. The Lumix GH3, Sony A7 / A7r and EOS 70D and 7D don’t have dual card slots either; the only cameras in this class which offer them are the Nikon D7100 and Pentax K3.
In terms of connectivity, the OMD EM1 is equipped with a Micro HDMI port, USB port (which doubles as an AV output and connector for the optional RM-UC1 cabled remote control), and an external microphone input, complete with basic levels adjustment, but sadly no peak-meters on-screen. The mic input is a useful addition over the EM5, although as you’ll discover throughout the review, the EM1 remains a fairly basic camera for video.
Like the EM5 and Sony A7 / A7r, there’s no built-in flash, but the EM1 is supplied with the same tiny accessory flash as the EM5 which slips onto the hotshoe. This little flash offers a Guide Number of 10 at 200 ISO and can also be used for wireless control. The built-in flash on the Canon EOS 70D and Nikon D7100 is more powerful with a Guide Number of 12 at 100 ISO. The EM1 additionally sports a PC Sync port on the front for external lighting – something that was missing on the EM5, not to mention most mirrorless cameras, although the GH3 sports one. Â Underneath and behind the hotshoe you’ll also find the Olympus Accessory Port 2, supporting the SEMA-1, MAL-1, PP-1, and VF2-4, although since the EM1 already has a microphone input and the best electronic viewfinder Olympus has to offer, much of this is redundant – still it’s there if you need it. Finally, as you might expect for a new camera, the EM1 is equipped with Wifi and I’ll cover that in more detail later; again this is an upgrade to the EM5 which didn’t offer wireless built-in. Note the GH3 and EOS 70D also feature Wifi, although the D7100 does not.
Olympus OMD EM1 screen
The OMD EM1, like the EM5 before it, offers composition by electronic viewfinder or tilting 3in / 3:2 shaped touch-screen, but the new model enjoys significant upgrades in both respects. Starting with the screen, the resolution has jumped from a 610k OLED to the same 1 million dot LCD as the EP5 and in person it looks a great deal crisper.
 |
The Lumix GH3, Sony A7 / A7r and EOS 70D also share 3in high resolution screens, while the Nikon D7100 trumps them all on size at 3.2in, although it’s also important to compare the shape of the screen and native images, as if they don’t match, then images won’t fill the screen. Of all these cameras, only the EOS 70D sports a screen that’s the same shape as its native images, allowing them to fill the screen and look much larger during Live View composition and playback. Meanwhile the EM1, GH3, A7 / A7r and D7100 all display their native Live View and images during playback with thin black bars, in the case of the EM1 vertical bars on either side of the image. Of course if you switch the EM1 to the 3:2 aspect ratio, the images will fill the screen, but they’ll also be cropped a little vertically.
Of this group, the EM1, GH3 and 70D are the only ones with touch-screens, leaving the D7100 and A7 / A7r without touch controls. They may sound like a novelty to some people, but I’m personally very fond of touch-screens and the way you can simply tap on the part of the frame you’d like the camera to focus on – it’s so much faster than manually moving a single AF area around with buttons. Ultimately I find the touch-interface on the EOS 70D and GH3 superior to the EM1 as you can effectively tap through the menus too, but at least they all allow you to tap to focus and swipe through images in playback.
As noted earlier, the EM1’s screen is mounted on a tilting platform, like the EM5 before it, and also the Sony A7 / A7r. All three allow you to tilt the screen down for easier composing overhead, or upwards for waist-level or table-top shooting. I find myself exploiting this all the time although I prefer the full articulation of the screens on the Canon EOS 70D and Lumix GH3 as they allow you to flip the screen around to face the subject for self-portraits or videos to camera; they also allow the low or high angle compositions when shooting in the portrait / vertical format which I’m also fond of. Meanwhile the D7100 lags behind here with its fixed screen – the only Nikon DSLR with an articulated screen is the cheaper D5xx line.
So of all the screens, I find the shape, touch-interface and full articulation of the EOS 70D best of all, although the GH3 is very close behind. Meanwhile the EM1’s screen remains very useful and I find its touch controls make it more flexible than the A7 / A7r, and again the detail is higher than the EM5.
Olympus OMD EM1 viewfinder
The EM1’s biggest compositional upgrade concerns the viewfinder, which inherits the 2.36 million dot LCD panel of the EP5’s VF4 accessory. To put this into perspective, 2.36 million dots corresponds to a resolution of 1024×768, compared to the 1.44 million dot panel on the OMD EM5 which has a resolution of 800×600 pixels. That means a lot more fine detail can be seen during composition, but what makes a bigger difference is the size of the viewfinder image: 0.74x magnification on the EM1 makes for a considerably larger view and if you’re familiar with the EM5 you’ll find the difference in size and detail astonishing. In terms of scale it’s actually a little larger than a full-frame DSLR viewfinder, and this alone could tempt many EM5 owners into upgrading; E5 owners will also notice it’s larger than their view, albeit now electronic rather than optical.
The panel specification may match the VF4 accessory for the EP5, but Olympus has made a minor tweak where the brightness can be automatically adjusted if desired for a more ‘natural’ appearance. You can turn this off if preferred though. There’s also a sensor which can automatically switch to the viewfinder as you bring your eye close to it, and the switchover is almost instant.
Olympus isn’t the only one delivering decent electronic viewfinders: Sony’s equipped the A7 and A7r with XGA OLED viewfinder panels with 0.71x magnification. Despite the minor difference in magnification, I found the viewfinders in the EM1 and A7 / A7r shared a similar overall size and degree of detail, but the big advantage of the EM1 is the 4:3 viewfinder panel matches the native shape of its images. So while the 3:2 shaped images on the Sony A7 / A7r are displayed with a black bar at the bottom (used to show shooting information), they fill the entire panel on the EM1. This means the active image area on the EM1 viewfinder is bigger than the Sony A7 / A7r and full-frame DSLRs. I had all on hand for comparisons and while all shared approximately the same image width, the EM1’s image was taller. Bottom line: the viewfinder is one of its highlights of shooting with the EM1.
I should note I much prefer the viewfinders on the EM1 and even the EM5 to the Lumix GX7 which for some strange reason opted for a 16:9 shaped viewfinder panel, which may be ideal for framing HD video, but results in a significant loss of size and detail when shooting stills in the native 4:3 aspect ratio. The Lumix GX7 also employs a field sequential technology panel which to my eyes suffers from rainbow tearing artefacts when you glance across the image – I don’t get those problems with OLED viewfinders on the Olympus and Sony viewfinders, nor on the Lumix G6 which also employs an OLED panel.
Olympus OMD EM1 menus and shooting information
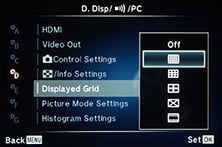
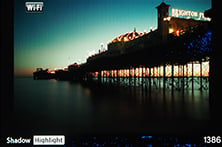
Olympus hasn’t skimped on the shooting information. There’s five different views available for the viewfinder and screen, and cycled-through using the INFO button. The first shows a clean image, the second overlays a dual axis leveling gauge (using levels at the bottom and right side) along with basic exposure information, the third reveals detailed shooting information around the borders, the fourth shows a live histogram, and the fifth indicated saturated highlight or shadow areas. You can configure the highlight and shadow cut-offs for the histogram if desired, and also choose to overlay one of five different guideline views on all the pages, although unlike Panasonic’s cameras, you can’t use the touchscreen to drag the guides or reposition the histogram.
|
|
|
 |  |
In any of the views, you can press the OK button to display a series of settings on the right hand side which can be highlighted and adjusted using the arrow keys or control dials; the list is taller than the screen, so you’ll sometimes need to scroll up and down to find what you’re looking for; the options for the selected setting are displayed in a row along the bottom.
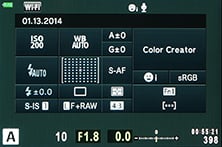
If you’re mostly going to compose with the viewfinder, you may prefer to enable the Super Control Panel option for the main screen, which fills it with shooting settings when you bring your eye away from the camera, This shows you a wealth of settings at a glance without the need for scrolling, and pressing the OK button lets you move a highlighter around to select the one you’d like to adjust.
 |  |  |
This works well with the buttons, but Olympus could have been more committed to using the touchscreen as an alternative. As it stands, the Super Control Panel does nothing if you touch it, until you press the OK button. Then you can tap to move the highlighter over whichever setting you want, but strangely not use touch controls to subsequently make the adjustment. It feels half-hearted compared to the touch-interface on the EOS 70D and Lumix cameras, and it extends through playback too. You can swipe between images in playback, but strangely not pinch to zoom. There is a touch slider to vary magnification, but if you’re going to implement touch controls in playback, surely it’s best to employ the universally-understood gestures from smartphones and tablets, or at least offer them in addition to your own version.
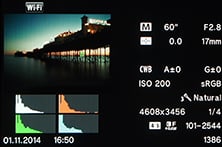
Speaking of playback, you can cycle between a clean image, one with basic shooting information, another with a thumbnail to make room for RGB and brightness histograms along with more detailed shooting information, then one which displays a single large brightness histogram over the full image, another which reveals saturated shadows and highlights, and finally one which can show two different images simultaneously for side-by-side comparison. If you have a portrait shaped image, it’ll also rotate to fill the screen during playback if the camera is turned – a simple but useful feature and one that annoyingly Panasonic doesn’t implement.
 |  |  |
During playback you can zoom into 14x using the rear dial or a touch-operated on-screen slider, and once magnified scroll around by push or using the arrow buttons. You can also use the front dial to switch between images, and if you’re already magnified this view is maintained on subsequent images which is handy for checking, say, the focus or noise between shots.
In terms of the main menus, Olympus has opted for an almost identical approach to the EM5 – so there’s five tabbed options on the left side, with their options displayed to the right. Four out of five of the tabs only need a single screen to display all their options, so there’s no scrolling to worry about. But the fifth option for the Custom Menu certainly does scroll. It gathers no fewer than 96 options (ten more than the EM5) into 11 sub-categories, and even as a long term Olympus user, I still find the sheer degree of what you can customize overwhelming at times. The sub-categories at least let you quickly get to approximately where you need to be, and it seems churlish to complain about the number of things you can customize. The options are there if you want them, but equally you can stay clear if preferred! If you’re into customization though you’ll love what you can do with the EM1, and it’s one of the most flexible cameras around in this regard. I’ll mention some of the options throughout the review.
Olympus OMD EM1 lenses and stabilisation
The Olympus OMD EM1 employs a Micro Four Thirds sensor and lens mount which, like the OMD EM5 and all PEN models before it (along with of course all Panasonic Lumix G cameras), results in a field reduction of two times relative to full-frame systems. So a 25mm lens delivers an equivalent field of view to 50mm on full-frame, and the effective depth of field compared to full-frame is also reduced by two times, so f1.4 will deliver a depth of field equivalent to f2.8 on full-frame. The EM1 also becomes the first body from Olympus to correct chromatic aberrations from JPEGs with both Olympus and Panasonic lenses.
Olympus sells the EM1 body-only or in one of two lens kits, although the choice may be dependent on region. First is the M.Zuiko Digital ED 12-50mm f3.5-6.3 originally launched alongside the OMD EM5. Second is the new M.Zuiko Digital ED 12-40mm f2.8 launched alongside the EM1. Both are dust, splash and freeze-proof lenses.
Olympus OMD EM1 with 12-40mm coverage wide | Olympus OMD EM1 with 12-40mm coverage tele |
 |  |
| 12-40mm at 12mm (24mm equivalent) | 12-40mm at 40mm (80mm equivalent) |
The new 12-40mm f2.8 is a particularly exciting option for the Micro Four Thirds lens catalogue, slightly trumping the Panasonic 12-35mm f2.8 in length while matching its bright and constant focal ratio (although understandably lacking the Panasonic’s built-in optical stabilisation). I tried the 12-40mm on the EM1 and it’s a perfect match for the new body, feeling altogether superior to the 12-50mm in my view, although if you’re considering it for a shallow depth of field remember it’ll still only be equivalent to shooting at f5.6 on a full-frame body. You can see many examples shot with the 12-40mm on my sample images page. Olympus also announced plans to release a 40-150mm f2.8 to go with it, which gives the combination a much longer reach than the 12-35mm and 35-100mm f2.8 from Panasonic.
Like the OMD EM5 and all PENs before it, you can use the optional MMF adapter to mount any of the 23 original Four Thirds lenses. What makes the EM1 different from all before it though is the promise of faster and continuous autofocusing thanks to the on-sensor phase-detect AF points. Note Olympus makes no claims concerning the compatibility or performance with Panasonic and Leica’s Four Thirds lenses. I’ll discuss the AF options in more detail in the next section, but for now will note that existing E5 owners in selected regions will get the MMF for free if they buy an EM1.
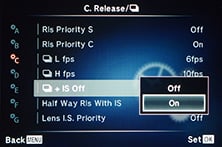
Moving on, the EM1, like all Olympus Micro (and original) Four Thirds bodies, features built-in image stabilisation which works with any lens you attach. I believe it’s the same 5-axis system deployed on the EP5 which makes it a little better than that in the OMD EM5. Note due to compliance with CIPA testing conditions, Olympus now has to describe this as being good for four stops of compensation, even though they claims it is a little better than before.
To evaluate the EM1’s built-in stabilisation for stills and compare it to the EM5, I fitted each camera in turn with the Olympus 75mm f1.8 lens, which delivers a 150mm equivalent field of view. This is a lens which really benefits from the presence of built-in stabilisation, not just because of its longer focal length, but also to exploit its great sharpness and ability to resolve very fine detail.
As always I set the cameras to Shutter Priority and started a sequence at approximately one over the effective focal length, in this case 1/160, before reducing the shutter speed one stop at a time with an without stabilisation enabled.
Olympus OMD EM1 with Olympus 75mm Stabilisation off / on | ||
 |  | |
100% crop, 75mm, 1/20, 400 ISO, IS off | 100% crop, 75mm, 1/20, 400 ISO, IS on | |
It’s always important to compare stabilisation under the same conditions, but as it happened on the day, my non-stabilised shots with the 75mm mounted on either camera required shutter speeds of 1/160 or faster to avoid any visible shake. Enabling stabilisation allowed me to handhold the EM1 and 75mm down to 1/20 for good results and 1/10 or even a bit slower still if I wasn’t looking too closely. So I’d say it was good for just over three stops of compensation in this example.
I expected the EM1 to out-perform the earlier EM5 in this respect not only for its claims of an updated system, but also thanks to a larger grip allowing me to hold it more confidently, but on the day I actually managed to achieve almost exactly the same result with the older model: 1/160 without stabilisation and 1/20 with it enabled.
In a way this is slightly disappointing, but equally it would be churlish to describe the Olympus built-in IS as anything other than wonderful. It’s a genuine 5-axis physical system without any digital assistance (some rivals claim five axes but use digital rotation), and it works with any lens you attach, be it one of the latest native options or an older manual focus lens. I love having this capability to stabilize all the lenses in my bag including all the primes, and it’s a joy to see the image float serenely in the viewfinder as you half-press the shutter release.
The EM1’s stabilisation also works a treat for video. Here’s a clip I filmed with the 75mm while making a handheld pan across a ship. Remember this is a 150mm equivalent lens, and I was also filming on a very cold and windy day, so the way it can iron-out the wobbles is fantastic. Note there can be some backlash if you pan too quickly and the system mistakes it for unintentional wobbles, but if you keep the movement gentle it can be such a valuable tool – again it works with any lens you attach, so it’s like always having a mini steadicam at your disposal.
| |
|---|---|
| |
|
I’ll complete this section with a quick note on the Micro Four Thirds system which the EM1 employs. Micro Four Thirds, jointly developed by Panasonic and Olympus, is the most established of the mirror-less system camera formats, bringing bodies and native lenses to the market at least one year before its first rival arrived. Being first to market along with having not one but two major manufacturers behind it are two major advantages Micro Four Thirds enjoys over the competition, and it really shows when you compare their respective native lens catalogues. At the time of writing, Micro Four Thirds had over 40 lenses available from Panasonic and Olympus along with third parties including Sigma, Tamron, Samyang, Voigtlander and others. So while many rival mirror-less formats are struggling to offer even one lens in every category, Micro Four Thirds typically has two or more options available. Whether it’s Fisheye, ultra wide, fast aperture, macro, super-zoom or good old general-purpose, the Micro Four Thirds catalogue has it covered, and many of them are great quality too – find out more in my Micro Four Thirds lens guide.
There can however be some issues with certain lenses – in particular the Lumix 7-14mm ultra wide zoom, which sadly exhibits the same flare problems with the EM1 as it did with the EM5 and other Olympus bodies.
Olympus OMD EM1 autofocusing
Up until now, all Micro Four Thirds cameras have relied solely a contrast-based autofocus system, and between them, Olympus and Panasonic have gradually been refining and accelerating the performance so that recent models will snap onto a subject almost instantly in Single AF mode under good light. The EM1 performs as well as you’d expect in this regard, focusing very quickly and confidently in Single AF mode when fitted with native Micro Four Thirds lenses, although I wouldn’t say it’s any faster than, say, the OMD EM5 before it.
Olympus doesn’t quote the light levels under which the EM1 will autofocus, but in my tests it was happy to lock-onto subjects under very dim conditions (or even with 10-stop ND filters fitted for daylight work), albeit with some slowdown in performance which could take as long as a second to confirm if it was really dark. Revealingly like the latest Panasonic models, the EM1 doesn’t hunt furiously back and forth in dark conditions, but simply slows down for a more careful approach. In dim conditions the AF illuminator lights-up by default, but I found the contrast-based AF system with native lenses rarely needed it and focused as quickly and accurately without, at least for nearby subjects.
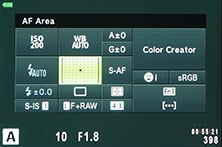
The EM1’s contrast-based AF system can pick from a 9×9 array of 81 AF areas which cover most of the frame, an increased number over the 7×5 / 35 area system employed by the earlier EM5. Like the EM5 you can have the camera automatically choose the most appropriate AF area or pick it yourself either individually or from a zoned group (3×3 on the EM1 vs 2×2 on the EM5).
|

Again like the EM5 you can adjust the size of a manually-selected AF area if desired, on the EM1 between 5x, 7x, 10x or 14x. New to the EM1 is an option to further reduce the AF area size for pinpoint accuracy, although beware like the EM5 before it the AF system can slow down with small AF areas.
Like the EM5 you can alternatively tap the touchscreen to move the AF area wherever you like, again within a region that extends across the entire frame. I personally find this incredibly useful, although I don’t extend that embrace to include the touch-shutter option which also takes a photo with a tap. Still it’s there if you fancy it.
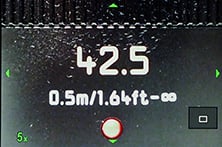
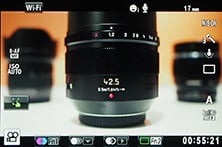
A highlight of the Olympus contrast-based AF system is the face detection which goes beyond the usual framing of a human face to also lock-onto the eye and focus on that. As before you can have the camera go for the left eye, the right eye, or best of all, the nearest eye in the shot. And you know what? It really works. I use the nearest eye detection for all my people shots with Olympus cameras and even when using bright primes with a very shallow depth of field (such as the Nocticron 42.5mm f1.2 opposite), it almost always nails it; the only times it misses slightly are when the subject moves or blinks as you take the shot. It’s brilliant for taking shallow depth of field shots of impatient kids too, although it’s not new to the EM1 – you could do it with the EM5, EP5 and numerous models before them.
So far so good, but the issue for Micro Four Thirds to date has been disappointing continuous AF, not to mention slow AF of any description when fitted with older Four Thirds lenses via an adapter. The latter in particular has put off many owners of E-series DSLRs like the E5 from upgrading to a Micro Four Thirds body. Yes they can use their lenses with an adapter, but the focusing will be disappointing.
The solution from Olympus is a dual AF system with 37 phase-detect AF points integrated onto the EM1’s new sensor. This is a technique employed by almost every other mirrorless format, but it’s the first time it’s been deployed on a Micro Four Thirds body. But read on as there are some important things to know.
First, Olympus has thought carefully about the impact of phase-detect AF points on the image quality. While Canon has figured out a way to switch sensor pixels from imaging to AF and back again with the Dual Pixel CMOS AF on the EOS 70D, every other hybrid system to date, including the Dual Fast AF system on the OMD EM1, permanently converts imaging pixels to AF duties. This means they can’t ever be used to generate an image and are effectively blank dots on the array. To avoid literal gaps in the image, the processor creates a replacement pixel using interpolation of surrounding pixels. Technically it’s creating detail that was never present, but remember most sensors also create colour through interpolation.
While most hybrid AF systems use adjacent pixels to create the pair required for phase-detect AF, Olympus has decided to stagger its ‘left’ and ‘right’ pixels in a zig-zag pattern. Their ability to offer phase-detect AF remains unchanged, but it means the processor has more surrounding information to interpolate from, resulting in less of a compromise.
But there’s another difference. In most existing hybrid AF systems, the phase-detect portion works out the initial direction of the focusing, then refines it using contrast based techniques. Others base the choice of contrast and phase-detect depending on the AF mode. But Olympus has instead decided to select the AF technique based on the type of lens attached to the camera.
If you fit an older Four Thirds lens, the EM1’s AF system switches to phase-detect only whether you’re shooting in Single or Continuous AF modes. Fit a Micro Four Thirds lens and the EM1 uses contrast-based for Single AF and, well, no-one seems entirely sure for Continuous AF. The official Olympus press release states the EM1 only uses contrast based when fitted with a Micro Four Thirds lens, but when quizzing representatives directly, I’ve been told it’s an undisclosed mix of the two technologies.
One thing is for sure though. Phase-detect may have the potential for confident continuous AF while filming video, but inexplicably the EM1 switches to contrast-based only when filming with Micro Four Thirds lenses or manual focus only when filming with Four Thirds lenses. So despite its new DUAL FAST AF system, the EM1’s movie AF remains exactly the same as any Micro Four Thirds model before it – that is to say, not great for refocusing on moving subjects – you can see examples in my movie section below.
So what about for still photos? Is the EM1 an improvement over the models which came before it? I tried it first with a selection of older Four Thirds lenses, including the 12-60mm and 90-250mm zooms, the former used for close-range people shots and the latter for horses approaching at a slow gallop.
In both scenarios the EM1 could certainly focus much faster and more confidently than any previous Micro Four Thirds body using a ‘legacy’ lens, but the continuous AF still felt leisurely compared to the latest cameras, and at times there was visible and audible juddering as the focus adjusted – sometimes you could even feel the lens’ AF system working. Obviously these lenses were designed to work with a separate phase-detect AF system in an optical viewfinder, as with the E5, so it’s always going to be a compromise on the EM1. Certainly it felt a world apart from, say, the tracking AF offered through the viewfinder of a DSLR. Personally I wouldn’t feel happy taking an EM1 with an older Four Thirds lens to a sporting event where the subjects were moving quickly towards or away from me, but equally it delivers better performance than any other Micro Four Thirds body when fitted with these lenses so if you have an existing collection of older optics it remains your best bet for a body upgrade.
Moving onto native Micro Four Thirds lenses, I wondered if the EM1 could out-perform the EM5 before it in terms of continuous AF. I fitted each in turn with an Olympus 75mm f1.8, opened to f1.8 in Aperture Priority, and shot sequences of people walking, striding and running towards me over a distance of about 50m to 2m.
With both models set to Continuous Low in order to support Continuous AF, they delivered a very similar success rate: both cameras managed to keep the slow walkers sharp on almost every frame, but began to struggle more as the subject’s speed was increased. Over numerous repeat runs I found the EM1 may have suffered from fewer mis-focused shots, but it was very close and not the decisive lead I was hoping for. I don’t know if the EM1 was exploiting its phase detect AF system or not with native lenses, but I can tell you it only enjoyed a minor lead over the EM5 for the number of shots in focus versus those which weren’t.
I have however not mentioned one important difference: when set to Continuous Low, the EM1 captures around 50% more frames per second than the EM5, so while its hit-to-miss ratio was only slightly better, the EM1 is capturing more frames to start with.
Ultimately if you were hoping the EM1 could offer DSLR-like continuous AF performance, you’ll be disappointed – I certainly wouldn’t choose it if I were regularly shooting subjects that were moving towards or away from me at speed. But on the positive side it is at least faster than the EM5 while additionally boasting a slightly higher hit-rate too, which ranks it as one of the best mirrorless cameras for continuous AF.
If you like to manually focus, or use lenses from other systems, the EM1 offers a number of tools to make your job easier. First is magnified assistance which can be set to kick-in as soon as you turn the manual focusing ring on native lenses; once in magnified view you can adjust the magnification to 5x, 7x, 10x or 14x, and also scroll around the frame if required.
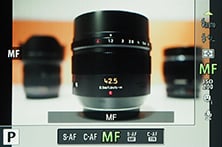 |  |  |
The EM1 also inherits the focus peaking capabilities of the EP5, giving it a valuable edge over the EM5 for manual focusing. Peaking surrounds the subject in focus with a highlight (in black or white on the EM1), allowing you to quickly identify whether the lens is focused correctly or not. It’s particularly helpful when also working in the magnified view, and it also works fine with third party lenses – I used it with my Samyang 7.5mm fisheye for example, where it provides a useful guide with subjects at very close range. Indeed this is another key feature to tempt EM5 owners into upgrading.
The EM1 also offers AF / MF hybrid modes where the camera autofocuses with a half-press of the shutter, but allows you to make manual focusing adjustments (again with a magnified view and or peaking if enabled) with a turn of the focusing ring. I found the Single AF + MF mode worked really well, using the AF to quickly find the subject before allowing you to fine-tune or confirm if necessary.
It all adds up to a satisfying experience, but I feel the peaking could be enhanced if it was available in different, less discreet colours, and more importantly if it were offered for video as well as stills. As it stands, while it is possible to select manual focusing for video, neither focus peaking nor magnified assistance are available, making it harder to nail the focus than it could have been. Olympus really doesn’t seem to understand video and I often feel they only include it as an afterthought – they’re definitely at least one or two steps behind Panasonic in this regard.
Olympus OMD EM1 exposure modes
The OMD EM1 offers nine exposure modes from its dial – one more than the earlier EM5. There’s the usual PASM modes, along with separate positions for iAUTO, ART filters, Scene presets and Movies, although you can alternatively start filming video in any of the other modes. The new mode over the EM5 is Photo Story, and I’ll come to it in just a moment.
The OMD EM1 offers shutter speeds from 60 seconds to 1/8000, the latter inherited from the EP5 and double that of the OMD EM5. 1/8000 is not only useful for freezing fast action, but also for allowing you to use smaller f-numbers (for a shallower depth of field) in bright conditions – I know I regularly bump-up against the 200 ISO and 1/4000 limits of the EM5 when shooting outside with bright primes, but having 1/8000 not to mention a LOW 100 ISO option gives you a useful two extra stops of darkening and the chance to open the aperture by two more stops without fitting ND filters.
In terms of the actual shutter sound, Olympus says it’s quieter than the EP5 simply due to the larger body around it; to my ears it sounds very similar to the EM5. Unfortunately there’s no electronic shutter option for completely silent operation, a feature that’s available on the latest Panasonic Lumix G models. While the use of electronic shutters can result in some undesirable rolling / jello / skewing effects on moving subjects, it normally behaves well with more static compositions and can be a useful tool for discreet shooting – for example in museums, churches, even quiet bars and restaurants. Electronic shutters can also often operate at extremely fast speeds, for example 1/16000 on the Lumix GM1, allowing you to freeze very fast action. It’s a shame the EM1 doesn’t offer it.
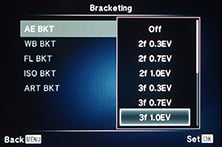
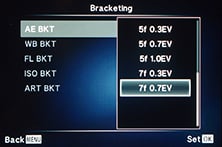
Auto Exposure Bracketing is available on the EM1 at two, three or five frames at 0.3, 0.7 or 1EV apart, or for seven frames at either 0.3 or 0.7EV apart. This is a nice broad and deep range for HDR enthusiasts, although unfortunately you can’t trigger an entire multi-frame burst with a single press of the shutter release or self-timer. Instead you need to fire each exposure separately. On the upside the built-in Wifi means you can at least trigger each frame remotely using your smartphone rather than having to buy a cable release accessory.
 |  |  |
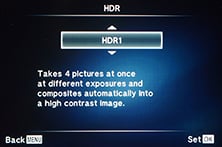
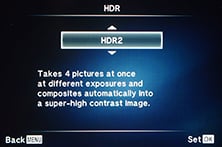
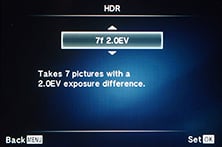
Alternatively you could use the new in-camera HDR mode. This offers seven different options, starting with two presets which capture four frames and assemble them in-camera with mild or strong contrast effects; these two modes record a single composite image, but they can include a RAW in addition to a JPEG if desired. The remaining five modes capture multiple frames, but require you to assemble them yourself later. You can choose three or five frames at 2EV or 3EV increments, or seven frames at 2EV only, and again you can record JPEG, RAW or both for each frame.
 |  |  |
Regardless which of the seven options you choose though, the drive mode is fixed to Continuous High, forcing the camera to fire-them off in a quick burst. This is fine, but annoyingly it prevents you from implementing the self-timer to avoid camera shake. Again though you can trigger the burst remotely using your smartphone, and in practice this can work well.
Olympus OMD EM1 using Olympus 17mm f1.8 HDR mode off | Olympus OMD EM1 using Olympus 17mm f1.8 HDR mode 1 | Olympus OMD EM1 using Olympus 17mm f1.8 HDR mode 2 |
 |  |  |
 |  |  |
HDR off, f4, 1/5, 200 ISO | HDR off, f4, 1/4, 200 ISO | HDR off, f4, 1/4, 200 ISO |
I should also add the EM1 offers ISO, White Balance, Flash Level and ART effect bracketing; the latter is a fun way to quickly try out all (or a selected bunch) of the ART filters if you can’t decide which you prefer – you can find out more about the ART filters later.
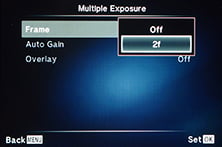
Sticking with the subject of multiple exposures, the EM1 also lets you combine two images on a single frame. You can also have the camera adjust the gain and show the first as a ghostly overlay as you line up the second. One file is recorded after the second exposure.
 |  | 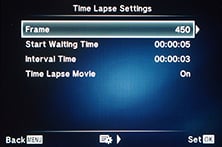 |
Moving on, the EM1 inherits the interval timer of the EP5, but thankfully extends the number of frames from 99 to 999. This may still not be enough for very long time-lapse shoots, but it’s a lot more useful than the EP5. You can also create 100 second time lapse move in camera, although annoyingly the EM1 assembles your images at a fixed frame rate of 10fps which doesn’t look particularly smooth during playback. Contrast this against the Panasonic Lumix G cameras which offer a variety of frame rates for in-camera timelapse movies up to 25 for a very smooth result. Of course you could alternatively just import the individual images from either camera into software on your computer and use it to create a timelapse movie at the desired frame rate, but it remains a shame the camera can’t create a smoother result itself.
| |
|---|---|
| |
| |
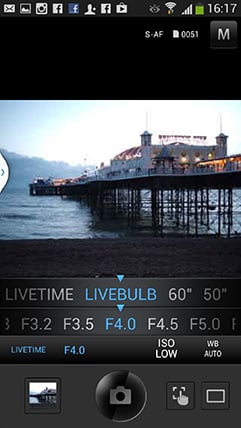
Like the EM5 before it, the EM1 boasts a number of unique options for long exposure fanatics. Turn the exposure dial beyond 60 seconds in Manual mode and you’ll be offered Bulb followed by Time. The difference between them is Bulb keeps the shutter open while you have the release button pressed, while Time opens it with a single press and closes it with another, so you don’t need to keep the button held down throughout the entire exposure.
Of course for the best results you’ll not want to actually touch the camera to start and stop a long exposure, but the EM1 cunningly lets you get around this without the need for additional accessories by first either implementing an Anti Shock delay or self-timer to start the exposure, coupled with a preset exposure length. Again, like the EM5 before it, you can set the maximum exposure time to be 1, 2, 4, 8, 15, 20, 25 or 30 minutes, after which the camera will automatically end the exposure. This allows you to take long exposures without the need for a cable release accessory.
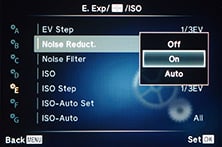 | 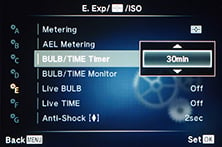 | 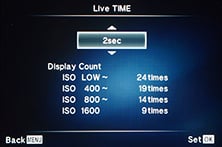 |
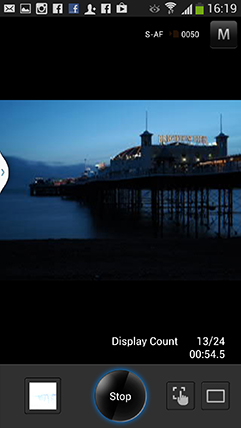
What makes the Olympus cameras even more unique though are their Live Bulb and Live Time options which let you take regular peeks at the exposure on the screen as it builds-up to see how it’s getting on. This lets you stop the exposure early if it’s already perfect, or perhaps not going to work out. The interval between updates can be set to 0.5, 1, 2, 4, 8, 15, 30 or 60 seconds, and the maximum number of peeks depends on the ISO value: 9, 14, 19 or 24 times for ISOs of 1600, 800, 400 or Low respectively. Once you’ve used up your allocation of peeks, there’ll be no more, regardless of the exposure length.
So far so similar to the OMD EM5 before it, but there’s two useful additions. First the actual exposure time is displayed like a digital stopwatch even if you’re not taking a peek at the exposure, and secondly if you are peeking at the exposure, the EM1 will also display a brightness histogram that provides accurate feedback on the tonal range as it builds. The histogram updates its graph for every scheduled peek and it’s great fun to see it gradually move from left to right, filling the shadows, then the mid-tones and finally the highlights during a long exposure. The histogram is useful because the screen – especially when viewed in the typically dark conditions of a long exposure – is not always an accurate representation of the image. If you’re remotely controlling the camera over Wifi you can even view the mid-exposure peeks on your phone’s screen.
The ability to peek at a long exposure while it’s being recorded is innovative, fun and genuinely useful, but there is one very important caveat: every time you peek at the image, you’ll slightly increase the noise. This is also why there’s a limit to the number of peeks, which reduces as the ISO increases. But by how much? I decided to find out.
Olympus OMD EM1 long exposure noise 120 secs at 200 ISO Noise Reduction On, Noise Filter Standard, 100% crops from in-camera JPEG | ||
 |  | |
| 120 seconds with Live Time disabled | 120 seconds with Live Time, 15 ‘peeks’ at 8 second intervals | |
In my comparison above, you’re looking at 100% crops from two exposures taken with the EM1, both of them lasting two minutes with noise reduction applied. The only difference is the exposure on the left had Live Time disabled, while the one on the right had it enabled with ‘peeking’ at eight second intervals – this provided 15 updates throughout the exposure.
As you can see, the crop of the image taken with Live Time enabled (above right), exhibits some chroma noise that’s absent on the one with Live Time disabled. I made the same comparisons at 30 and 60 seconds and found the noise levels to be similar. The impact seems to boil down to the number of peeks you make rather than the exposure length. The more times you peek at the image, the worse the noise.
To put it in perspective though, it’s not exactly terrible, just worse than the version with it disabled – and it is the kind of noise that can be reduced quite effectively in post-production. Ultimately if you want the cleanest results you should shoot without Live Time / Live Bulb, although you could of course use them to quickly nail the correct exposure for a shot, before then turning it off and shooting your ‘proper’ exposure with it disabled.
A penchant for long exposure landscape photography saw me putting the EM1 through a number of additional tests which go beyond the scope of a normal review, and I’ve detailed my findings in a separate section if that’s your thing – see my Olympus EM1 long exposure noise page for full details. But the short version is I found the EM1 was capable of delivering good-looking long exposures lasting several minutes with minimal noise, so long as you have noise reduction enabled. This takes a dark frame lasting the same time as the original exposure afterwards and uses it to subtract most undesirable artefacts. It’s a successful technique, but one which obviously incurs a delay before you can use your camera again.
While it can be a little boring waiting for a dark frame to be recorded on the EM1, especially if it’s also several minutes long, it is a necessary step for clean results. I found that disabling noise reduction resulted in the EM1’s images becoming scattered with hot pixels on exposures longer than 30 seconds, which are hard if not impossible to reduce. They’re also present on the RAW files.
This poses a problem for certain types of photography. If you’re shooting a busy fireworks display you don’t want to potentially miss some bursts while waiting for a dark frame to be recorded. Equally if you’re capturing a series of star trails to stack into a single composite, any delays between exposures will result in gaps and a dotted rather than a continuous line. I realize this will only affect a handful of specialist photographers, but anyone who needs to record long exposures without dark-frame noise reduction should probably stay clear of the EM1. But if you’re happy to let the camera take a dark frame, then you’ll probably be satisfied by the camera’s output – there’s an example of a two minute exposure with NR below. Interestingly the earlier OMD EM5 doesn’t seem to suffer from the same hot pixel issue as the EM1, so if you’re into long exposure work, you will want to check out my Olympus EM1 long exposure noise page for the full details.
| |||
Switch the mode dial to SCN and you can choose from 24 different scene presets, three of which are designed for use with additional converter lenses. Of the more unusual options, Handheld Starlight shoots eight frames and combines them into one; I didn’t get a chance to try this in person, but hope to add an example in the future.
One of the other presets is the Panorama mode, but this remains a panorama-assistance option which simply displays guides to help you line up each frame; unfortunately they still need to be stitched in separate software afterwards. Why is it such a challenge for Olympus and Canon to offer stitched panoramas in-camera? Sony and Panasonic have offered it for ages, and it feels very old fashioned to be forced to complete the process on your computer afterwards.
 |  |  |
Moving on, the ART position on the dial lets you apply a selection of 12 different filters, and while Olympus may have fallen behind on auto-panoramas, it was one of the first to really dive into in-camera effects. You can choose from Pop Art, Soft Focus, Pale Light and Colour, Light Tone, Grainy Film, Pin Hole, Diorama (Miniature), Cross Process, Gentle Sepia, Dramatic Tone, Key Line and Watercolour, or as mentioned earlier, opt for the ART Bracketing mode which takes shots with all of them, or a pre-selected bunch. Here’s half of the ART filters in action.
Olympus OMD EM1 ART Filter 4: Light Tone | Olympus OMD EM1 ART Filter 5: Grainy Film | |
 |  | |
Olympus OMD EM1 ART Filter 6: Pin Hole | Olympus OMD EM1 ART Filter 8: Cross Process | |
 |  | |
Olympus OMD EM1 ART Filter 9: Gentle Sepia | Olympus OMD EM1 ART Filter 10: Dramatic Tone | |
 |  | |
While going through the ART filters on-screen, you’re shown an example of the effect and pushing the right button expands a bunch of additional options. Yes, the effects are novelties, but the results to me look more mature and well thought out than much of the competition, a sign of Olympus’ experience in this regard. If you choose RAW+JPEG, the ART effect is also only applied to the JPEG file, leaving the RAW untouched as a backup or reference if desired. You can also record video with most of the effects applied, although the processing time incurred will reduce the frame rate. Here’s a video with the Diorama effect applied.
| |
|---|---|
| |
| |
|
|

|
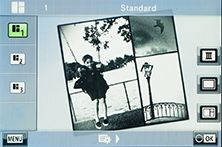 | |
Finally there’s the new Photo Story mode, first seen on the Stylus XZ-10 and later deployed on the PEN EP5. Photo Story arranges between two and five photos into frames on a single image. A selection of presets let you choose the frame layout, the final aspect ratio of the image, along with the style of the borders and the art filters applied to the photos within. Once you’ve chosen the desired preset, one frame at a time becomes live, allowing you to compose each shot in turn before then letting the EM1 composite them into a single image.
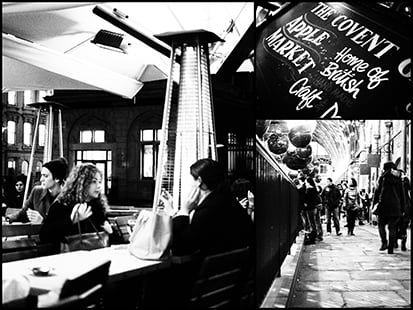
It may sound a little tacky, but Photo Story, like the ART filters, is a fun way to present a story rather than a single image, and you can even create them on your phone or tablet using the free Olympus app. And if you’re shooting in RAW+ JPEG mode, the Photo Story effect is only applied to the JPEG, while the separate frames which make it up are saved as untouched RAW files, giving you the flexibility of using them without the effect later if desired. Here’s a couple of examples I took around London’s Covent Garden at Christmas.
 |  | |
Oh yes, I almost forgot: there’s also iAUTO for foolproof operation and while I can’t see many EM1 owners using it themselves, it can be useful when handing the camera over to someone else to take a photo with it. The iAUTO mode also offers a number of Live Guides which help you implement certain effects with on-screen controls.
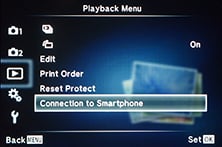
Olympus OMD EM1 Wifi
The OMD EM1 becomes the second Olympus camera to feature built-in Wifi, a predictable but very welcome move for those who previously relied on Eye-Fi cards or similar.
As you might expect, the basic implementation is inherited from the EP5, which means you can connect to a smartphone for picture sharing, GPS tagging and remote control. Like the EP5 the EM1 can also display a QR code to simplify the pairing process.
 |  |  |
There’s still no means to upload direct from the camera to sharing services, nor offer image transfer to laptops, but the smartphone app can at least now support shooting in PASM, allow manual adjustments to the exposure, ISO and white balance, and even offer the Live Bulb and Live Time modes which preview the image as it’s being recorded. This makes the Wifi functionality on the EM1 much more useful than the EP5.
 |
To get started, install the free Olympus Share app on your phone or tablet; it’s available for iOS or Android devices and I tested the latter on my Samsung Galaxy S4. Next tap the Wifi icon in the top right corner of the screen (you may need to press the info button to see it), then the EM1 will display a QR code on-screen.
If the camera and phone have not yet been paired, then simply start the Olympus app and point the phone’s camera at the EM1’s screen to scan it – I was amazed how quickly this worked with the app getting the information it needed just as I began to point the phone at the QR code. From this point on the scanning shouldn’t be necessary. Starting the Olympus app will fire-up Wifi and look for the signal from a camera it’s already paired with and simply connect to it. I’d previously been impressed by the touch-pairing of NFC on Panasonic and Sony cameras, but this is as easy and possibly quicker too.
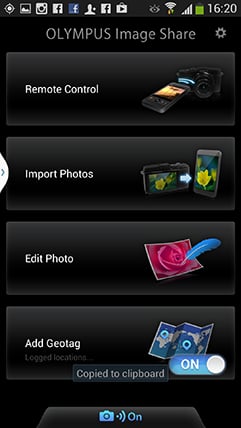
Once connected the app offers four main options: Remote Control, Import Photos, Edit Photo and Add Geotag. I’ll cover each in turn. Tapping Remote Control lets you see a live image from the camera and refocus it by tapping on your phone or tablet’s screen. Impressively you can remotely change the exposure mode between Program, Aperture Priority, Shutter Priority, Manual and iAUTO without touching the camera’s mode dial. Depending on the selected mode, you can then tap to adjust the shutter speed, aperture, exposure compensation, ISO and white balance, along with changing the drive mode, and of course triggering the exposure.
You can’t set or adjust things like HDR modes or multiple exposures, but you can trigger them remotely (useful for hands-free bracketing), and if desired you can also dial the shutter speed in Manual all the way to Live Time and if previews are enabled on the camera you can view the peeking during the exposure along with the updated histogram on your handset’s screen. This does however have the same impact on noise levels as viewing the peeks on the camera’s screen so unfortunately you can’t get around it. Note unlike Panasonic’s remote control, there’s no option to remotely start or stop a video, nor configure a timelapse.
 |  |  |
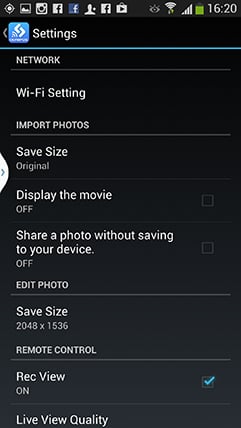
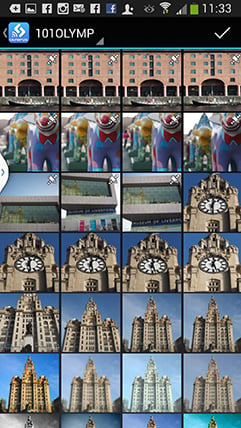
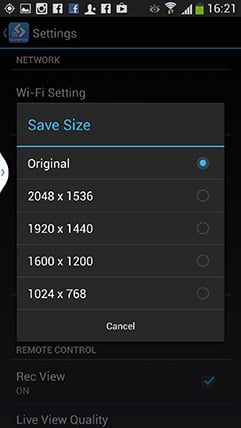
The second option on the app is to Import Photos and pressing it displays a thumbnail view of the card’s contents which you can scroll through. Tapping a photo displays it full-screen, after which you can pinch to zoom-in for a closer look, albeit not at the maximum resolution. If you like what you see you can save the image to your handset by tapping the floppy disk icon, or share it using the sharing icon alongside – of course once it’s saved onto your handset you can also share it later. In the separate settings page you can choose to import images for saving or sharing at 1024×768, 1600×1200, 1920×1440, 2048×1536 or their original resolution – JPEGs only though, not RAW files. It took about 12 seconds to copy an original JPEG measuring 6.6MB from a few inches away.
 |  |  |
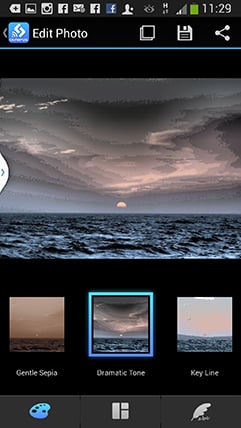
Choosing Edit Photo lets you perform a number of adjustments on images that have already been copied onto your handset. You can apply Art Filters, superimpose text, logos, even signatures written on your phone’s touchscreen, and play around with composite Photo Story arrangements.
 |  |  |
Finally the Add Geotag option does what it says on the tin by tagging photos with positional information recorded by your phone. For this to work, you first need to switch on the Geotag feature from the app, and if desired, change the logging frequency from the default 60 seconds. After that the app will dutifully record your position at the preset intervals until you’re ready to sync them with the images on the camera.
 |  |  |
The actual tagging is a very easy process: if it’s enabled the app will actually offer to tag your photos as soon as the phone and camera are next connected over Wifi. The process is fairly quick too, and the app can additionally plot a log on a Google map, although you may need to disconnect from the camera to load the map details from the internet.
 |  | |
In the example above, my Galaxy S4 had a good lock on the GPS satellites and allowed the Olympus app to tag the photo with a very accurate position. I’d also say the tagging process is simpler and quicker than Panasonic’s approach which involves first copying the log to the camera before it’s then laboriously applied. But like any other camera which relies on a separate device for collecting positions, it’s at the mercy of that device. If the phone is buried away in a bag or pocket, the accuracy could suffer, and an altogether better solution is to have a device collecting positional information that’s out in the open as you take the photo – namely your camera. I do wish manufacturers would integrate GPS into more cameras, but if we do need to tag via a smartphone, the Olympus solution at least makes it as quick and painless as possible.
Indeed I was impressed by the overall implementation and functionality of the Olympus smartphone app – the remote control really is powerful and useful, and the only way I’d improve it would be the ability to adjust things like the interval timer or HDR settings. It’d also be nice to have an automatic push from the camera for those wanting to sync or backup images online as they take them.
I’d also like to see some means to connect the camera wirelessly to a laptop, but having spoken to Olympus about it, that’s not a priority at least at the moment. Ultimately it’s better to have a decent implementation on one platform rather than an unsatisfactory one across multiple platforms – and the EM1’s wireless capabilities remain a big step forward over the EP5’s implementation, and a very tempting upgrade for existing EM5 owners who’s only wireless option has been image transfer via an Eye-Fi card (although that does at least let you copy JPEGs and or RAW files to laptops).
Olympus OMD EM1 movie mode
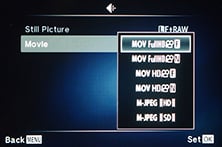
The Olympus OMD EM1 inherits much the same video capabilities as the EP5. As such you can record 1080p at 30fps (29.97 actual) at 20 or 17Mbps, or 720p at 30fps (29.97) at 13 or 10Mbps. There’s also 720p and standard definition options in Motion JPEG if preferred, but there’s no other frame rates available. The maximum file size is 2GB or 29 minutes, whichever happens first.
 |
 |
 |
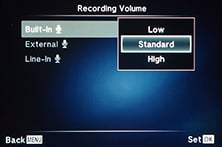 |
There is however full manual control over exposures for movies (using a choice of PASM modes) and for the first time on an Olympus camera, an external microphone input. You can adjust the audio level too, although there’s only three levels and sadly no graphic level meters to help you gauge the volume. On the upside the built-in IS can work for movies – albeit with some audible mechanical whirring – and you can tap different areas of the screen to refocus while filming.
The Art Filters can be applied to movies, although the more demanding ones will slow the frame rate. You can also instruct the Timelapse mode to assemble the photos into a movie afterwards, although they’ll be encoded and replayed at a slow rate of 10fps. This is really annoying as natural movement doesn’t look great played at less than 24fps and the resulting timelapse movies aren’t as smooth or usable as those generated by the Lumix G cameras which give you a choice of frame rates up to 25fps. I have some in-camera examples below, although of course there’s nothing stopping you from taking the separate frames and encoding them into a movie yourself using software later at whatever frame rate you like.
Unfortunately the focus peaking introduced for stills on the EP5 still isn’t available for video here, and as explained in the AF section, autofocusing still employs a contrast-based system and doesn’t exploit the new phase-detect AF points on the sensor. As such there’s some searching when autofocusing during movies as you’ll see in my clips below.
There’s a Digital Teleconverter option which extends the reach of your lenses, but unlike the similar modes on Lumix G models, the EM1 doesn’t take a 1:1 crop from the sensor; instead it takes a crop from the normal footage and interpolates it up for a much fuzzier result – another missed opportunity.
The absence of 24fps will also rule it out for serious film makers and the lack of 25fps is annoying for anyone filming under artificial light in 50Hz regions (such as Europe) as footage can suffer from strobing or flickering as you’ll see in my samples below.
Overall when you look at the movie modes and options of Olympus cameras, they’re at least a generation behind what Panasonic or Canon offers. I get the continued impression that video is something Olympus includes reluctantly on its cameras, and while the EM1 does enhance what was previously available on the EP5, which in turn was better than the EM5, if you’re really into video, I’d recommend Canon or Panasonic instead. That said, here’s a bunch of samples to show you what you can expect if you shoot video on the EM1.
| |
|---|---|
| |
| |
| |
|---|---|
| |
| |
| |
|---|---|
| |
| |
| |
|---|---|
| |
| |
| |
|---|---|
| |
| |
| |
|---|---|
| |
| |
| |
|---|---|
| |
| |
| |
|---|---|
| |
| |
| |
|---|---|
| |
| |
| |
|---|---|
| |
| |
| |
|---|---|
| |
| |
| |
|---|---|
| |
| |
Olympus OMD EM1 continuous shooting
The Olympus OMD EM1 offers two continuous shooting modes: 10fps with focus, white balance and exposure locked at the first frame, and 6fps with support for auto exposure and continuous autofocus if enabled. Note the 6fps speed is with IS disabled; if you enable IS, the speed falls further to 3.5fps. Interestingly this restriction doesn’t seem to apply to the 10fps mode. Meanwhile, Olympus quotes the buffer as being good for 50 RAW frames.
 |
 |
 |
In comparison the OMD EM5 is quoted as offering 9fps at its top speed with AF and exposure fixed, or 4.2fps with AF, reducing to 3.5fps with IS enabled. Olympus quotes a buffer on the EM5 for 20 RAW frames or 70 JPEGs. So according to the specifications, the EM1 is fractionally quicker in its top speed, around 50% faster in its lower speed so long as stabilisation is disabled, and also enjoys a considerably bigger buffer.
To see if the claims measure-up in practice, I fitted the EM1 with a freshly-formatted 32 GB SD card rated as Class 10, set the sensitivity to 400 ISO and the shutter to 1/500. Note Large Fine JPEGs were set to the default size and compression.
With the speed set to Continuous Low, I fired off 100 frames in 16.55 seconds, corresponding to a speed of 6.04fps. The EM1 seemed happy to keep shooting at this speed while I kept the shutter release pressed, and the buffer flushed almost instantly after letting go.
Sticking with Continuous Low, but switching to RAW saw the EM1 capture exactly 50 frames in 8.34 seconds, corresponding to a speed of 5.99fps. After the fiftieth frame the EM1 was happy to continue shooting but at a greatly reduced speed of 2.5fps, and once I let go of the shutter the buffer took about ten seconds to clear.
Switching up to the maximum Continuous High mode and choosing Large Fine JPEG allowed me to capture 55 frames in 5.38 seconds, corresponding to a speed of 10.22fps. The camera was happy to continue shooting beyond 55 frames, but slowed down a fraction.
Staying with Continuous High but switching to RAW allowed me to capture 38 frames in 3.64 seconds, corresponding to a speed of 10.4fps. Beyond 38 frames, the camera slowed to 2.5fps, and again it was a good few seconds before the buffer fully cleared.
Interestingly I tried shooting continuously in both the Low and High modes with and without IS enabled and didn’t measure a difference in speed. I also tried enabling or disabling the custom menu which switches IS off when shooting continuously, but it didn’t seem to make a difference to speed either.
So in my tests the OMD EM1 delivered the quoted speed and RAW buffer depth, making it one of the fastest and deepest shooters of its group. It’s a little bit quicker than the EM5 when the focus is locked, and about half as fast again if you’re using continuous AF, but a larger buffer coupled with support for faster cards means you can shoot much longer bursts. It’s also considerably twice as fast as the Lumix GX7 when the focus is locked, and again about half as fast again with continuous AF. And while Sony’s NEX 7 can match the 10fps speed with the focus locked, it’s only for a burst of 17 JPEGs, one third of the burst I managed with the EM1.
The EM1 is also faster than its full-frame rivals, be they the mirrorless Sony Alpha A7 and A7r or the DSLR Canon EOS 6D and Nikon D610, although to be fair each of those models is shifting at least 50% more pixels per frame.
But the bottom line is the EM1 can certainly rattle-off fast and deep bursts. The question is whether you can actually apply them to any realistic action environments. When set to Continuous High, you lose Live View and the image shown between frames is the previous one captures; this means you can find yourself playing catchup with a moving subject and is far from idea for erratic subjects, but it can be workable. Meanwhile the Continuous Low speed also appeared to be replaying the previous image, although at least it now attempted continuous AF.
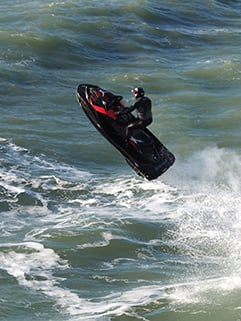
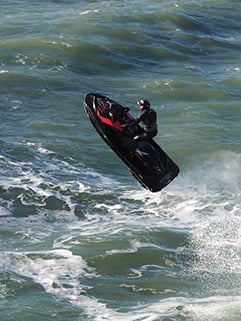
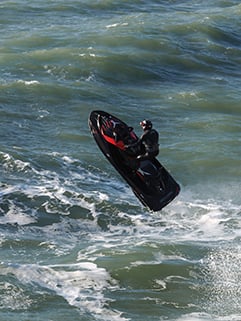
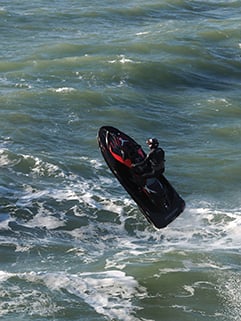
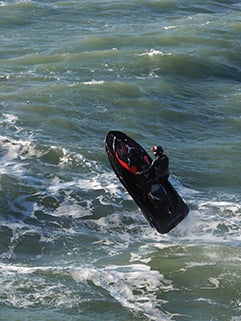
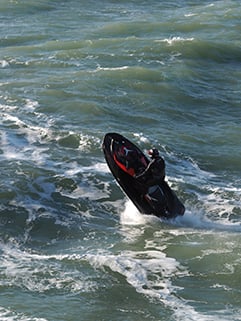
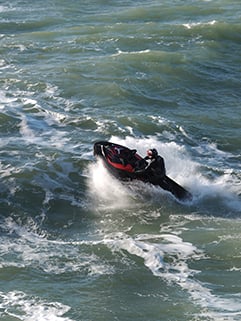
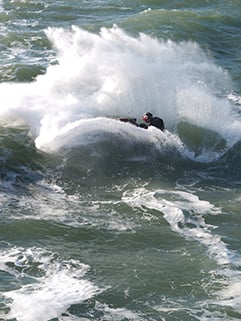
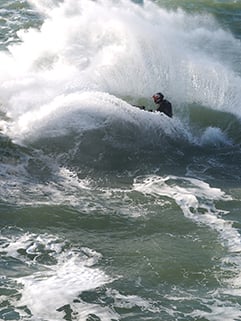
In my AF tests I found the EM1 could keep a slow moving subject in reasonably sharp focus, but once the subject was moving at speed the hit rate could fall considerably. Like most mirrorless cameras, it’s still not ideal for shooting sports where the subject is approaching or receding at speed. But if the subject distance is fairly static, the Continuous High mode can do a great job at capturing the action – ideal for skate, bike or snow tricks, or indeed the jetskis I photographed below using the EM1 and 75mm lens.
Olympus OMD EM1 with Olympus 75mm f1.8. Continuous High at 10fps | ||||
 |  |  | ||
 |  |  | ||
 |  |  | ||
 |  |  | ||
Olympus OMD EM1 sensor and processing
The Olympus OMD EM1 is equipped with a new sensor that’s not been used on any Micro Four Thirds camera before, although the resolution remains fixed at 16 Megapixels. Clearly this is a resolution both Olympus and Panasonic feel comfortable with having stuck with it for multiple generations now.
Personally speaking I’m completely at peace with this resolution, having shot most of my personal photography with 16 Megapixel Micro Four Thirds bodies for the best part of two years now. Not once have I wished for higher resolution files or had anyone commenting on their lack of detail – indeed most seem to notice the sharpness in the corners due to excellent optics before anything else. But at the same time I think it will prove off-putting for owners of higher resolution DSLRs who are considering a switch. It may involve a reduction in ultimate resolution and equally implies this is as far as the format is going in this respect. It’s something you’ll have to decide for yourself, although again if it offers any reassurance, I find the combination of 16 Megapixels and the excellent Micro Four Thirds lens catalogue a very satisfactory combination.
What makes the OMD EM1’s sensor different from the models before it though are integrated phase-detect AF points and the complete absence of an optical low pass filter, OLPF. Phase-detect AF points allow the EM1 to autofocus more quickly – and continuously – with older Four Thirds lenses, and I’ve explained this in detail in the autofocus section above. Meanwhile eliminating the OLPF has become an increasingly popular way of boosting fine detail without increasing sensor resolution.
An OLPF is used to reduce interference called moire which occurs when the subject includes patterns which are at the resolving limit of the sensor. Undesirable shimmering coloured artefacts appear which will be familiar to anyone who’s seen a presenter wear a stripy shirt or tie on TV. The OLPF fixes this by literally blurring the image a little, but of course this also reduces the ultimate detail and may not even be required for most images.
Remove the OLPF and all your detail comes back, although you do now have to manage moire when it becomes a problem. Olympus does this with its latest image processor, which also includes additional tricks. It’s the first from Olympus to reduce chromatic aberrations, on both Olympus and Panasonic lenses. It also keeps an eye on the aperture setting in use, and should smaller values stray into diffraction, it’ll boost the sharpening to compensate. You can see the latter in practice in my Olympus OMD EM1 diffraction compensation results.
In terms of image quality options, the EM1 lets you record JPEG files at one of four quality settings. The clever part is you can configure the quality settings of these four options from a choice of eight resolutions and four compression levels; so if you like, all four JPEG options could be at, say, the maximum resolution but with different compression levels, or you could go for different resolutions, but all with the mildest compression applied.
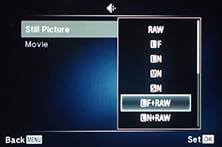 | 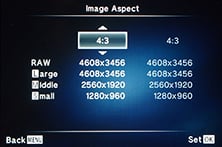 | 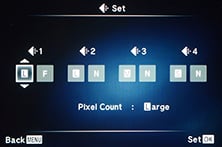 |
Suffice it to say you can also record RAW files with or without an accompany JPEG, although RAW files are always at the maximum resolution and there’s no compression options for them. Using the default settings, Large Fine JPEGs typically measure between 7 and 8MB each, while RAW files weigh-in at around 15MB each.
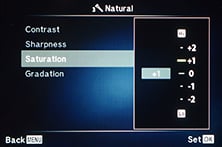 |
The Picture Mode menu applies the contrast, sharpness, saturation, gradation and any monochrome filters as a series of presets or custom options. I used the default Natural mode for all of my test shots and found it had sensibly dialed-back the over-zealous default sharpening of the EM5 resulting in JPEGs which inevitably looked a bit softer but more natural. The typical Olympus colour is alive and well though and I found out-of-camera JPEGs from the EM1 to be extremely satisfying – so much so in fact that I rarely processed RAW files unless I wanted to change the white balance, significantly modify the exposure or achieve an unusual effect. The concept of relying on JPEGs may be abhorrent to some enthusiasts for whom RAW is the only option, but Olympus arguably process them better than anyone else, and if you opt for minimal compression the EM1 simply records great looking images with little or no intervention.
If you’re coming from the EM5 and have never changed the settings, you’ll find the EM1’s out-of-camera JPEGs are lacking its bite, but again this is no bad thing. The EM5’s default settings had the sharpening turned up a bit high and while it could look punchy on some subjects, it inevitably suffered from haloing artefacts on others. Either way if you prefer more punch from the EM1 to match the EM5’s style, all it takes is a tweak in the Picture Mode menu.
 |  |
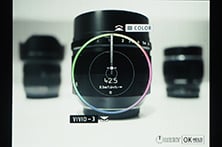 | 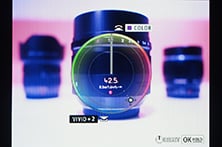 |
As with all Live View systems, any image parameters can be previewed immediately on-screen. In terms of White Balance there’s Auto, seven presets, four one-touch options and the ability to manually set the colour temperature from a scale of 2000-14000K. Highlights and shadows can be adjusted using a tone curve. Olympus has additionally gone one step further with its new Colour Creator option which lets you adjust hue and saturation using a cunning on-screen circular interface. Saturation is represented by a concentric ring which can grow or shrink in diameter, increasing or decreasing the saturation respectively, while hue is adjusted by rotating a marker around the ring’s circumference. It’s quick and fun to make these changes using the twin control dial system, and shows Olympus is thinking about different ways to present the usual adjustments.
Finally, the sensitivity is available between 200 and 25,600 ISO, the same as the earlier EM5 but with the addition of a new Low option, equivalent to 100 ISO. While the base sensitivity remains 200 ISO – and that’s the best option to record the broadest dynamic range – I welcome the inclusion of a Low option that was missing on the EM5. If you’re shooting under bright conditions and want to open the aperture or select slower shutters to blur motion, a lower sensitivity option is always helpful. Indeed when coupled with the faster 1/8000 shutter, the EM1 can reduce the recorded light by two stops over the EM5 without resorting to ND filters.
Right, that’s enough talk, it’s time to check out my results and comparisons. In my results pages I’ve compared and analysed the resolution and noise for JPEG and RAW files for the EM1 and several key rivals. Or if you’ve seen enough, head over to my Olympus EM1 sample images or straight to my verdict!