Panasonic Lumix DMC-GH2
-
-
Written by Gordon Laing
Intro
Panasonic’s Lumix DMC-GH2 is a hybrid camera designed to capture high quality stills and HD video. Announced in September 2010, it’s the successor to the Lumix GH1, and like that model is based on the Micro Four Thirds standard. The earlier GH1 raised the bar for video capture in a hybrid camera which the new GH2 enhances further, while also enjoying higher resolution stills, quicker AF, faster continuous shooting and a touch-screen display.
The headline specification is a sensor increase from 12.1 to 16 Megapixels, making the GH2 the highest resolution camera to use the Micro Four Thirds standard. Like its predecessor, the sensor actually sports a higher resolution – in this case 18 Megapixels – with spare pixels around the edges used to maintain the angle of view when shooting in different aspect ratios. The sensor also enjoys quicker data readout, allowing faster continuous shooting.
Like the GH1 before it, the GH2 can capture Full HD video with continuous autofocus and full manual control over exposures. The major difference is the GH2’s sensor outputs a higher frame rate when recording Full HD video, which not only allows smoother capture, but quicker continuous autofocus. The GH2 also now offers a 1080 / 24p option for movie makers, along with variable speed modes which can slow the output to 80% or speed it up to 300%. You can additionally take still photos while filming (albeit at 2 Megapixels) without interruption. Pros will also be delighted to discover audio level meters and that the HDMI output delivers a clean 1080i feed even when the camera’s recording video.
 |
In our review of the Lumix GH2, we’re concentrating on its new features and the key aspects where it differs from the GH1, along with comparing it against an interesting rival from Sony, the Alpha SLT-A33. This review is designed to be read alongside our original GH1 report which should be referred back to for more detail on the aspects both cameras have in common. So check out our Panasonic Lumix DMC-GH1 review for further information on these shared features as we’ll be brief about them here. You may also wish to open our Sony Alpha SLT-A33 review for further comparisons.
We have of course fully retested the Lumix GH2 for real-life resolution and noise, along with RAW comparisons and our usual sample images gallery. We’ve also included a variety of 1080i HD movie clips to view and download.
Panasonic Lumix DMC-GH2 design and controls
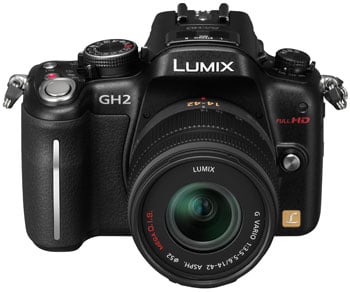
At first glance, the Lumix GH2 could easily be mistaken for its predecessor. Both share essentially the same body shape and control layout, although there are a number of minor differences, several of which are inherited from the Lumix G2.
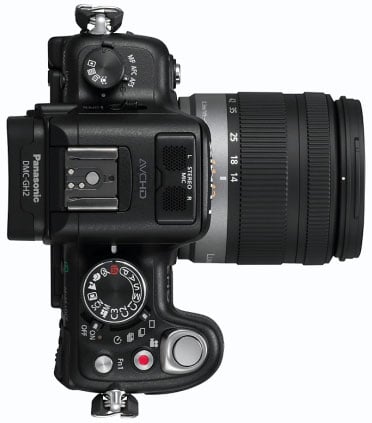
Most obviously the Lumix GH2 swaps the rubbery coating of the GH1 for a more traditional and professional-looking mottled finish. Like the G2, the finger dial has been relocated to the rear as a thumb dial, while the direct record button now finds itself on the top surface next to the shutter release. Again like the G2, the dial to the left of the viewfinder head now controls the AF area, with a new rotary switch around it for the AF mode.
The Film Mode button of the GH1, which is dedicated to switching into Intelligent Auto on the G2, now becomes a programmable Function button. Thanks to the new AF area dial, the left button on the GH2’s rear is now freed-up to provide a second Function button. These are in addition to the programmable down button, giving the GH2 no less than three customisable keys – a classy update.
 | |
Measuring 124x90x76mm (excluding protrusions), the GH2 is essentially the same size as its predecessor, and at 444g including battery (but no lens), is roughly the same weight too. Viewed and handled in isolation, you’d be forgiven for thinking the GH2 is roughly the same size as a typical entry-level DSLR, but it comes-up about 50g lighter and one centimetre shorter than models like the Canon EOS 1000D / XS and Nikon D3100. The GH2 also looks less chunky overall thanks to a smaller grip and slimmer frame which lacks a protruding lens mount.
The Lumix GH2 looks even smaller when placed alongside typical mid-range DSLRs, which it’s closer to in terms of features, although it’s important to note despite its compact size, the camera doesn’t compromise on ergonomics. Like its predecessor and the G2, the GH2 is comfortable to hold and use, while feeling well built and secure in your hands.
Panasonic isn’t the only company to deliver a compact DSLR-styled hybrid camera though: Sony’s Alpha SLT-A33 makes an interesting rival and at 124mm wide and 92mm tall shares a similar body shape from the front, although the presence of a mirror in the body (albeit a translucent one) along with compatibility with standard Alpha lenses makes it thicker at 85mm.
The reason the Lumix GH2 is smaller than a traditional DSLR is the absence of a mirror and optical viewfinder in the body. Like all Lumix G cameras, it’s based on the Micro Four Thirds standard, a mirrorless system with a short lens to sensor distance and full-time Live View composition. This means the GH2 is compatible with all Micro Four Thirds lenses, along with a wealth of others via optional adapters.
Fit the basic kit zooms to both the GH2 and Sony A33 and the advantage of the mirrorless former becomes quite apparent: the GH2 with 14-42mm weighs 93g lighter than the A33 with 18-55mm SAM, and is noticeably less bulky too, squeezing into smaller bags or even coat pockets at a push. The A33 may be smaller than most traditional DSLRs, but is beaten on overall size and weight by the GH2.
 | |
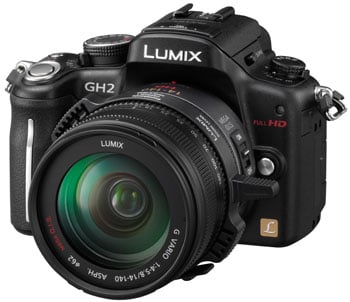 | |
All lenses mounted on the GH2 (or any other Micro Four Thirds body) have their effective field of view reduced by two times, so a 14-42mm lens would deliver coverage equivalent to 28-84mm. Note while it’s possible to mount a huge variety of lenses onto the GH2 though, their autofocusing capabilities will vary, especially in terms of continuous AF. Panasonic maintains an updated GH2 lens compatibility guide, where you’ll discover the best match in terms of autofocusing and quiet operation remains the 14-140mm super-zoom (28-280mm equivalent).
The earlier GH1 was only available with this lens whether you wanted it or not, making the camera look pricey compared to basic DSLR kits, but with the GH2, Panasonic now sensibly offers three options: first there’s the body alone for those with existing lenses, secondly there’s a kit with the 14-140mm, and third there’s a new kit with the latest 14-42mm lens.
The new 14-42mm kit lens is smaller and much lighter than the 14-140mm, transforming the GH2’s look and feel; indeed the combination of body and lens is one third lighter at 609g compared to 904g. It obviously lacks the reach of the 14-140mm, and also lacks its virtually silent focusing and stepless aperture control for movies, but in our tests it was still very quiet in operation compared to traditional DSLR kit lenses. As such while the 14-140mm is the ultimate partner for the GH2’s video, the 14-42mm represents a cheaper point of entry and a lighter combo to carry around.
Since we profiled the 14-140mm lens in our earlier GH1 review, we’ve dedicated most of our GH2 gallery and results pages to the new 14-42mm. Most people using the GH2 for video will however favour the 14-140mm, so we’ve used that lens for our movie samples, although we re-filmed one of the clips immediately afterwards using the 14-42mm for direct comparison.
Like traditional DSLR zooms, the focal length on both lenses is adjusted with a mechanical ring. This isn’t ideal for zooming while filming, so Panasonic has introduced a new accessory which clips around the ring and provides a protruding lever to make finer adjustments – see right. It’s a basic but fairly effective solution in the absence of motorised zooms.
The Lumix GH2 is also powered by a new battery pack, albeit one that’s curiously slightly less powerful than its predecessor: the new DMW-BLC12E is rated at 1200 mAh compared to the 1250 mAh of the earlier DMW-BLB13E. That said, the quoted number of shots per charge for the GH2 is slightly higher than before at 320 images with the screen or 330 with the Live View Finder, compared to 300 or 320 shots on the GH1; note all figures quoted by Panasonic under CIPA conditions with the 14-140mm zoom.
Panasonic Lumix DMC-GH2 screen
Like its predecessor, the Lumix GH2 is equipped with a fully articulated screen which can twist and flip to any direction, including facing forward for crafty self-portraits or back on itself for protection. The screen is hinged at the side, which allows for easy adjustments and viewing even when mounted on a tripod, unlike the Sony Alpha A33’s flip-out screen which is hinged at the bottom and as a consequence sometimes finds itself in an awkward position.
 |
The size, shape and resolution of the GH2’s screen are also the same as its predecessor at 3in, 3:2 and 460k dots. The Sony Alpha A33 also has a 3in screen, but it’s in a wider 16:9 aspect ratio and sports a higher resolution of 920k dots. When shooting 16:9 content, the GH2 shows thin black bars above and below the image, resulting in a 2.8in diagonal; this is obviously a little smaller than 16:9 content on the A33 which fills its 3in screen.
On the other hand, if you’re shooting 3:2 images, they’ll fill the 3in screen on the GH2, but only occupy a 2.6in diagonal on the A33 with thick black bars running down either side. Ultimately you should ideally go for the screen shape which matches the majority of your content, although if you’re shooting a mix of 3:2 and 16:9, the GH2’s screen area is better-exploited than the Sony. The higher resolution of the Sony screen does show finer details though, so there’s pros and cons to each implementation.
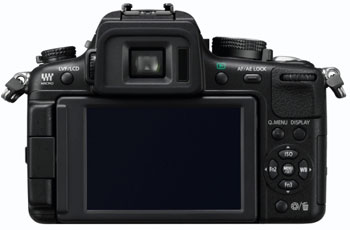 | |
Where the GH2’s display really differs from the Sony A33 though, not to mention the GH1, is that it’s now touch-sensitive. Panasonic has arguably embraced touch-screens more than any other camera manufacturer and is deploying them on a wide range of products. The idea of tapping the screen to confirm settings or swiping through images during playback is something you’ll either enjoy or fail to see the point of; some may even find it less usable than traditional controls. Thankfully Panasonic has retained a full complement of buttons and dials on the GH2, so if you prefer, you can operate it entirely without touching the screen.
But novelty aside, there are a few genuine benefits to a touch-screen on a camera. The most useful is without a doubt being able to tap on the subject you’d like the camera to focus on. Panasonic extends this with the GH2 so that in group shots you can choose which face has priority, while in action sequences, the continuous tracking can by activated by simply tapping on the desired subject even as it moves towards or away from you.
For us though, the neatest application for touch-focusing on the GH2 comes when recording movies, where you can easily refocus between different subjects during the same clip by tapping them. Imagine filming a conversation between two people with a shallow depth-of-field and a fixed camera position. Normally in a movie or TV show, the focus would be adjusted during the sequence so that the person talking was sharp – it’s an almost subliminal effect which helps us know who to watch and listen to. Traditionally this would involve a focus-puller carefully measuring the distance between the camera and the two subjects before then manually adjusting the focus on the lens back and forth while filming. Now with the GH2 you simply tap the person you’d like the camera to refocus on.
| |||
|---|---|---|---|
| |||
You can see an example of this technique in action above. We mounted the GH2 with the 14-140mm lens (at approximately 25mm) on a tripod at table-height, and set the movie mode to manual with the maximum aperture to minimise the depth-of-field. We then flipped the screen out and tapped the objects or areas we wanted the camera to focus on.
As you can see in the clip, the 14-140mm refocuses fairly swiftly and with minimal noise; there’s also few if any visual or audio clues that the screen is being tapped, although this understandably requires a gentle touch and a secure hold on the camera. Where the technique falls down is when the camera momentarily searches back and forth before locking-on – this isn’t as slick as manual focus-pulling, where the process is generally more confident and precise, but that’s not to detract from the GH2’s tap focusing experience which is easy, fun and useful.
Panasonic Lumix DMC-GH2 viewfinder
Again like its predecessor, the Lumix GH2 is equipped with an electronic viewfinder as an alternative means of composition; Panasonic calls this a ‘Live View Finder’ or LVF for short. The earlier GH1 featured a highly detailed LVF with a total of 1,440k dots, which equated to an 800×600 pixel image in the 4:3 aspect ratio.
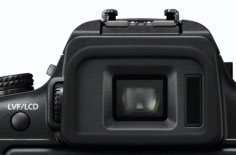 | |
Panasonic has made a minor but welcome update to the GH2’s LVF by slightly widening it to a 3:2 aspect ratio which now matches the shape of the screen. Rather than stretching the existing LVF though, the GH2 maintains square pixels with a new 1,530k dot panel which equates to 852×600 pixels. This means 4:3 shaped images still occupy the same 800×600 area as before, but with think black bars running down each side, as they do on the screen. More importantly, 3:2 shaped images now fill the LVF rather than appearing letter-boxed, and while 16:9 images still have black bars above and below, the picture occupies more of the LVF than before. The bottom line is the new LVF involves fewer display compromises than its predecessor when it comes to composing in multiple aspect ratios.
As for the quality of the new LVF, it remains large and highly detailed. Like its predecessor, it’s a world apart from the coarse electronic viewfinders on most compact super-zooms and camcorders. The technology driving it also creates a smooth image with the illusion of full colour pixels at every location and no gaps between them. We say illusion because the Field Sequential technology behind it actually displays red, green and blue colours separately, but in quick succession to give the impression of a full colour image.
For some people, the illusion works perfectly, although others may notice a slight tearing rainbow effect when quickly glancing from one side of the image to the other. You may also notice it when panning slowly over parallel lines, like fencing. At worst this could result in some eye-fatigue, so it’s important to try it for yourself if you’re concerned; if you see tearing on DLP projectors you’ll probably see it here too.
We directly compared the GH2’s LVF to the electronic viewfinder in the Sony Alpha SLT-A33 and while both suffered from some tearing, the Sony was visibly worse in this regard – at least to our eyes. While there’s not a great deal between them in terms of viewfinder resolution (1,530k dots on the GH2 vs 1,440k dots on the A33), there are differences in the apparent size of the images in their viewfinders. Both panels appear roughly the same width, but the Panasonic’s is 3:2 in shape compared to 16:9 on the Sony. This means when both cameras are set to record 16:9 photos or video, their viewfinder images are roughly the same size. But switch them to 3:2 and the GH2 image expands in height, whereas the A33 image becomes horizontally cropped, making the former look much bigger. Overall, the combination of a larger apparent image (when shooting 3:2), a slightly higher resolution and less visible tearing made the GH2 viewfinder preferable to the Sony.
Die-hard fans of optical viewfinders however may remain unconvinced. When using the GH2 or A33, you’re never in any doubt it’s an electronic image you’re looking at. Both models may sport high resolution images, but they have an electronic appearance, and a finite amount of detail, not to mention limited dynamic range; it’s easy to find bright areas saturating into pure white which contained visible tonal detail through an optical viewfinder. Then there’s the tearing artefacts, battery drain and absence of live feedback when following action at top speeds which we’ll discuss in the continuous shooting section below.
But the counter-arguments are bigger apparent images than the often tiny optical viewfinders on budget DSLRs, 100% coverage and the benefit of super-imposed graphics and information. There’ll always be pros and cons to both technologies, but the bottom line is the Lumix GH2 Live View Finder is one of the best on the market.
Panasonic Lumix DMC-GH2 auto-focusing
The Micro Four Thirds standard exclusively employs Live View for composition, and as a mirror-less system, there’s no opportunity to divert any light to a phase-change autofocus sensor. As such, focusing entirely relies on contrast-based systems, which in the past haven’t always been the quickest solutions around. Panasonic has however been working hard to resolve this, and its earlier Lumix GH1 was already quicker than the phase-change AF systems on most budget DSLRs.
Impressive stuff, but rather than resting on its laurels, Panasonic has further accelerated auto-focusing on the Lumix GH2; indeed it’s so good we’ll even forgive the slightly cheesy ‘World’s fastest level of light speed’ description. In short it’s the quickest contrast-based AF system we’ve used, snapping confidently onto subjects in a split second. In use with a suitably quick lens like the 14-140mm, it feels comfortably faster than traditional DSLR kits; even fitted with the ‘basic’ 14-42mm kit lens, the GH2 is quicker. The focusing is also quieter than the Canon, Nikon, Sony (Alpha mount) and Pentax kits.
In use alongside the Sony Alpha SLT-A33 kit, the Lumix GH2 simply felt much snappier. The A33’s clever translucent mirror may give it the benefit of phase-change AF during Live View, but fit their respective kit zooms and the A33 feels comparatively sluggish, not to mention being noisier.
The GH2’s AF performance certainly lays to rest any concerns that quick focusing isn’t possible with contrast-based systems, not to mention the old tradition that phase-change was always faster. It’s also important to remember a contrast-based system works with data from the same sensor you’ll use to the capture the image. This allows contrast-based systems to avoid the front and rear focusing errors which can plague phase-change AF systems, including those on the Sony Alpha A33 / A55. So with the GH2, you’ve got the best of both worlds: the accuracy of a contrast-based system, with the speed of the best phase-change systems – and it’s quiet too. Panasonic has also improved the AF speed while filming 1080i HD video, which we’ll cover in more detail below.
Panasonic Lumix DMC-GH2 sensor and processing
The Panasonic Lumix GH2 features a brand new sensor boasting the highest resolution of the Micro Four Thirds system to date. The GH2 sports an effective resolution of 16 Megapixels, up from the 12.1 Megapixels of its predecessor. Like the earlier GH1 (and several other Lumix cameras), the GH2’s sensor actually sports a higher resolution – in this case 18 Megapixels – with spare pixels around the edges used to maintain the angle of view when shooting in different aspect ratios.
 |
 |
 |
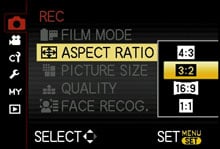
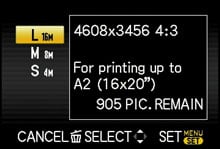
The maximum 16 Megapixel resolution is available when shooting in the 4:3 aspect ratio, and delivers images with 4608×3456 pixels. Switch the GH2 to the 3:2 aspect ratio and you’ll capture 15 Megapixel images with 4752×3168 pixels, while in 16:9 records 14 Megapixel images with 4976×2800 pixels; there’s also a 1:1 mode which simply crops the 4:3 image to 3456×3456 pixels.
While the total pixel count gradually reduces as the aspect ratio widens, the GH2 genuinely captures more of the view widthways with a higher number of pixels in that dimension too as quoted above. This is in contrast to most cameras which simply crop strips from the top and bottom to deliver wider aspect ratios, thereby reducing the resolution and field of view. To illustrate this, we shot our standard real-life resolution view with each of the GH2’s aspect ratios and put them next to each other below. It’s clear how the wider aspect ratios are capturing more in the horizontal axis. There’s also a handy Multi-Aspect bracketing option which captures all four for you in a burst.
| Panasonic Lumix DMC-GH2 aspect ratios, 1:1, 4:3, 3:2, 16:9 |
 |
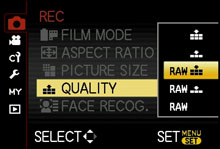
Each aspect ratio is available in the choice of three resolutions and with either Standard or Fine JPEG compression; you can also record RAW data at the maximum resolution of each aspect ratio either by itself or accompanied by a Standard or Fine JPEG.
The sensitivity range of the GH2 has increased from the 100-3200 ISO of its predecessor to 160-12800 ISO. The combination of four extra Megapixels and up to four times the maximum sensitivity from the same sensor area may be cause for concern, but as you’ll see in our High ISO Noise results pages, the GH2 performs respectably in this regard.
Also new to the GH2 over its predecessor is Intelligent Resolution which applies selective sharpening to images. It’s set to Auto in Intelligent Auto mode, but disabled by default in the PASM modes, where you can manually choose between Off, Low, Standard, High and Extended. To see it in action, we shot our standard test scene (as seen in the aspect ratio examples above), with each of the Intelligent Resolution settings and have presented 100% crops from two of them below for comparison.
Panasonic Lumix DMC-GH2 Intelligent Resolution disabled |
Panasonic Lumix DMC-GH2 Intelligent Resolution Extended | |
 |  | |
100% crop, 1/1000, f5.6, 160 ISO |
100% crop, 1/1000, f5.6, 160 ISO | |
In the example above, Intelligent Resolution has done a good job of applying fairly significant sharpening while minimising the usual artefacts. It’s certainly delivered a punchier result than the somewhat laid-back style of the default JPEG processing, although you may prefer the result from RAW files, as seen in our second results page.
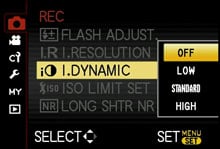 |
Like most new Panasonic cameras, the GH2 also features I.Dynamic, or Intelligent Dynamic Range control, which automatically adjusts the contrast when there’s a big difference between light and dark areas on the image. Again it’s applied automatically in Intelligent Auto, but off by default in the PASM modes, where you can choose between Off, Low, Standard and High.
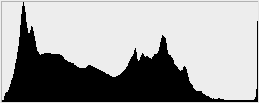
To put it to the test we photographed our standard low-light test scene with each of the settings; this composition feature both dark shadows in the roofing, along with brightly backlit windows. We’ve pictured two samples with histograms below with I.Dynamic disabled on the left and set to High on the right.
Panasonic Lumix DMC-GH2 I.Dynamic disabled |
Panasonic Lumix DMC-GH2 I.Dynamic High | |
 |  | |
 |  | |
0.5 secs, f5.6, 160 ISO |
0.5 secs, f5.6, 160 ISO | |
In the example above, there’s no obvious difference between the samples taken with I.Dynamic set to Off or High; the histograms confirm this. We repeated the test on another day and found the same result. Either I.Dynamic didn’t see any reason to make any significant adjustments to this composition, or wasn’t working properly on our sample. If we manage to source another GH2 sample in the future we’ll retest this feature on a different composition.
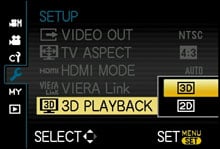 |
The Lumix GH2 also supports Panasonic’s recent H-FT012E 3D lens which employs two separate lenses to generate a 3D image on compatible cameras. When fitted with the lens, the GH2 can record 2D JPEGs with an accompanying MPO file containing depth information which can be interpreted by most 3D TVs to display a 3D image. The maximum resolution supported is 1920×1080 pixels in the 16:9 aspect ratio. Note, the GH2 can only record still 3D photos with this lens, not 3D movies.
A quick note on exposures: the GH2 offers shutter speeds from 1/4000 to 60 seconds, but while long exposure fans will welcome the ability to select 60 seconds in Manual without the need for a cable release to keep the shutter open, the GH2’s Bulb mode only extends this by about two times to a maximum of around 120 seconds. You can see a 20 second exposure of a starry sky in our Gallery.
On the upside, the exposure compensation is available in a broad range of +/-5EV, and the exposure bracketing can be set to three, five or a generous seven frames at up to 1EV apart; so while deep-sky astro-photographers will be disappointed by the two-minute bulb, HDR fans will love the seven-frame bracketing.
Panasonic Lumix DMC-GH2 movie mode
Like the GH1 before it, the GH2 can capture Full HD video with continuous autofocus and full manual control over exposures. The major difference is the GH2’s sensor now outputs a higher frame rate when recording Full HD video, which not only allows smoother capture, but quicker continuous autofocus.
 |
 |
 |
The earlier GH1’s sensor outputted 1080p progressive video at 24fps for NTSC regions and 25fps for PAL regions, which in turn was encoded into interlaced AVCHD files at 60i and 50i respectively. Now the new GH2’s sensor outputs 1080p progressive video at 50fps for PAL regions and 60fps for NTSC regions, which are again encoded into interlaced AVCHD files at 50i and 60i respectively.
The reason the output is recorded as an interlaced file is one of compatibility as there isn’t yet a broad standard for delivering AVCHD at progressive rates of 50p and 60p. The important thing though is the GH2 is effectively downsampling 50p / 60p into 50i / 60i, as opposed to its predecessor which was upscaling 25p / 24p into 50i / 60i. This not only delivers a smoother result for motion, but crucially gives the GH2 more frames per second for its autofocus system to work with. Previously the GH1’s 720p movie modes boasted quicker AF than the 1080i modes due to the faster frame rates output by its sensor, but now on the GH2, the 1080 modes match the 720 ones for frame rates, and therefore also AF speed.
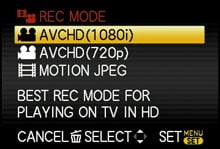
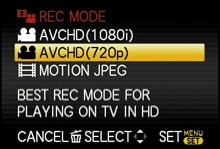
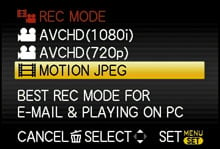
In terms of quality settings, the GH2 offers three main options: AVCHD (1080i), AVCHD (720p) and Motion JPEG. The AVCHD (1080i) mode encodes interlaced 1920×1080 video at 50i / 60i (depending on region) in the choice of FH (13Mbit/s) or FSH (17Mbit/s). The AVCHD (720p) mode encodes interlaced 1280×720 video at 50p / 60p (depending on region) in the choice of H (13Mbit/s) or SH (17Mbit/s). Panasonic recommends a Class 4 card or faster for AVCHD recording in either mode.
The Motion JPEG mode offers QVGA (320×240) , VGA (640×480), WVGA (848×480) and HD (1280×720) options, all encoded as progressive files at 30fps regardless of region; Panasonic recommends a Class 6 card for Motion JPEG modes.
 |
 |
 |
 |
 |
|
You can start recording video in any shooting mode by simply pressing the dedicated record button next to the shutter release, and the GH2 can also capture still photos while recording without interrupting the video, albeit only at the video resolution – for example, 2 Megapixel 1920×1080 images when filming in the AVCHD (1080i) mode. You can alternatively set the camera to capture full resolution stills while filming, but doing so will briefly interrupt the footage.
As with previous Panasonic cameras offering the choice of AVCHD and Motion JPEG encoding, the latter is easier to edit, but limited to file sizes of 2GB – which in turn limits you to around seven and a half minutes of recording time per clip in the 720p HD mode. In contrast, AVCHD may be tougher to edit, but creates smaller files and can keep recording until you run out of memory. The same 2GB file would actually get you 13 minutes at 17Mbit/s, or 17 minutes at 13Mbit/s. Fit a 16GB card, and you could record just over two hours, uninterrupted in the best quality 17Mbit/s modes.
The only caveat for maximum recording times as always concerns cameras destined for the European market, which for tax regulations are limited to 29 minutes and 59 seconds. This is annoying if you’re recording anything which lasts longer than half an hour, but it’s still four times longer than the maximum length in Motion JPEG, and you can of course just start recording a new clip when the first one ends.
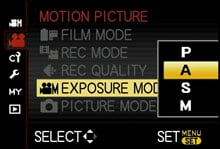
Turn the GH2’s mode dial to Creative Movie, and you can choose whether to record in Program, Aperture Priority, Shutter Priority or full Manual. You can choose shutter speeds from 1/25 to 1/4000 (or as slow as 1/2 in Manual Focus), and any aperture offered by the lens. You can set the sensitivity to auto, or manually set it to any value. Basically you have complete control over the exposure, sensitivity and depth of field.
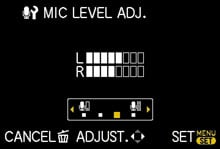
New to the GH2 are 24p Cinema and Variable Movie modes, both available when the camera’s set to Creative Movie. As its name suggests, 24p Cinema records progressive 1080 video at 24fps, which will delight independent film makers. They’ll also be pleased to find the GH2 offering generous bit rates of 17 or 24Mbit/s in the 24p Cinema mode, although many videographers will still look at Canon’s additional 25p and 30p options with envy. Like the GH1 you can connect an external microphone for better sound quality (albeit still using a 2.5mm jack), but you can now manually choose one of four recording levels and in a nice addition, choose to display tiny level meters in the corner of the screen.
These are all very considerate additions, but the icing on the cake for pros is the ability to output a clean 1080i output over HDMI while recording video; this is very useful when connecting and composing with an external monitor. Most DSLRs and hybrid cameras may output 1080i over HDMI in Live View, but scatter it with icons and downgrade the feed to standard definition as soon as you start recording. Not so with the GH2 which can drive external monitors with a nice, clean 1080i image, while recording, and even maintain a duplicate image on the camera’s own screen if desired; you could even have icons and level meters on the latter while keeping the HDMI output clean.
Moving onto the Variable movie modes, these allow you to slow the output to 80%, or speed it up to 160, 200 or 300%. So if you filmed a ten second clip in the 80% mode, it would take 12.5 seconds to playback, or 3.3 seconds in 300% mode.
The 80% option barely qualifies as slow motion though, so anyone hoping for 50% or slower will be disappointed. While the accelerated modes are fun, we also believe anyone who really wants to speed up footage is more likely to do so in a software editor after the event. Indeed software tools can also be used to deliver surprisingly good slow motion effects. The bottom line though is the GH2 cannot be classed as a proper slow motion video camera.
This is however just one minor feature where the Lumix GH2’s movie experience doesn’t excel. The degree of control and quality of the footage is as good as any hybrid / DSLR we’ve tested, and one area where it easily takes the lead over most is in terms of autofocusing while filming.
To date, most traditional DSLRs either perform painfully slow and obvious focusing searches while filming, or don’t bother at all and force you to manually focus. Sony’s Alpha SLT A33 and A55 sport a far superior experience thanks to their translucent mirrors allowing phase-change AF sensors to remain active during filming, but focusing can still be audible with common lenses.
In contrast, the Lumix GH2 manages to focus quickly and quietly even with its kit lens, and especially so with the 14-140mm super-zoom. Don’t get us wrong, it’s not perfect: the GH2’s contrast-based AF can’t help but search back and forth, even if only by a tiny amount and for an instant, in order to confirm focus, whereas the Sony SLT’s phase-change AF tends to avoid it. But on the whole the Lumix GH2 locks-on quickly, quietly and without fuss. It’s the closest we’ve experienced to a dedicated camcorder, which lest we forget employ smaller sensors and shorter actual focal lengths which enjoy a larger inherent depth-of-field.
As described and demonstrated in the AF section above, the GH2 also inherits a neat option from modern camcorders where you can use the touch-screen to tap on the subject you’d like the camera to refocus on, while you’re filming. This is great for pulling-focus between subjects without recomposing the shot. Again as seen in the sample video earlier on this page, there can still be a little visible searching, but it remains a useful and enjoyable feature for those who don’t want to manually pull-focus; check out the sample if you’ve not already done so.
Speaking of samples, let’s now see some more examples of the GH2’s movie mode in practice, which were all filmed with the 14-140mm zoom and unless otherwise stated, using the camera’s 1080i AVCHD mode in Program.
We’ll start as always with a handheld pan, including a full optical zoom towards the end. The clip starts pointing down at bright reflections on water, which caused no streaking with the GH2’s MOS sensor. As we panned around, the stabilisation did a good job at ironing out most wobbles. Finally towards the end of the clip we zoomed the lens all the way in and back out again. Like all cameras with manual zoom rings, this process is nigh-on impossible to perform handheld without twisting the body, and the result looks pretty bad. To be fair to the GH2 though, the situation is no different on the Sony SLT cameras or indeed any DSLR with video, and in the GH2’s favour it did at least refocus the image quickly and keep it steady once we’d repositioned our grip. We filmed a similar clip moments later with the 14-42mm zoom for comparison – you can view and download it here.
| |||
|---|---|---|---|
| |||
Our second clip was filmed under stricter conditions, mounted on a tripod with a fluid head, smoothly panning from left to right; stabilisation was disabled for this clip. We’ve paused briefly at the start to allow you to frame-grab if desired. We re-filmed this sequence in the GH2’s 24p Cinema mode for comparison, which you can see and download here.
| |||
|---|---|---|---|
| |||
Our third clip demonstrates how quickly and effectively the GH2 refocuses when zooming. We used the 14-140mm lens for this clip and if you adjust it fairly slowly, the camera manages to keep the image in focus pretty effectively. Crash zooms in or out inevitably trip the system up with a little searching, but not for long on the GH2 which locks back on again fairly swiftly.
| |||
|---|---|---|---|
| |||
Our fourth clip heads indoors where we put the GH2 into Manual exposure mode, selecting a shutter speed of 1/25 and the maximum aperture of f4, before then adjusting the sensitivity for the desired brightness; in this example, we set the sensitivity to 1600 ISO. The camera was then panned handheld with stabilisation enabled, although we disabled Continuous AF to avoid unnecessary searching. The result seen here is pretty good, without any detrimental noise or banding artefacts, despite the relatively high sensitivity. A good result here for the GH2 under low light with a reasonably high ISO.
| |||
|---|---|---|---|
| |||
Moving on, we wanted to demonstrate the GH2’s continuous autofocusing in action. Our first example below was filmed handheld with the focus point locked to the centre of the frame, and with Continuous AF enabled in the movie menus. We then simply rested the AF area over various subjects in the room to see how quickly and easily the camera would refocus. In practice the Lumix GH2 does a great job, out-performing any other contrast-based AF system we’ve tested to date. There’s a brief period of searching as the camera is pointed at a new subject, but it’s over fairly quickly, and with barely any audible evidence of the lens either. Before getting too carried away with the GH2 though, it’s worth comparing a similar clip filmed with the Sony SLT-A33, which also managed to refocus quickly, albeit with less searching (but more focusing noise).
| |||
|---|---|---|---|
| |||
Next for anyone who missed it earlier on the page we’d like to show you the Lumix GH2’s tap-focusing in action for movies. Here we disabled Continuous AF in the menu, which means the GH2 will only refocus on a subject when you either half-press the shutter release or tap on the screen. The benefit of the latter is you don’t need to recompose the shot so that an AF area rests on the desired subject – simply tap the thing you’d like the camera to refocus itself on. In the video, which was shot in Manual mode at the maximum aperture and a sensitivity of 400 ISO, you can see the camera refocusing on various areas via a simple tap on the screen, and although there’s again a little searching, it’s got to be one of the easiest examples of pulling-focus we’ve experienced.
| |||
|---|---|---|---|
| |||
In the next example we wanted to test the GH2’s continuous autofocusing when it came to tracking a moving subject – in this case a cable car on the Skyline Gondola, steadily approaching. To maximise the challenge we zoomed the 14-140mm all the way to 140mm and selected the maximum aperture in Manual mode. As you can see in the clip, there’s little if anything to fault the GH2 on. The camera and lens successfully track the approaching subject with no visible errors or searching. Indeed it even maintained sharp focus when the cable car was directly alongside, delivering a nice close-up of the bikes. A triumph for the GH2.
| |||
|---|---|---|---|
| |||
Here’s another example of focus-tracking with the 14-140mm when fully zoomed-in, although this time the action is faster. We filmed one of Queenstown’s famous Shotover Jet boats approaching at high speed before performing a 360 degree turn. Again the GH2 impressively kept the action sharp thoughout.
| |||
|---|---|---|---|
| |||
Just before wrapping-up this section, here are a couple of clips to illustrate the Lumix GH2’s new Extra Tele Converter option in action. This takes the Movie Crop mode pioneered by Canon on its recent DSLRs and runs with it to the logical conclusion. The theory goes as follows: most camera sensors sport many more pixels than are required to record a video frame. For example, when set to the 16:9 aspect ratio, the GH2’s sensor features 4976×2800 pixels, but when recording Full HD, only needs a frame measuring 1920×1080 pixels. In practice, most cameras employ the full width of their sensor and ‘bin’ spare pixels to generate the required video resolution, either by throwing away data, or combining adjacent pixels for greater sensitivity.
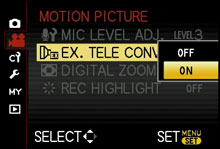 |
Canon’s idea was to offer an additional mode which didn’t bin pixels and instead simply recorded the required video resolution from a cropped area in the middle of the frame. This crop effectively magnified the image, but unlike a digital zoom or cropping in software later, it maintained the resolution. It was a great idea, but Canon only implemented it for VGA video. While this maximised the effective magnification, it would have been nice to also offer HD options.
Which is where the Lumix GH2’s Extra Tele Converter comes in, allowing you to apply the same trick, but for 720p and 1080i footage. With Extra Tele Converter enabled and the camera set to 720p, it grabs a 1280×720 pixel frame from the middle of the 4976×2800 pixel sensor, thereby delivering 3.9x magnification. When set to 1080i with its larger 1920×1080 pixel frame, the magnification is obviously decreased, but still represents 2.6x. So with the 14-140mm lens zoomed-into 140mm, the Extra Tele Converter effectively turns it into 364mm for 1080i footage or 546mm for 720p – and remember the Micro Four Thirds format effectively multiplies these by a further two times into 728mm and 1092mm respectively.
Panasonic Lumix DMC-GH2 using 14-140mm at 140mm 1080i footage with Extra Tele Converter disabled |
Panasonic Lumix DMC-GH2 using 14-140mm at 140mm 1080i footage with Extra Tele Converter enabled | |
Download the original file (Registered members of Vimeo only) |
Download the original file (Registered members of Vimeo only) | |
Above are two videos filmed moments apart from a tripod with the GH2 and 14-140mm fully zoomed-in. The first shows 1080i footage as normal, while the second shows 1080i footage with the Extra Tele Converter enabled. As always, feel free to download the originals for personal use to confirm the resolution of both is 1920×1080 without any interpolation.
Panasonic Lumix DMC-GH2 using 14-140mm at 140mm 720p footage with Extra Tele Converter disabled |
Panasonic Lumix DMC-GH2 using 14-140mm at 140mm 720p footage with Extra Tele Converter enabled | |
Download the original file (Registered members of Vimeo only) |
Download the original file (Registered members of Vimeo only) | |
Above are two videos filmed moments apart from a tripod with the GH2 and 14-140mm fully zoomed-in. The first shows 720p footage as normal, while the second shows 720p footage with the Extra Tele Converter enabled. Again the originals confirm the resolution of both is 1280×720 without any interpolation.
The Extra Tele Converter is a really nice feature to have as it effectively magnifies your image without compromising resolution. The only downside is the lack of pixel binning could result in higher noise or more chance of visibly ‘stuck’ pixels, but this aside it’s a useful facility to have at your disposal. Canon users can only hope the company follows-suit and offers HD Movie Crop options in its future DSLRs.
Panasonic Lumix DMC-GH2 continuous shooting
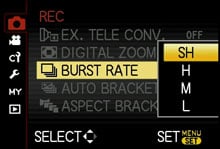
The faster readout of the Lumix GH2’s sensor now allows it to support quicker continuous shooting than its predecessor. The earlier GH1 could shoot at a maximum quoted speed of 3.5fps, which the GH2 accelerates to 5fps at the full resolution. There are also lower speeds of 3 and 2fps if preferred, along with a Super High Speed option which reduces the resolution to 4 Megapixels, but fires off 40 frames in a second.
If the AF mode is set to Continuous and Focus Priority set to On, the GH2 will attempt to predict and track a moving subject, although sometimes at the cost of a slower burst speed. If maintaining a high frame rate is more important though, you can disable Focus Priority, albeit with the risk of some images not being perfectly in focus.
 |
With the GH2 set to AF-S, we fired-off eight Large Fine JPEGs in just under two seconds before the camera stalled; this corresponded to a rate of just over 4fps. Switching to AF-C with Focus Priority On or Off though saw the rate fall to just 2fps, again for no more than seven or eight Large Fine JPEGs. Reducing the quality to Large Standard JPEG allowed us to keep shooting indefinitely, but at the same frame rates.
With the GH2’s Burst mode set to 3fps and AF-S, the camera delivered its quoted frame rate, again for a burst of just seven or eight Large Fine JPEGs, or indefinitely when set to Large Standard. Again when the AF mode was changed to AF-C, the frame rate reduced to around 2fps.
For quick bursts, the Super High Speed option fared better, capturing the quoted 40 frame burst in a fraction over a second. Note this mode fixes the focus on the first shot.
We also tested all the continuous shooting modes under real-life action conditions, photographing Queenstown’s famous Shotover Jet boats zooming past and performing 360 degree spins. The GH2 managed to capture some good sequences with sharp images as seen below and in the Gallery, although the maximum speed at the full resolution with continuous autofocusing was pretty leisurely at around 2fps. The Super High Speed burst proved more effective though, even if it was only at 4 Megapixels and not tracking the focus.
 |
 |
 |
 |
 | ||||
 |
 |
 |
 |
 |
If you’re into action photography, there is however one very important technical issue which affects all cameras with 100% Live View systems to date: between frames, the image displayed by the screen or viewfinder is not live, but the previous photo played-back. So while you have the shutter release held, you’re effectively shooting blind.
This causes a problem when the action requires panning, as you have no feedback as to where to point the camera other than the previous photo you took – by which time the subject will of course have moved-on. As such, panning on live view systems involves a certain degree of blind anticipation and adjusting the camera further than the image you’re viewing might suggest. It’s something you do get used to, but it’s nowhere as intuitive or easy as the optical viewfinder in a traditional DSLR which thanks to the speed of light gives a brief glimpse at what’s happening between frames, allowing you to recompose as required.
If the GH2 is set to High or Super High Speed, the image between frames is the previous one played back, but reduce the shooting speed to the 3 or 2fps modes and the camera has sufficient processing muscle to display a live image between frames. If you’re shooting with Continuous AF, you may as well select the 3fps mode as it delivered the same 2fps frame rate as the ‘High Speed’ mode, but with the benefit of Live View between frames.
We also compared the Sony Alpha A33 against the GH2 and found it could deliver around 6fps in practice while continuously autofocusing with its phase-change system; indeed the translucent nature of the A33’s mirror means it can actually keep autofocusing even while the pictures are being taken. It’s a far superior experience to the GH2 in this regard, although like the Panasonic, it still suffers from a lack of live feedback between frames. So while 100% Live View cameras are getting better at continuous shooting with each generation, the bottom line is a traditional DSLR with an optical viewfinder remains best for this kind of thing today.
To see how the quality of the Lumix GH2 measures-up in practice, take a look at our real-life resolution and high ISO noise results pages, browse the sample images gallery, or skip to the chase and head straight for our verdict.