Panasonic Lumix FT7 / TS7 review
-
-
Written by Ken McMahon
Quality
To test real-life performance, I shot this scene with the Panasonic Lumix FT7 /TS7 using its best quality JPEG mode. The Lumix FT7 / TS7 was mounted on a tripod and image stabilisation was disabled, the sensitivity was manually set to 80 ISO and Program auto mode was selected for the exposure. The Lumix FT7 / TS7 has two apertures – f3.3 and f10 at the wide angle lens setting and in the bright sunshine it chose the narrower f10. I also took a shot in Manual exposure mode with the aperture set to the wider f3.3 setting and comparing the two the f3.3 image was significantly better quality, so that’s the one I’ve used here.
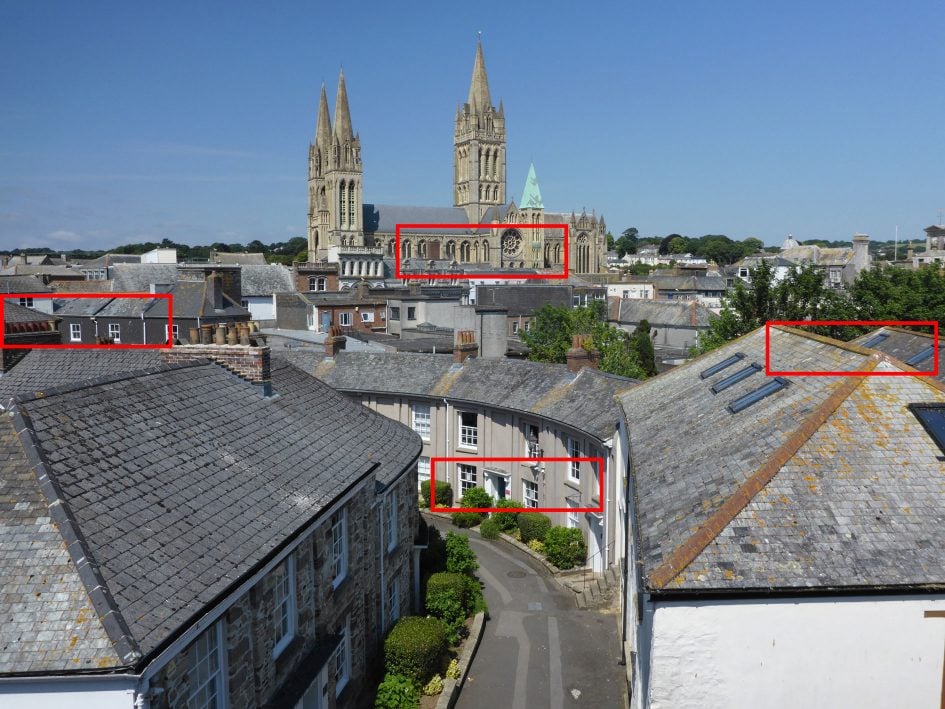
As usual, the crops below are taken from the areas marked in red above. Overall, the quality of the Lumix FT7 / TS7 crops looks to be pretty good. With a 20 Megapixel sensor the Lumix FT7 / TS7 is one of the highest resolution waterproof rugged compacts around; it’s way out ahead of the 12 Megapixel Olympus Tough TG-5, and beats the 16 Megapixel Nikon COOLPIX W300 by a significant margin. But does packing all those photosites onto a compact sensor provide any more detail, or is it just introducing other problems, like increased noise?
Looking closely at these 100 percent crops, I think there is evidence of a little bit of noise texture in all of them and I’d say it’s enough to just slightly compromise the image detail and sharpness. Despite that though these crops look pretty good and while those extra pixels may not deliver more visible detail than a waterproof comnpact with a lower resolution sensor, it doesn’t look to me like they’re delivering any less. The other thing to bear in mind is that you’ll be able to make bigger prints from the Lumix FT7 /TS7 (or show your photos on a huge screen) than from a lower resolution model. For example, the maximum size it would be sensible to print from the TOUGH TG-5 is roughly 50 x 38cm (20 x 15in). But with the Lumix FT7 /TS7 you could safely go up to 65 x 50cm (25 x 20in).
The only other thing to say about the crops from the Lumix FT7 / TS7 is that the quality is fairly consistent across the frame, though there’s a slight softening at the edges and a little bit of purple colour fringing on the first crop from close to the left edge of the frame. Next let’s see how that sensor performs at higher ISO sensitivity settings, lower on the page.

Panasonic Lumix FT7 /TS7 at 4.9mm (28mm equivalent) f3.3 80 ISO

Panasonic Lumix FT7 /TS7 at 4.9mm (28mm equivalent) f3.3 80 ISO

Panasonic Lumix FT7 /TS7 at 4.9mm (28mm equivalent) f3.3 80 ISO

Panasonic Lumix FT7 /TS7 at 4.9mm (28mm equivalent) f3.3 80 ISO
Panasonic Lumix FT7 / TS7 Noise
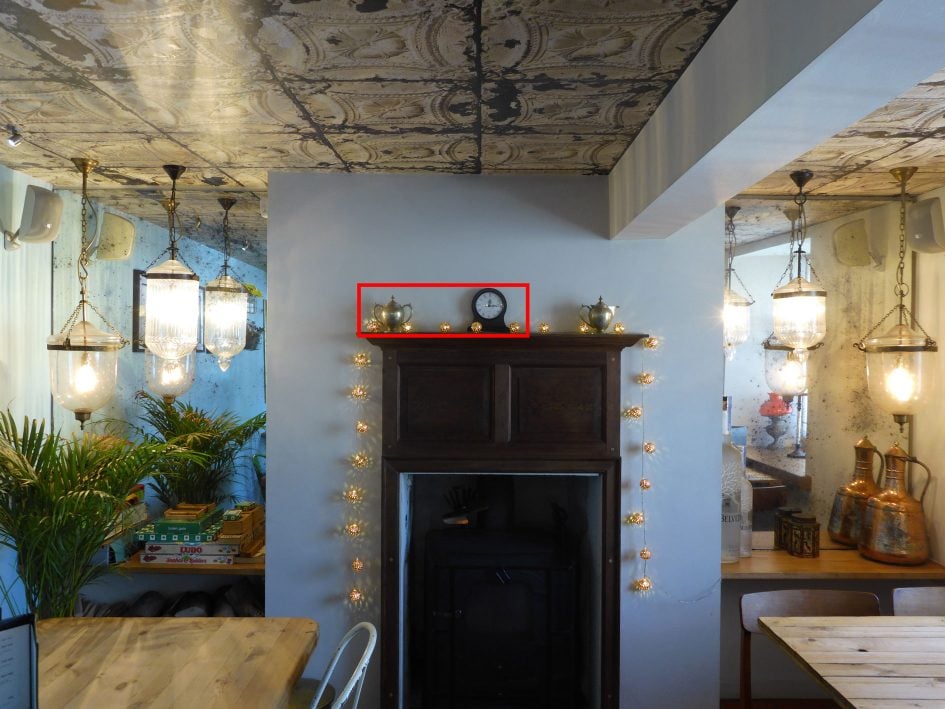
To examine noise levels under real-life conditions, I shot this scene with the Panasonic Lumix FT7 / TS7 at each of its ISO settings. The FT7 / TS7 was set to its best quality JPEG mode and mounted on a tripod with stabilisation disabled. The ISO sensitivity was manually set to the lowest available setting and Program auto mode was selected for the exposure. In the low light interior the Lumix FT7 / TS7 selected the widest f3.3 aperture which I’d previously determined produces the best quality results. At the base 80 ISO setting the exposure it selected was 1/5 at f3.3.
Looking at the base 80 ISO crop immediately below, if you look closely, you’ll see that there is already visible noise texture across the crop. You can see it in the flat colour of the wall, most noticeably in the shadow areas to the left of the clock and just above the mantelpiece. The edge between the mantelpiece and the wall is a little sketchy as a result of the noise suppression and the clock face detail isn’t as clear as it might be. These are the areas to watch as we go down the column of crops and ISO sensitivity increases.
At 100 ISO, even though it’s only a small increase in sensitivity, the shadows become more speckled and the clock face a little less clear. It’s only fair to point out that you’re unlikely to notice this other than pixel-peeping these 100 percent crops. At 200 ISO there’s another slight increase in the noise and now that mantelpiece edge is looking quite crumbly. At first glance the 400 ISO crop doesn’t look much worse than the 200 ISO one, but if you look closely, some of the detail has gone (you can no longer make out the second dividers on the clock face for example). That’s because the noise suppression has stepped up a gear and kept the texture at bay – but at the cost of image detail.
By 400 ISO I think we’re into the kind of quality degradation that a keen-eyed observer would spot at smaller than 100 percent sizes. And at 800 ISO, though Panasonic’s noise suppression is doing a sterling job of keeping the texture at bay, the image detail is really suffering. I would only want to venture above 1600 ISO if there was no other option, you might get away with it at smaller sizes, but a full size print isn’t going to look very pretty. The same goes, only more so, for the 3200 ISO and extended 6400 ISO setting.
Overall, the Lumix FT7 / TS7 does a good job at the base ISO setting, but once the sensitivity increases, noise quickly becomes a problem. Cameras with a lower pixel count on the sensor, like the 12 Megapixel Olympus TOUGH TG-5 won’t suffer from noise to quite the same degree. Not only that, the TOUGH TG-5 has a much brighter f2 aperture, which means that under the same lighting conditions you’ll be able to shoot at lower ISO sensitivity settings than with the Lumix FT7 /TS7.

Panasonic Lumix FT7 /TS7 80 ISO

Panasonic Lumix FT7 /TS7 100 ISO

Panasonic Lumix FT7 /TS7 200 ISO

Panasonic Lumix FT7 /TS7 400 ISO

Panasonic Lumix FT7 /TS7 800 ISO

Panasonic Lumix FT7 /TS7 1600 ISO

Panasonic Lumix FT7 /TS7 3200 ISO

Panasonic Lumix FT7 /TS7 6400 ISO
Next check out my sample images or skip to my verdict using the tabs above.
