Viltrox AF 35mm f1.8 review
-
-
Written by Thomas
Quality
Longitudinal Chromatic Aberration and focus shift
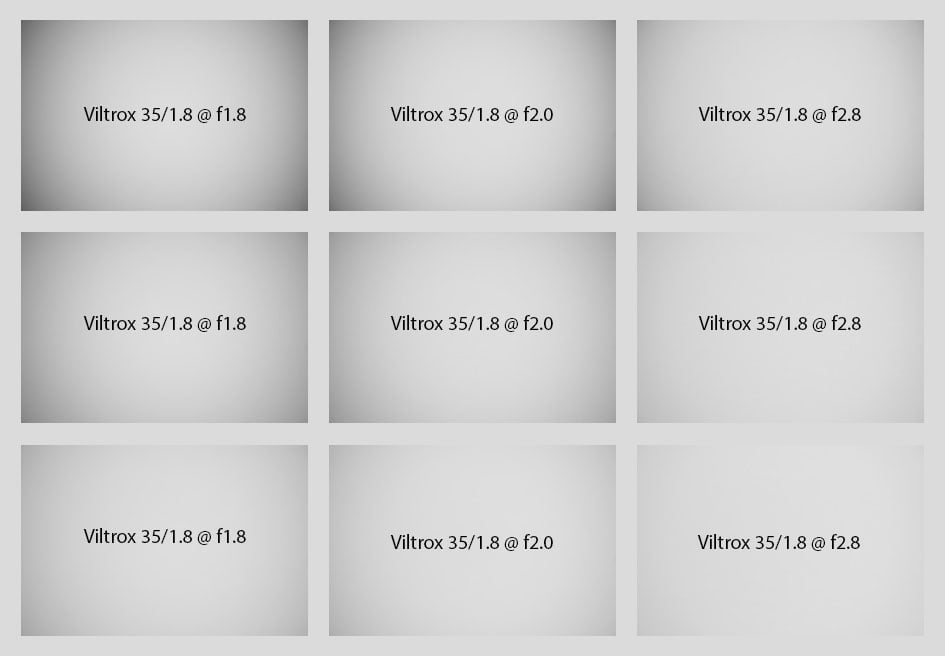
Lenses with focal ratios of f2.8 or larger are often prone to longitudinal color aberrations (loCA, a.k.a. “axial color” or “bokeh CA”). These show up as magenta coloration in the foreground and greenish hues in the background and are not easily corrected in post-processing. The Viltrox shows a bit of loCA but it is less pronounced than on the Nikon Z 35mm f1.8 Z and Sony FE 35mm f1.8 at distances of 1.5m or further away. It becomes stronger though the closer you focus.
Viltrox AF 35mm f1.8 Longitudinal Chromatic Aberration (loCA)
100% crops, from top to bottom: f1.8, f2.0, f2.8; left = foreground, right = background
When stopping down the background and foreground become equally sharper and there’s no focus shift.
The following real life shot shows that the Viltrox AF 35mm f1.8 produces quite some purple fringing around high-contrast edges in the focal plane:
Above: Viltrox AF 35mm f1.8 at f1.8; 100% crop; click image for 4k version, here for large original
The second image on the samples page of the fountain backlit by the sun also shows some coloration in the air bubbles.
Sharpness and contrast
Let’s have a look at the theoretical performance of the Viltrox AF 35mm f1.8 and compare it to the performance of the Nikon Z 35mm f1.8 S, Sigma 35mm f2 DG DN, and Sony FE 35mm f1.8:
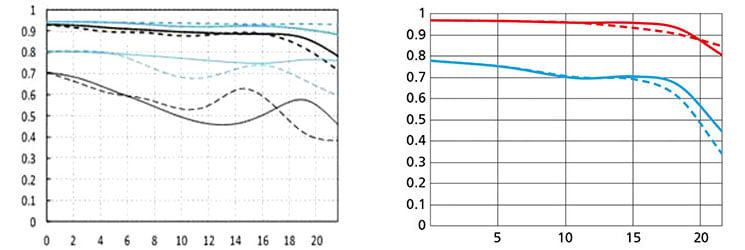
Above: Viltrox AF 35mm f1.8 (black=f1.8, blue=f8), Nikon Z 35mm f1.8 S (at f1.8)
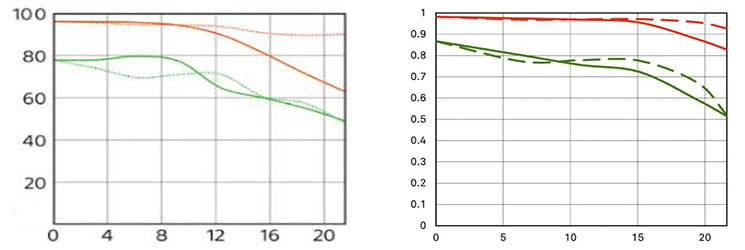
Above: Sony FE 35mm f1.8 (at f1.8), Sigma 35mm f2 DG DN (at f2.0)
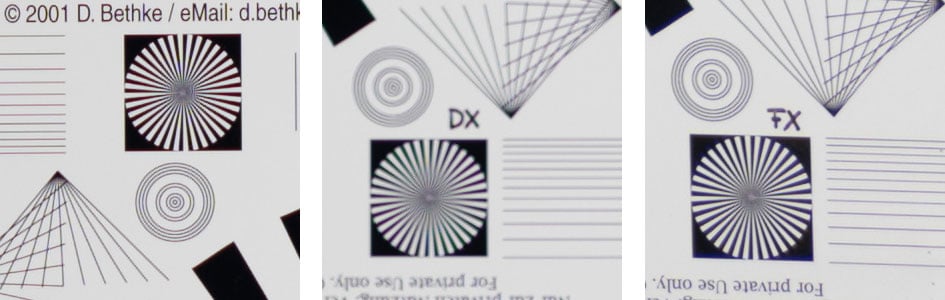
The MTF charts show the computed contrast-curves at 10 line-pairs/mm and 30 lp/mm without influence of diffraction. Higher values are better (more contrast) and the closer the dotted and solid lines are together the less contrast dependents on the orientation of the test-pattern (less astigmatism). The x-axis displays the distance from the optical axis (=center of the sensor) in mm. I’ll show you the real-life performance at 4 mm (“center”), 13 mm (APS-C/DX-corner), and 20 mm (FF/FX-corner) on a 45MP Nikon Z7 body.
From the charts the Viltrox AF 35mm f1.8 (at f1.8, black lines) should be the softes of the four lenses wide open with a low point around the APS-C/DX-corner and a bit of recovery towards the FF/FX-corner. Even at f8.0 (blue lines) the Viltrox looks only slightly sharper than the other lenses wide open.
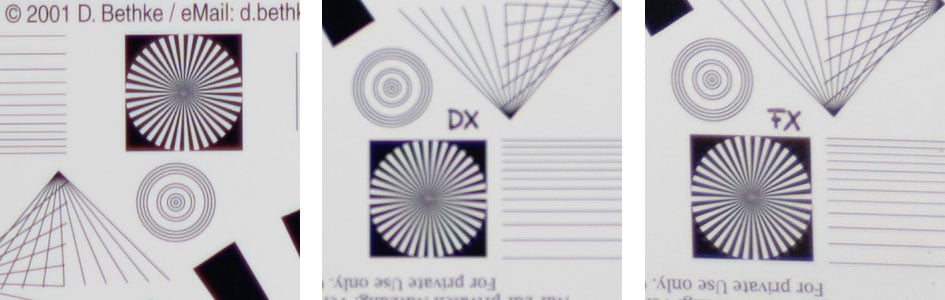
Let’s see how this theoretical performance of the Viltrox translates into real life results in the sharpness test based on Siemens-stars. Processing was done in Lightroom 11.5/CRAW 14.5 from RAW to Adobe Color profile with only CA compensation applied. Noise-reduction is set to 0, sharpening to 50/0.5/36/10, with no extra tone, color, or saturation adjustment. White-balance was adjusted to a neutral white and I did some exposure compensation to make the brightness of all crops match. So you will not see light fall-off in the corners.
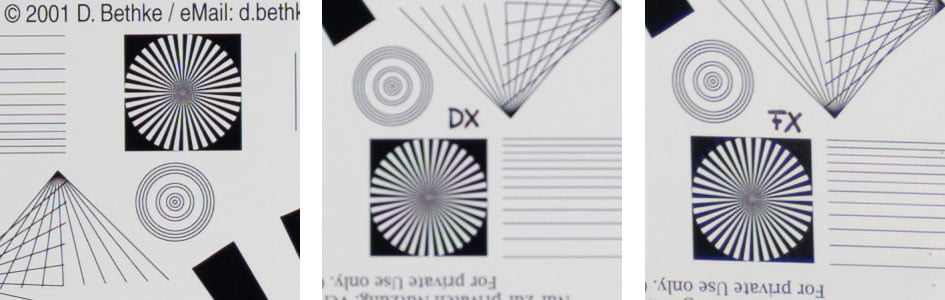
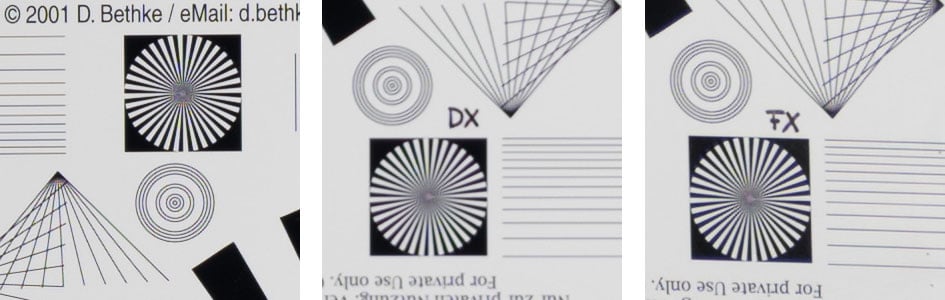
The following 100% crops show the Viltrox AF 35mm f1.8 from f1.8 down to f11 compared to the Nikon Z 35mm f1.8 S and Sony FE 35mm f1.8 (shot on a Sony A7R II). With linear resolution of the 45MP Z7 sensor only 4% higher than from the 42MP A7R II, identical test set-up and identical RAW processing (except for the use of the built-in lens-profiles for the Z-Nikkor and Sony FE) the comparability between the test-shots should be very good.
Viltrox AF 35mm f1.8 compared; 100% crop from center, APS-C/DX-corner, FF/FX-corner
Above: Viltrox AF 35mm f1.8 at f1.8
Above: Nikon Z 35mm f1.8 S at f1.8
Above: Sony FE 35mm f1.8 shot on Sony A7R II at f1.8
Above: Viltrox AF 35mm f1.8 at f2.0
Above: Viltrox AF 35mm f1.8 at f2.8
Above: Viltrox AF 35mm f1.8 at f4.0
Above: Viltrox AF 35mm f1.8 at f5.6; also available at f8.0, f11
At f1.8 and f2.0 the Viltrox AF 35mm f1.8 looks soft in the center and pretty mushy in the APS-C/DX-corner. Surprisingly the FF/FX-corner reveals almost as much detail as the center. The center and FF/FX-corner sharpen up nicely with every stop of the aperture – with f4.0 delivering good to very good performance. But the APS-C/DX-corner needs stopping further down to f5.6 or f8.0 to improve to OK or good sharpness. The Nikon Z 35mm f1.8 S and Sony FE 35mm f1.8 are clearly sharper in the APS-C/DX image-circle. Field-curvature of the Viltrox is quite pronounced and you better focus at the point where you want the image to be sharpest.
Performance at long distances
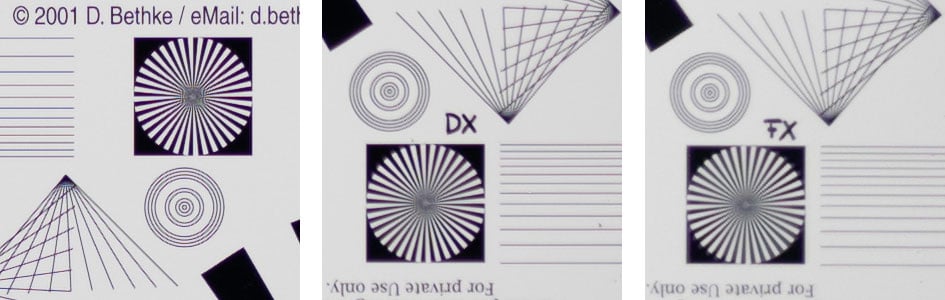
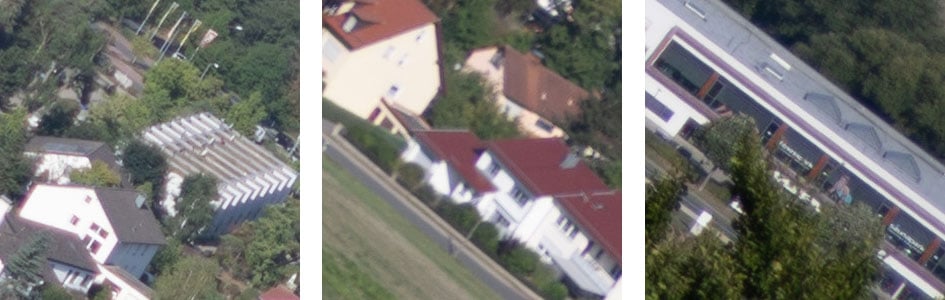
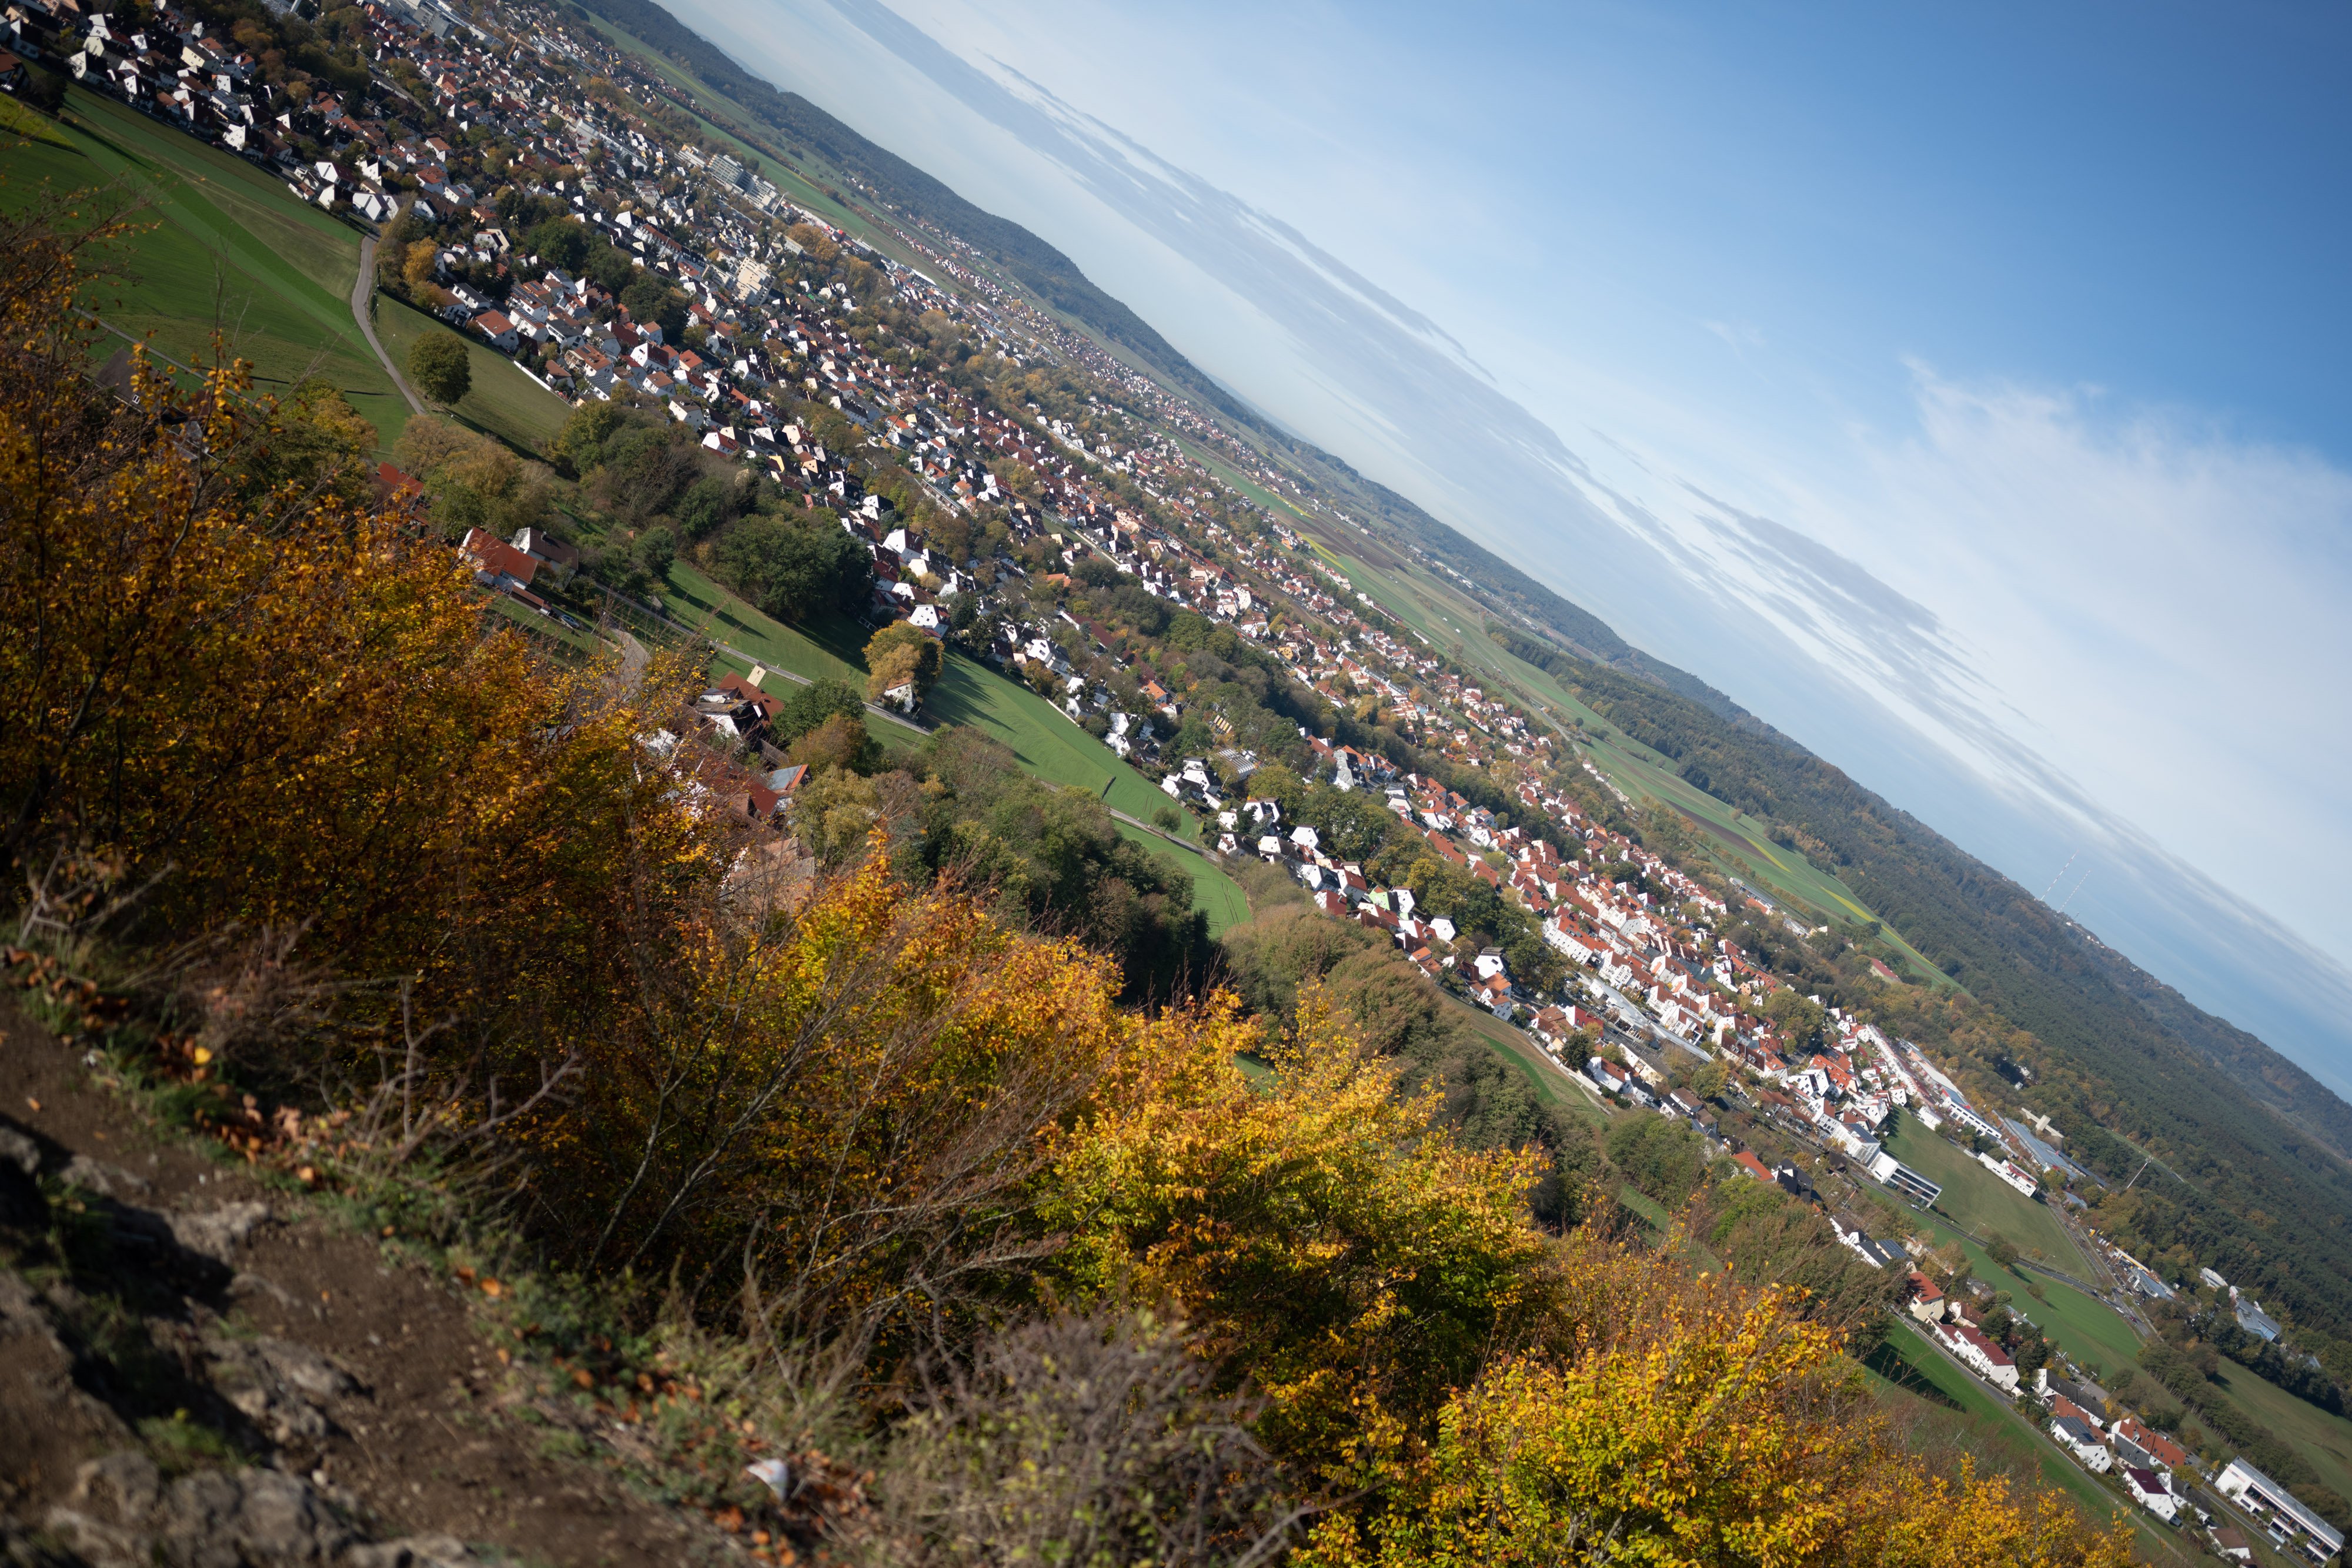
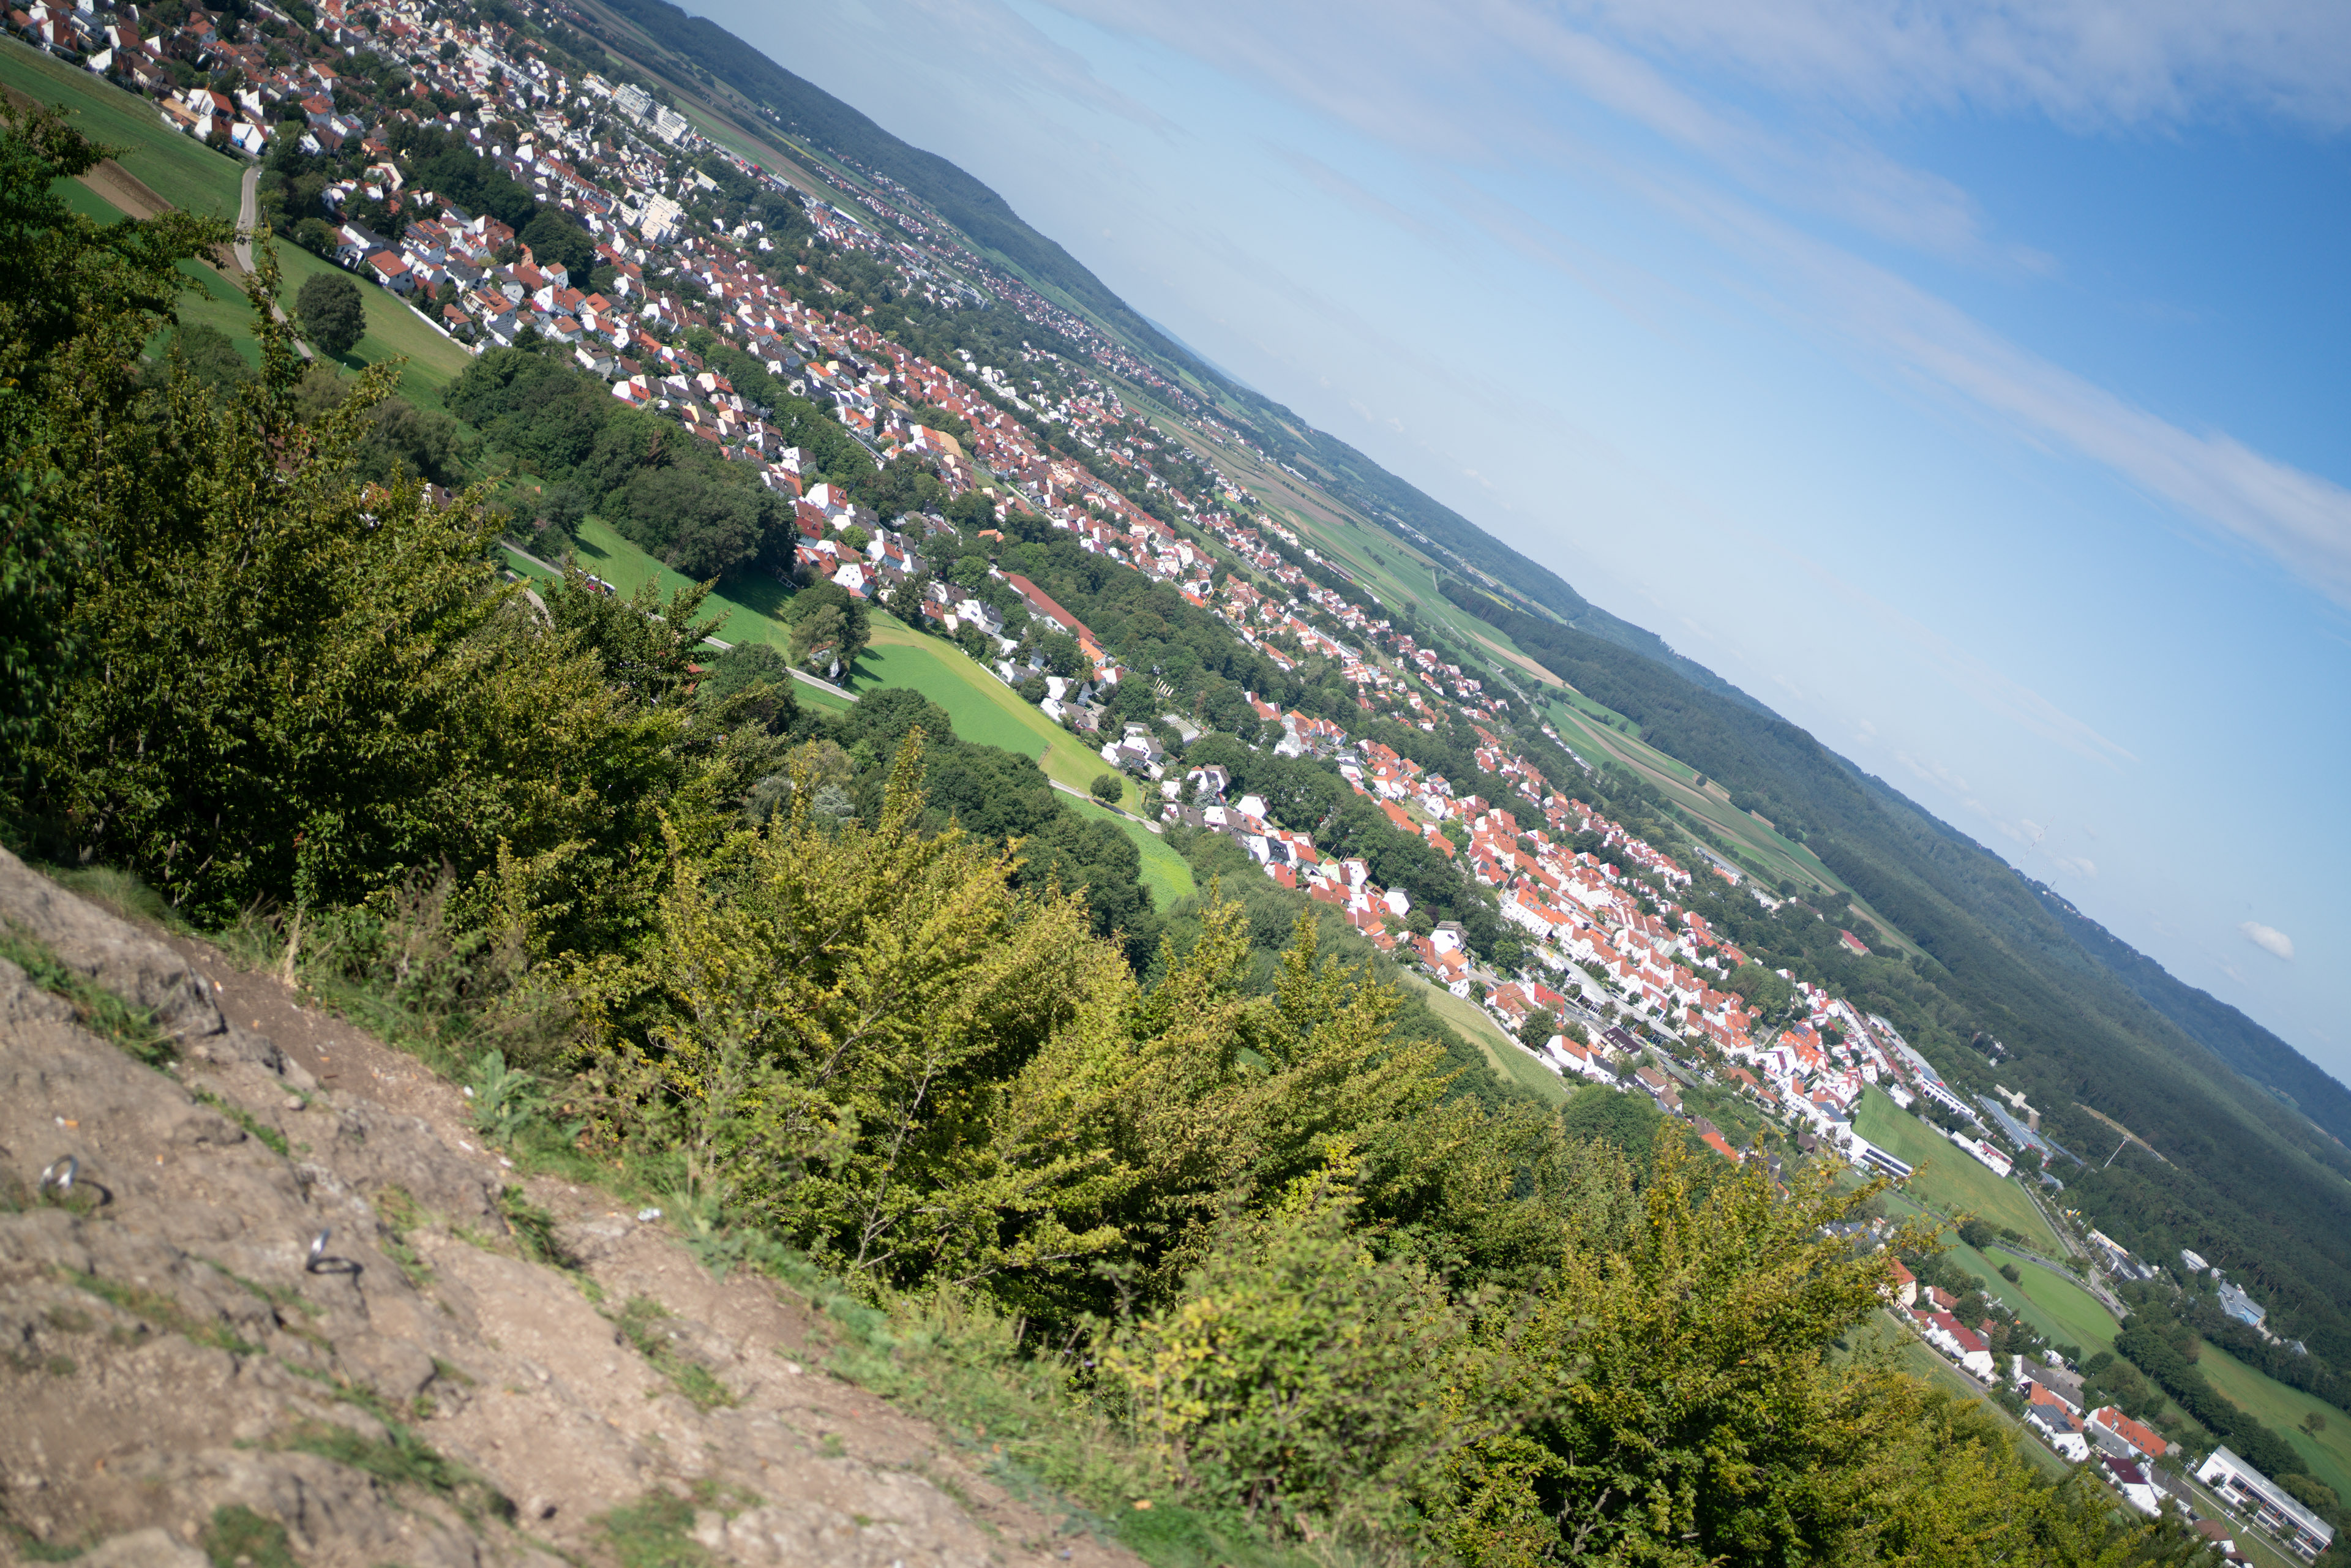
The Siemens-star test-targets are shot at a distance of 45x focal length (i.e. at around 1.6m for 35mm focal length). But performance of lenses also depends on the shooting distance. Therefore I present another series of test-shots of a city around 1 km away. Processing was done in Lightroom 11.5/CRAW 14.5 from RAW to Adobe Color profile with the Adobe lens-profile applied to reduce distortions (200%) and light fall-off (50%). CA-removal is On, Noise-reduction set to 0, sharpening to 50/0.5/36/10, with no extra tone, color, or saturation adjustment. I used manual focus at the largest aperture and did not change focus for other apertures. All shots were made at base ISO and image stabilization switched off.
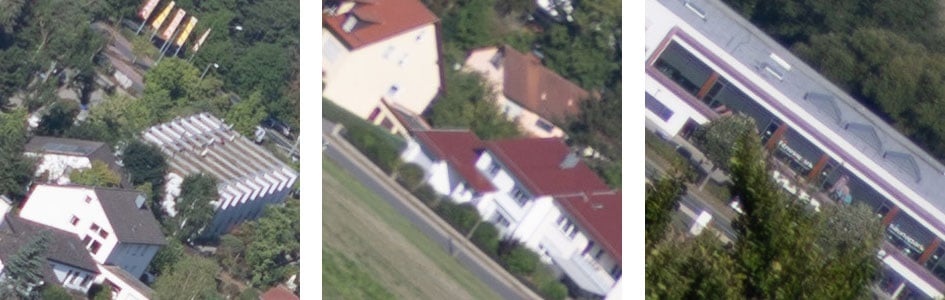
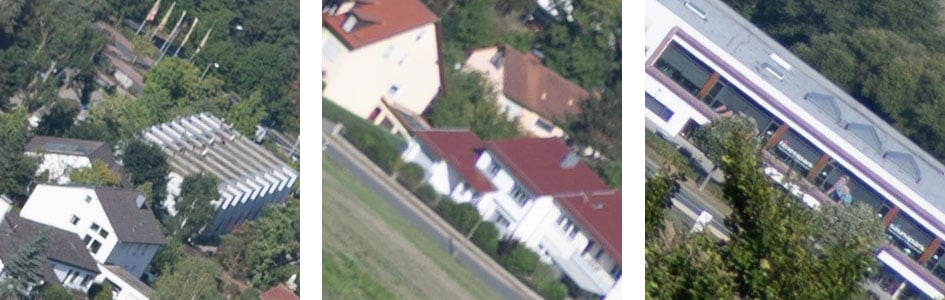
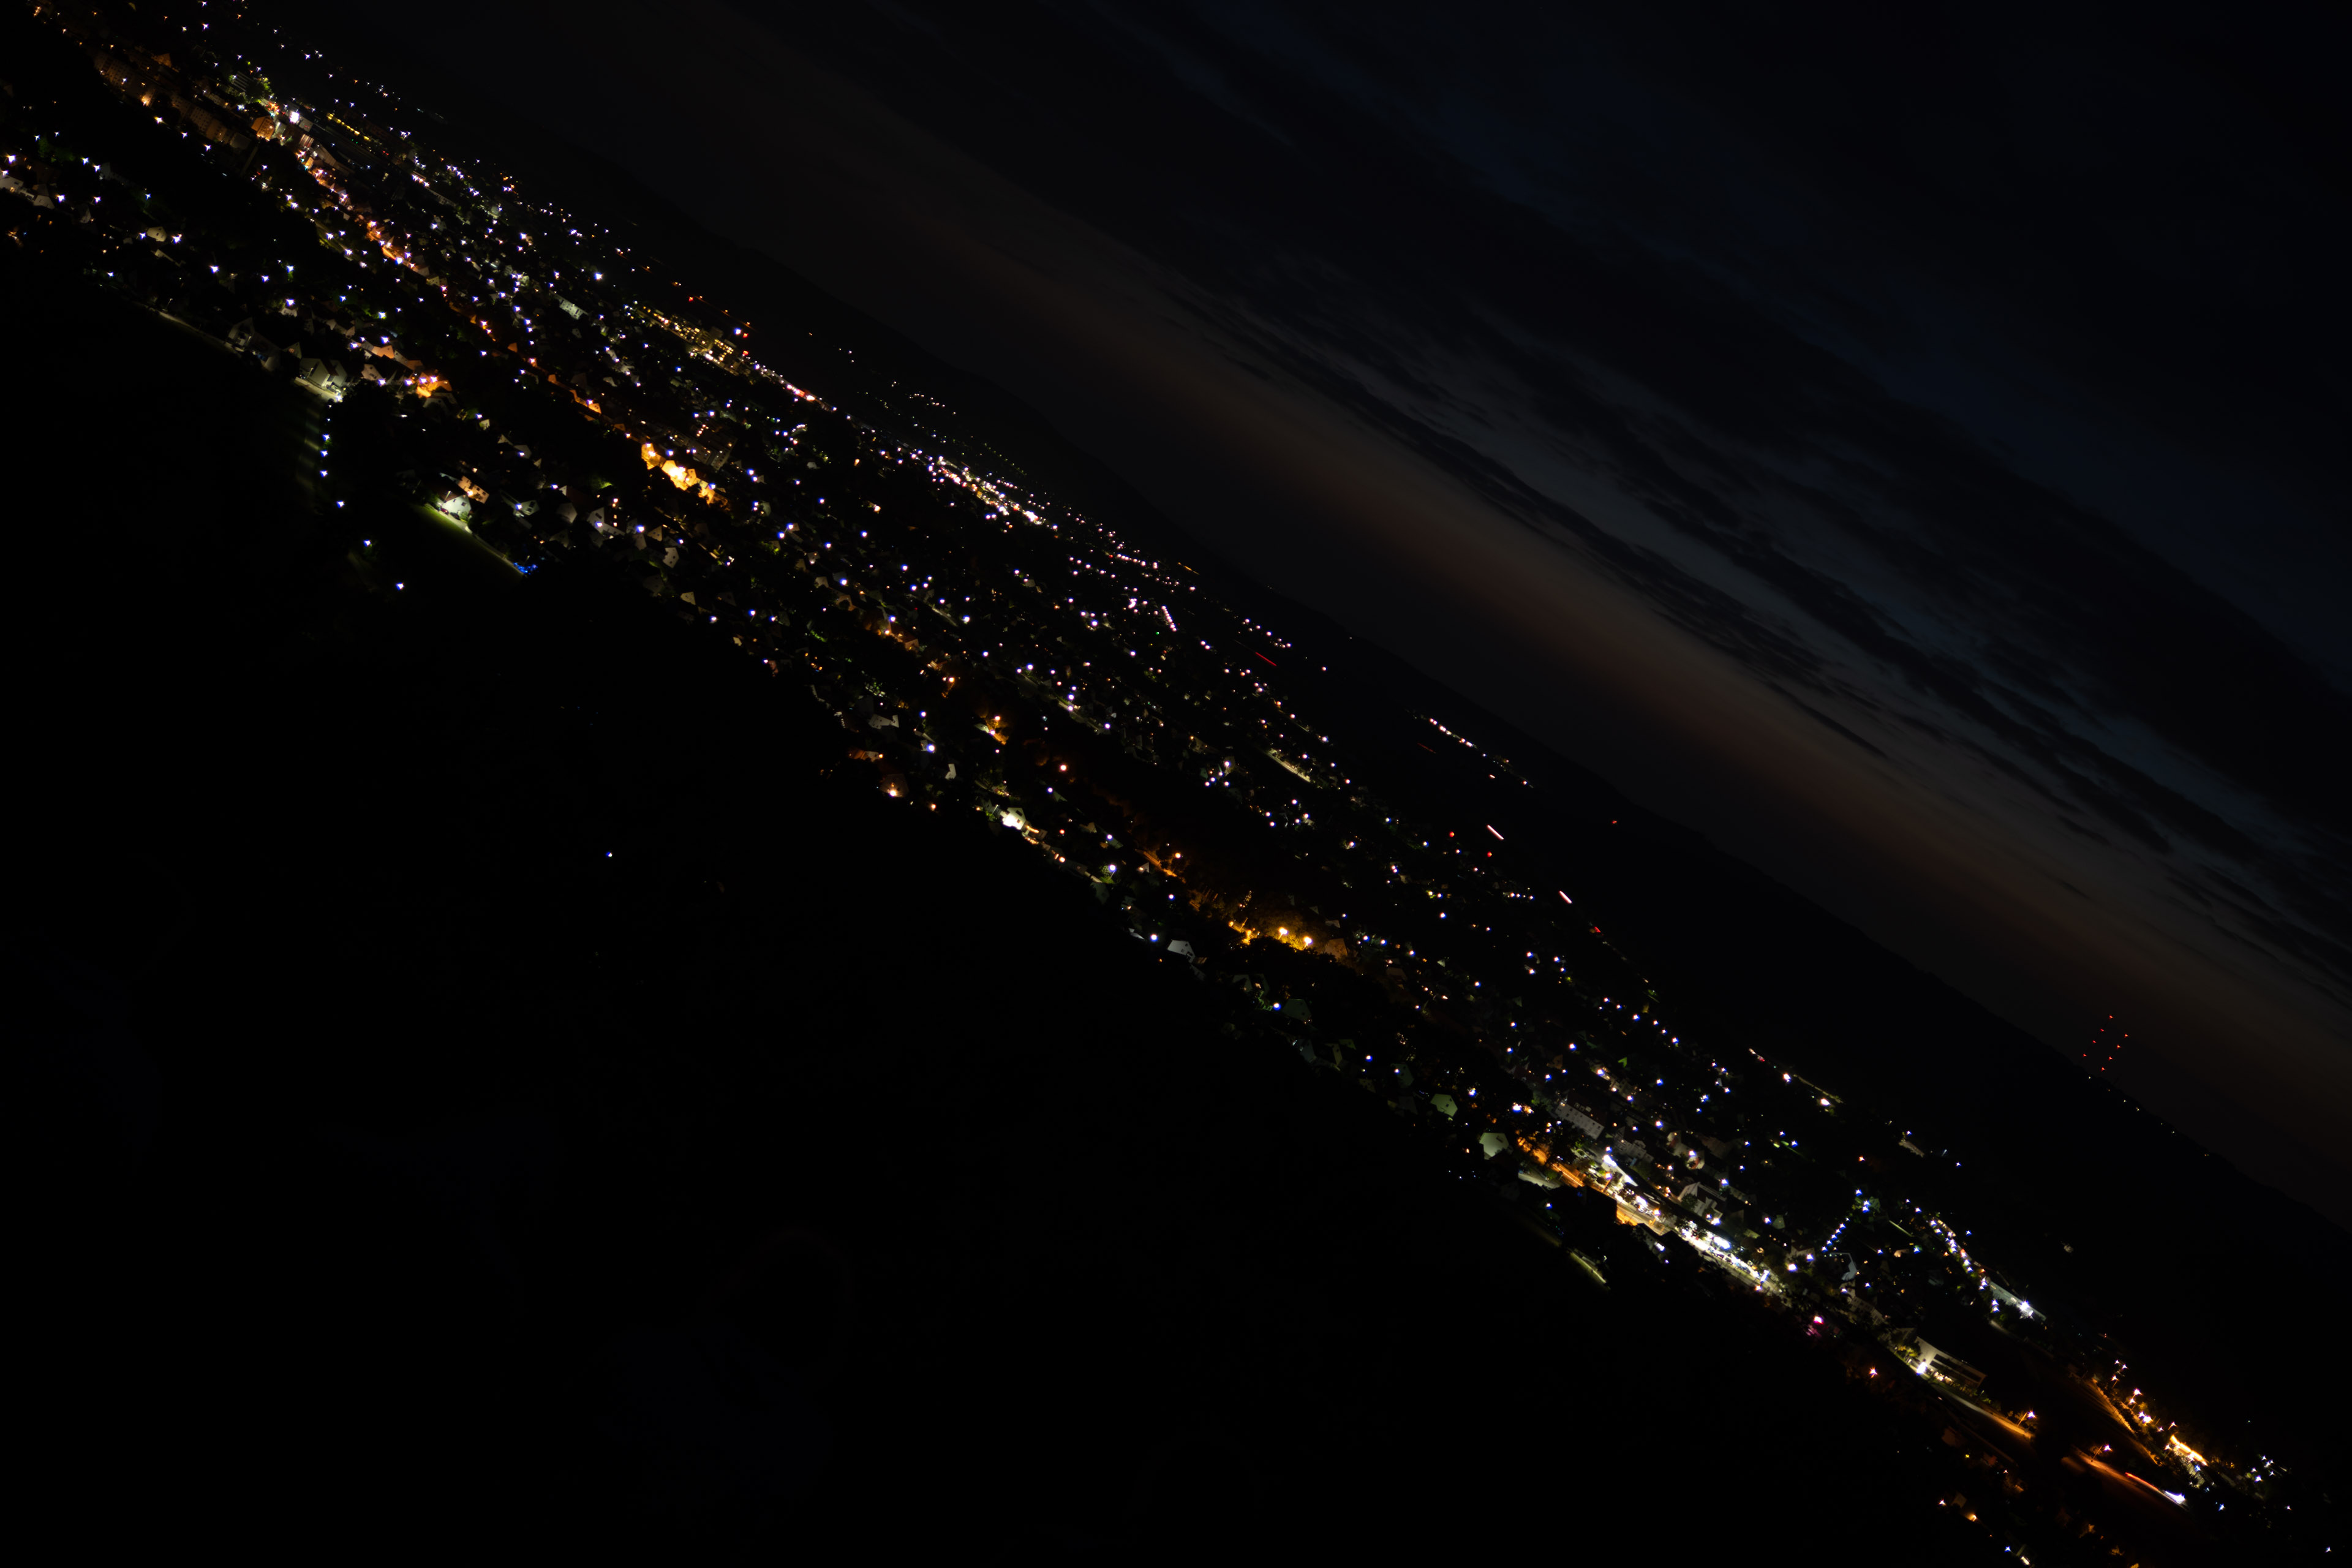
The following image shows the complete scene wide open to give you an impression of the angle of view. Following the main image are 100% crops from the center, APS-C/DX-corner, and FF/FX-corner from the Viltrox AF 35mm f1.8 compared to the Nikon Z 35mm f1.8 S and Sony FE 35mm f1.8 (shot on a Sony A7R II). The Z-Nikkor and Sony FE were shot at different days – but with roughly comparably atmospheric conditions. As usual I chose the better corner for this test as almost any lens is a bit decentered.
You can access the large originals but please respect our copyright and only use those images for personal use.

Above: Viltrox AF 35mm f1.8 at f1.8; click image for 4k version, here for large original
Above: Viltrox AF 35mm f1.8 at f1.8; 100% crops, click image for 4k version, here for large original
Above: Nikon Z 35mm f1.8 S at f1.8; 100% crops, click image for 4k version, here for large original
Above: Sony FE 35mm f1.8 shot on Sony A7R II at f1.8; 100% crops, click image for 4k version, here for large original
Above: Viltrox AF 35mm f1.8 at f2.0
Above: Viltrox AF 35mm f1.8 at f2.8

Above: Viltrox AF 35mm f1.8 at f4.0

Above: Viltrox AF 35mm f1.8 at f5.6; also available at f8.0, f11
In this ling distance test the Viltrox AF 35mm f1.8 again started relatively soft in the APS-C/DX image-circle but improves visibly already at f2.0. Stopping further down to f4.0 shows good to very good sharpness in the center and FF/FX-corner. But the area around the APS-C/DX-corner is still soft and needs stopping down to f8.0 for a satisfactory level of detail.
After looking at both sets of test images and the MTF chart it becomes clear that the Viltrox AF 35mm f1.8 and Viltrox AF 24mm f1.8 share a weak spot: It is the area around 8-16mm image height where both lenses are relatively soft and do not respond too quickly to stopping down. So for a good sharp landscape or architecture shot you should stop down to f5.6 or even f8.0.
Vignetting and distortions
To make it easier to see light fall-off in the corners of a full-frame sensor I’ve arranged a series of shots with the Viltrox AF 35mm f1.8 at different apertures. All images were developed from RAW to the same brightness in the center. Adobe’s RAW converter automatically applies vignette control as it was set in camera (Off in the first row, Normal in the second row) but you cannot alter the setting in postprocessing. In the third row I had vignette control set to Normal plus activated Adobe’s lens profile – but only at 50% as you would otherwise overcompensate vignetting:
Above: Viltrox AF 35mm f1.8 with vignette control Off (top), and vignette control Normal (middle), plus 50% additional lift from Adobe’s lens profile (bottom) at f1.8, f2.0, f2.8
Setting vignette control to Normal (middle row) gives the corners a lift of about 0.5 EV at f1.8 but vignetting of the Viltrox is still pretty strong wide open. Adding 50% vignetting correction from Adobe’s lens profile lifts the corners another 0.5 EV (bottom row) which makes vignetting inconspicuous.
Regarding distortions: Adobe’s RAW converter ignores what was set in camera and always corrects them. So I used JPGs to see the uncorrected distortions (first row):
Distortions of Viltrox AF 35mm f1.8: JPG with distortion compensation Off (top), RAW with distortion compensation On (middle), plus 200% additional compensation from Adobe’s lens profile (bottom)
Interestingly the second row with distortion compensation in camera set to On looks like the pincushion distortions got stronger and I had to dial in 200% distortion compensation in postprocessing via Adobe’s lens profile to get it reasonably straight. Unfortunately pin-cushion distortions become more extreme the closer you focus.
Again, like with the Viltrox AF 24mm f1.8, this is pretty confusing if you use the Viltrox AF 35mm f1.8 and want optimally corrected results. I personally would hesitate to switch vignette control or distortion compensation in my camera each time I swap lenses: You’re bound to forget this in the heat of a photo-shooting. I’d rather leave everything in camera at my usual settings (On + Normal) and then apply the Adobe lens-profile in post-processing with Vignette control at 50% and distortion compensation at 200% – unless Viltrox comes up with a firmware update to deal with the inconsistencies of distortion correction.
Rendering of point-light sources at night-shots
Night-shots pose a different challenge for lenses as the contrast is even higher than under bright sun and point-light sources can reveal some weaknesses such as coma, haloing and colour-aberrations that do not show up as prominently in other test-shots. The 100% crops below the main image show the effect of coma in the FF/FX-corner of the Viltrox at various apertures:
Above: Viltrox AF 35mm f1.8 at f1.8; click image for 4k version, here for large original
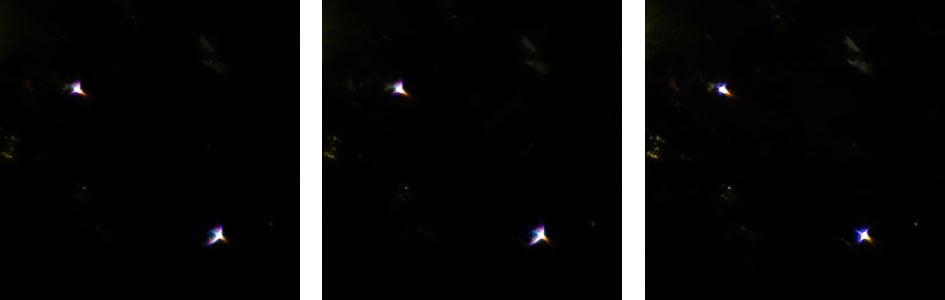
Above: Viltrox AF 35mm f1.8; 100% crops from the FF/FX-corner at f1.8 (left), f2.0 (middle), f2.8 (right)
The Viltrox AF 35mm f1.8 shows only little coma at f1.8 and f2.0 and at f2.8 the effect is practically gone. Looking at the large original there’s also quite a bit of magenta and blue haloing around street lights in the center at f1.8. But the effect is much reduced at f2.0 and completely gone at f2.8.
Bokeh quality
This test is for the rendering of point-light sources in an out-of-focus background. The circle of confusion that is produced by this test is pretty indicative of Bokeh performance (in the background) and light fall-off. Ideally the out-of-focus image of the point-light is evenly lit and perfectly circular, with no “onion-rings”, and without coloration. Large aperture lenses normally produce an effect known as “cat’s eye” the further away from the optical axis the point-light is projected. This is due to optical vignetting in the lens barrel when light enters the lens from an angle.
The crops below the main image are from the center, APS-C/DX-corner, and FF/FX-corner of the 4k version.
Above: Viltrox AF 35mm f1.8 at f1.8; click image for 4k version

Above: Viltrox AF 35mm f1.8 at f1.8; click image for 100% crops

Above: Viltrox AF 35mm f1.8 at f2.8; click image for 100% crops

Above: Viltrox AF 35mm f1.8 at f4.0; click image for 100% crops
The diameter of the Bokeh balls in the center is determined by the entrance pupil of the lens. So it’s the same size on all 35mm f1.8 lenses – if they are focused to the same distance/magnification. But the “beauty” of the balls is still important. Unfortunately all of the Viltrox AF lenses I’ve tested so far (except for the AF 85mm f1.8 II) are plagued by onion-rings and strong outlining tinted green. This is indicative of a pretty busy background Bokeh possibly with double contours. Compression of the circle towards the corners on the Viltrox AF 35mm f1.8is not that pronounced although the effect already starts in the APS-C/DX-corner at f1.8. But at f2.8 this is practically a non-issue. The aperture blades are not well-rounded and show up already at f2.8.
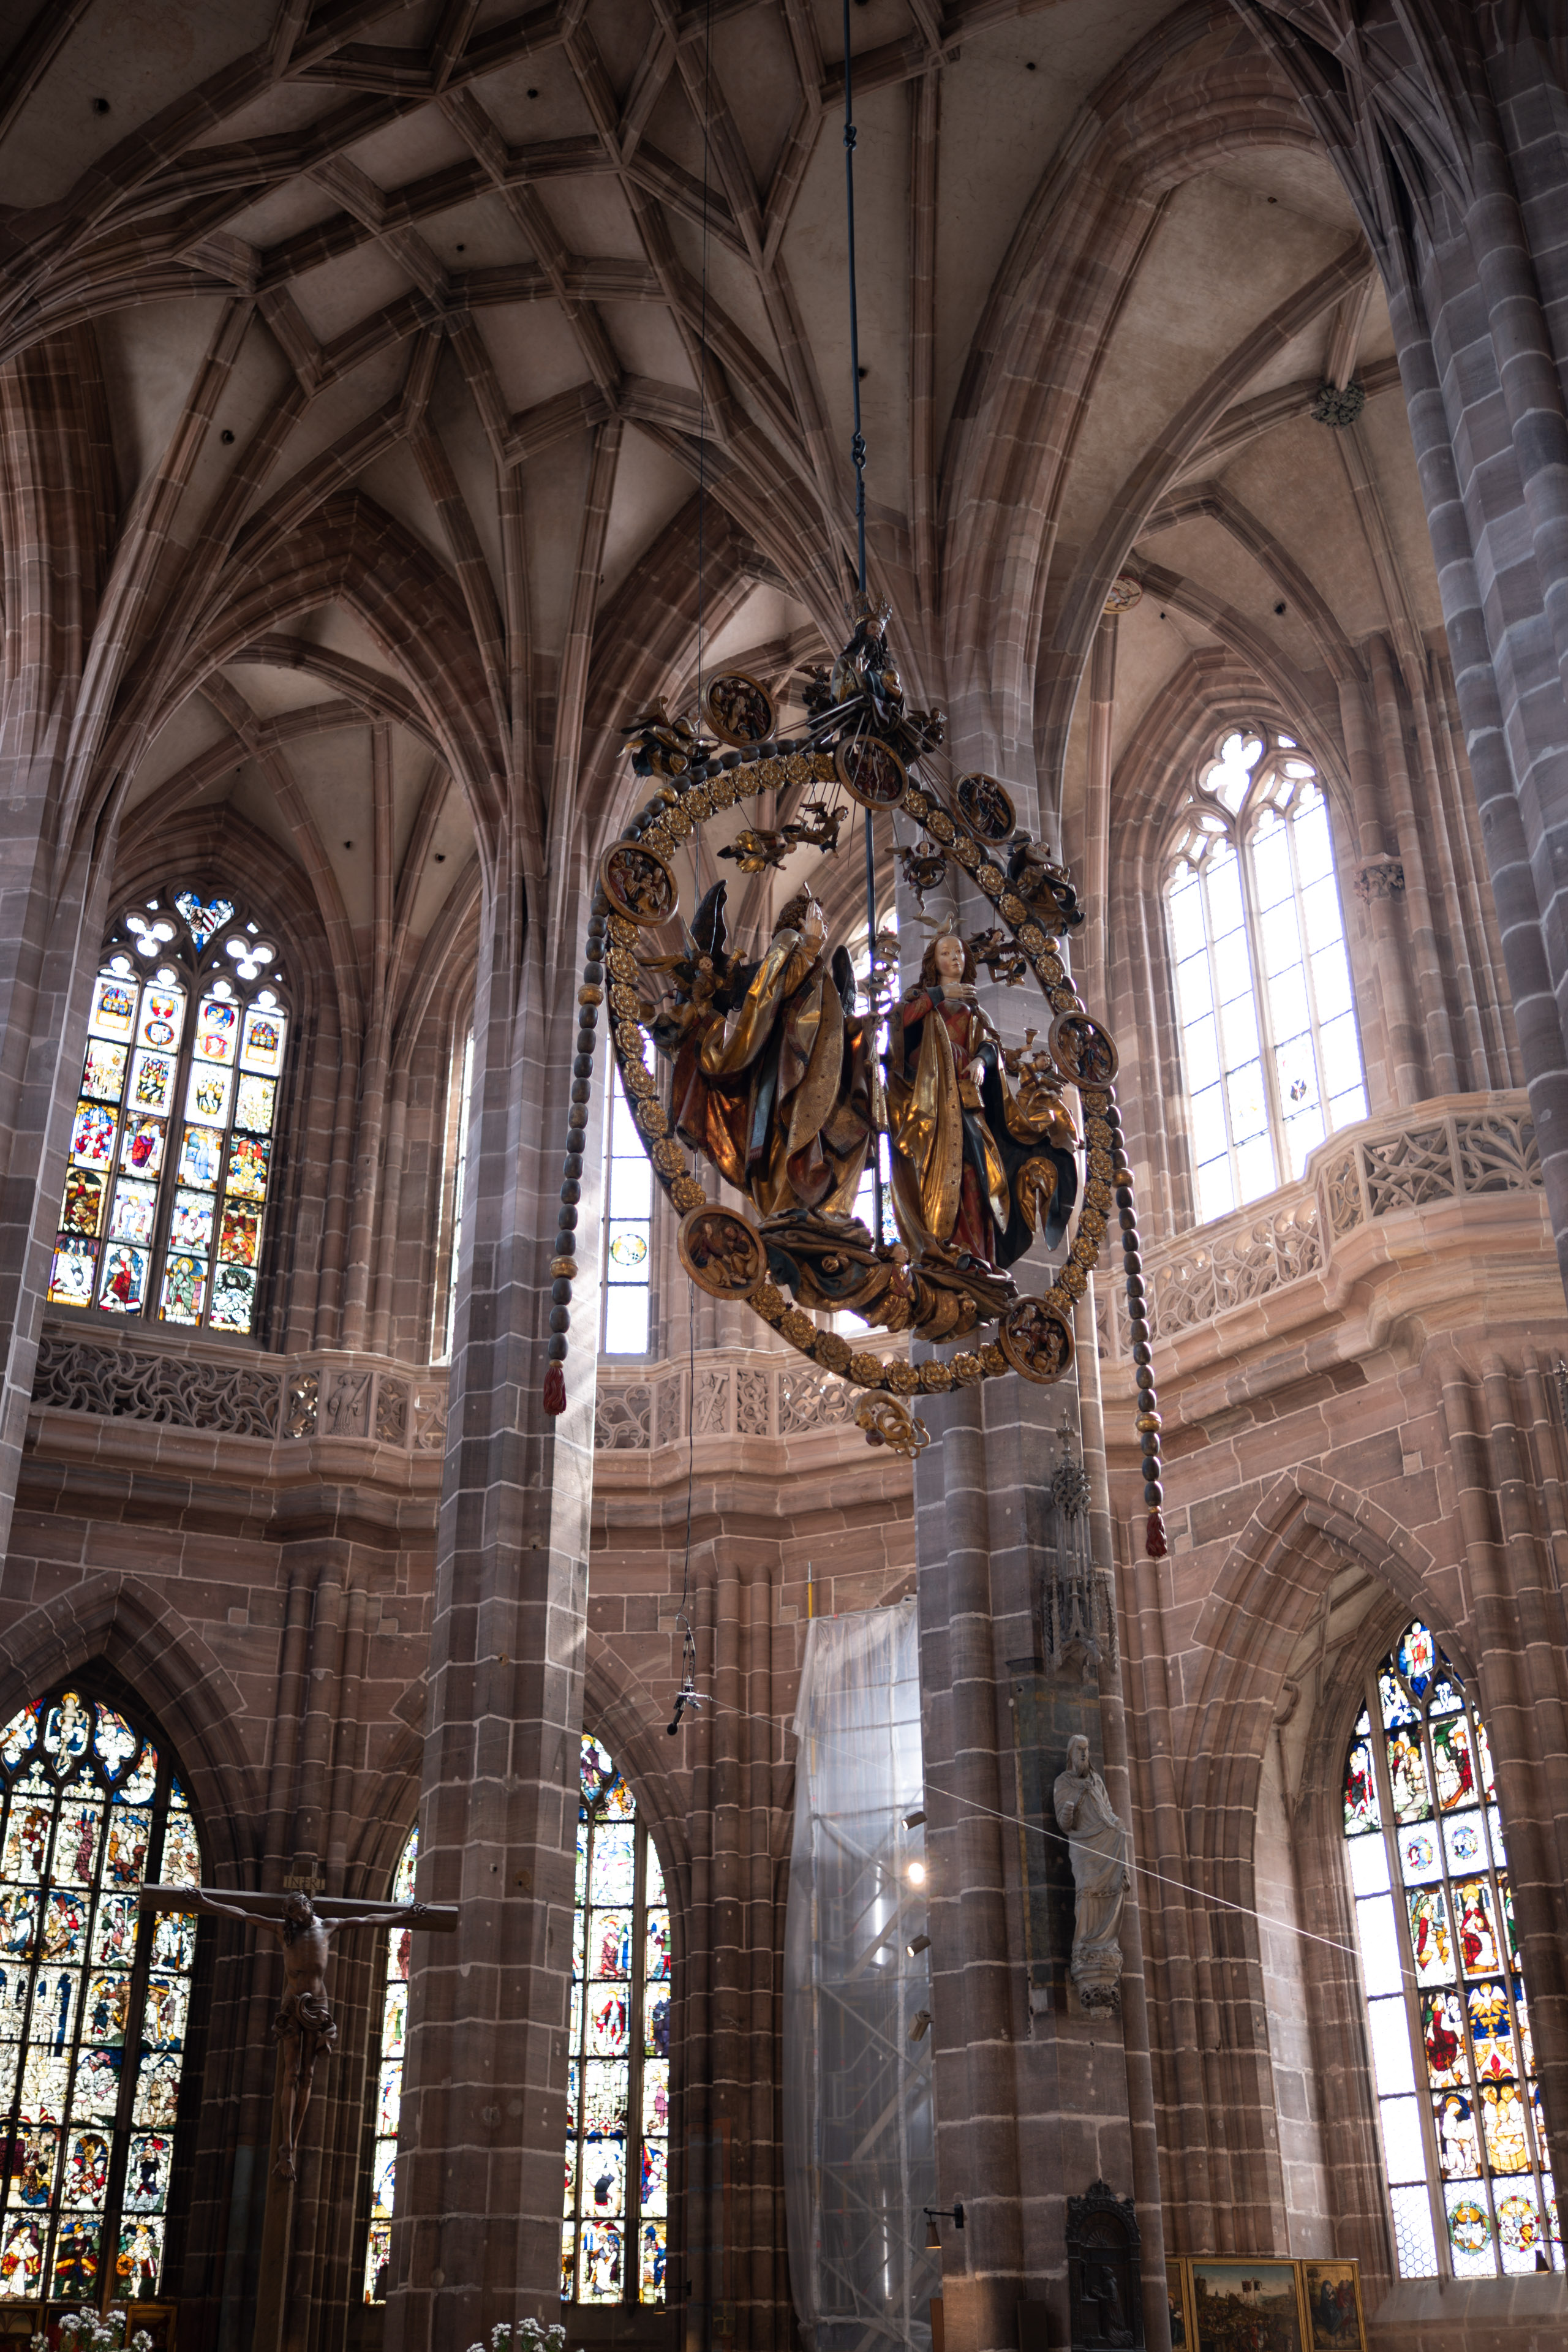
Now let’s see how this analysis of out-of-focus point-light sources translates into Bokeh-performance shooting a book-shelf. The crops of the foreground, the middle-ground, and the background below the main image are resized to make them comparable across all my reviews.
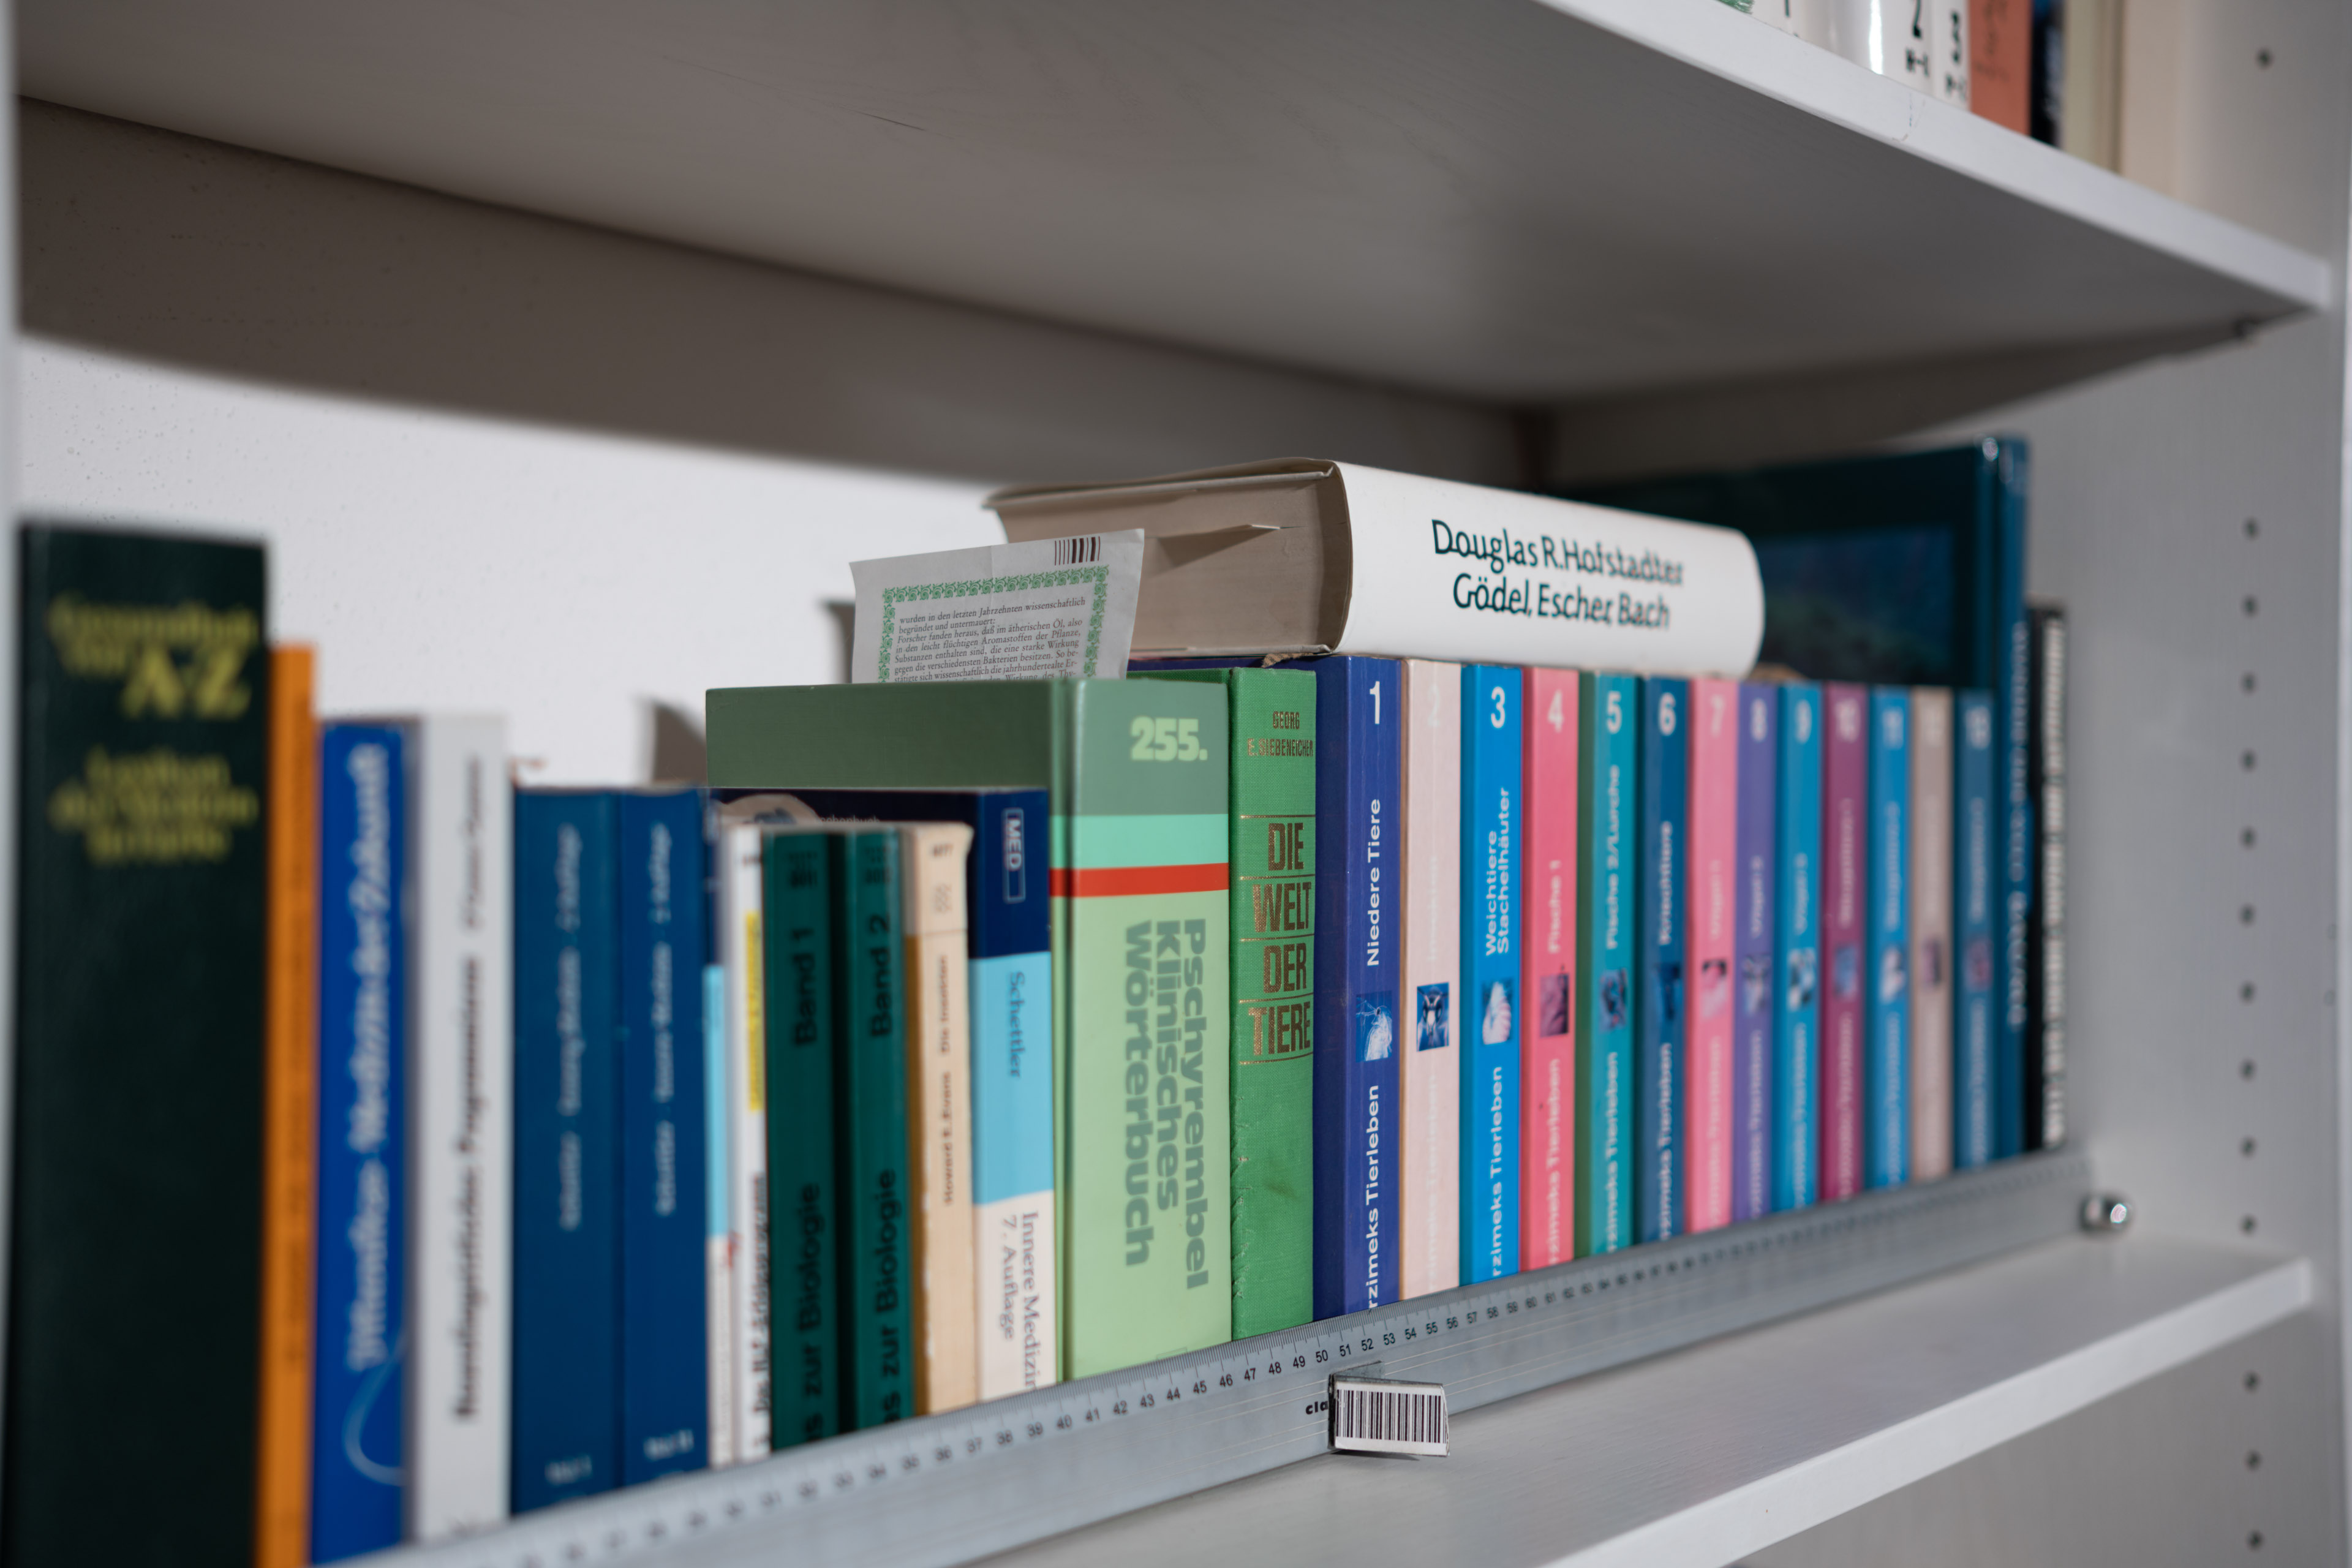
Above: Viltrox AF 35mm f1.8 at f1.8; click image for 4k version, here for large original
Above: Viltrox AF 35mm f1.8 at f1.8; click image for 4k version, here for large original
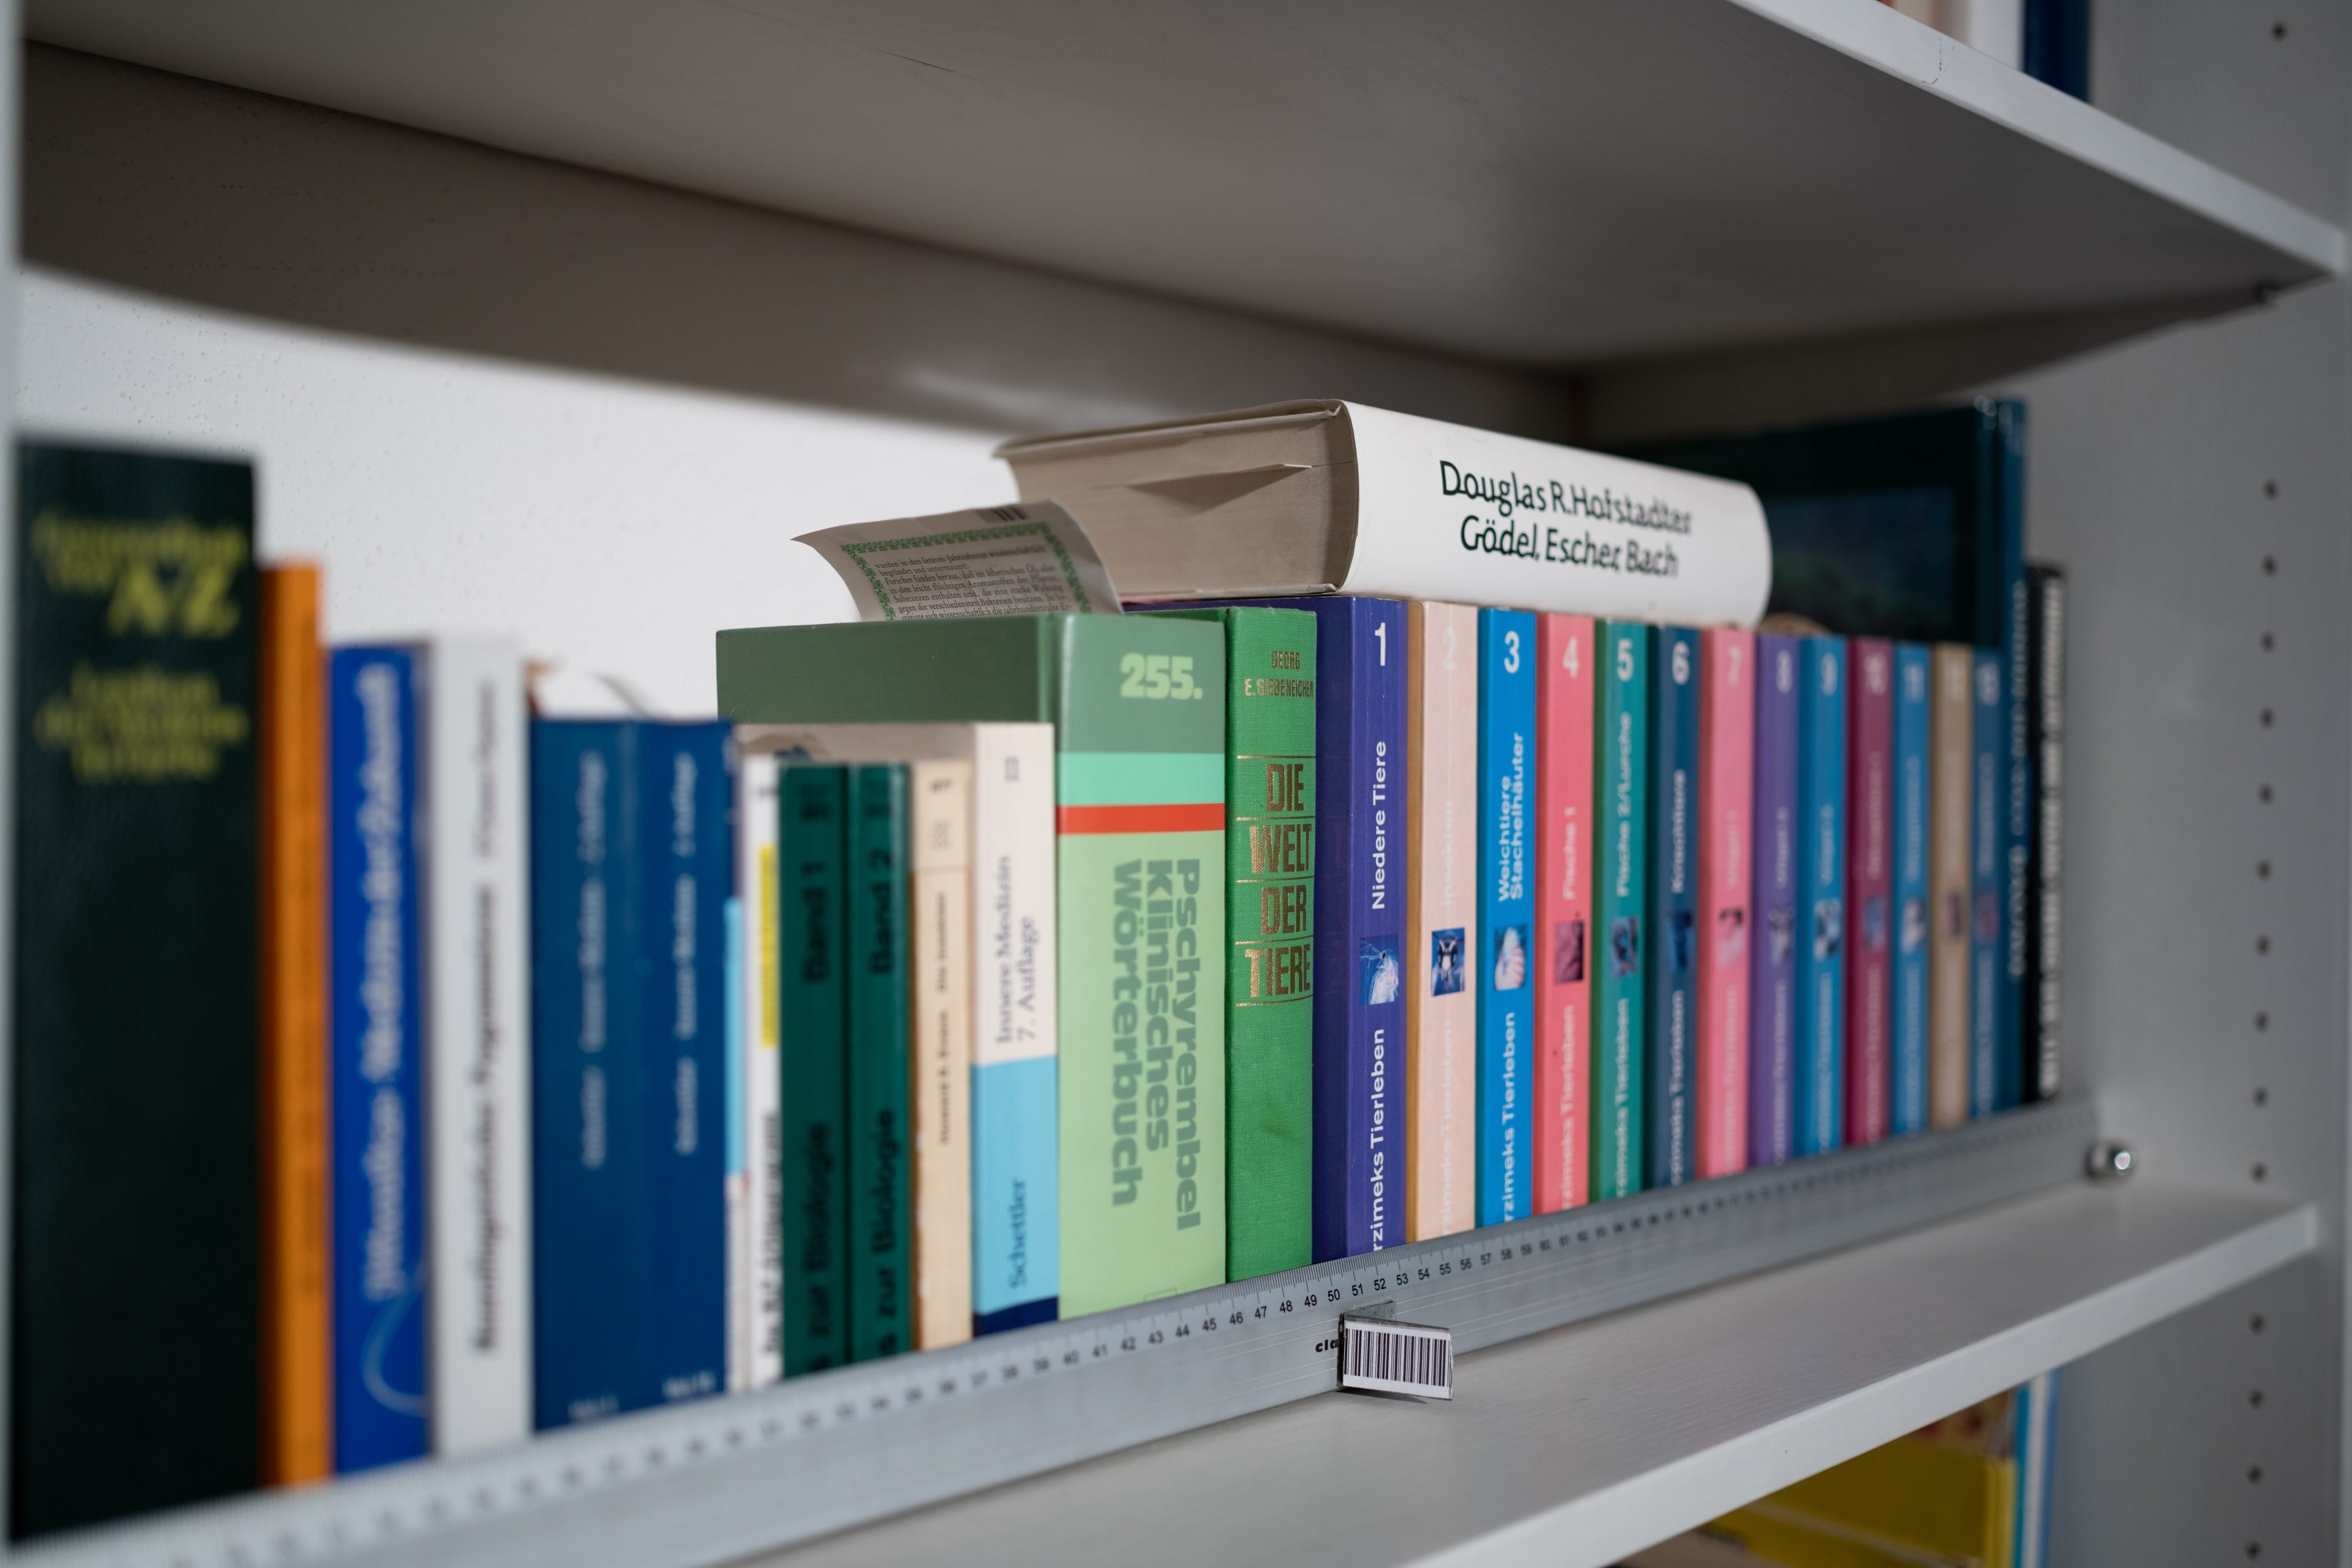
Above: Nikon Z 35mm f1.8 S at f1.8; click image for 4k version, here for large original

Above: Sony FE 35mm f1.8 shot on Sony A7R II at f1.8; click image for 4k version, here for large original
The Viltrox produces a slightly softer Bokeh than the Nikon and both are better than the Sony FE which also suffers a bit from loCA.
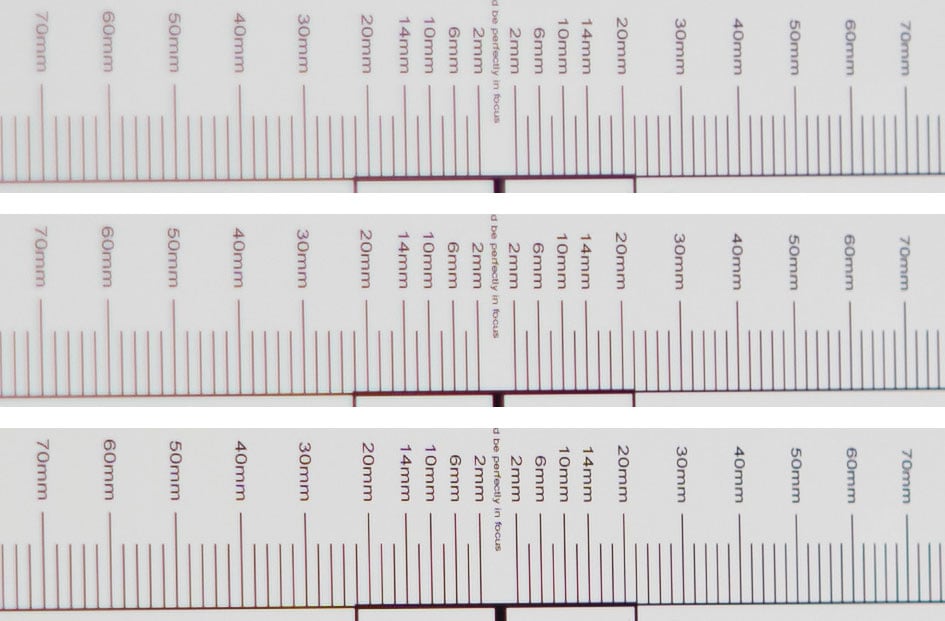
Below is another crop (now at 100%) from the same images showing the ruler. Again the Viltrox produces the softest transition behind the plane of sharpest focus.
Above: Viltrox AF 35mm f1.8 at f1.8; click image for 4k version, here for large original
Above: Nikon Z 35mm f1.8 S at f1.8; click image for 4k version, here for large original
Above: Sony FE 35mm f1.8 shot on Sony A7R II at f1.8; click image for 4k version, here for large original
But looking at some of the images on the next page you’ll find examples of double-contours in the background farther behind the plane of focus – although not quite as pronounced as from the Viltrox AF 24mm f1.8:
Above: Viltrox AF 35mm f1.8 at f1,8; 100% crop, click image for 4k version, here for large original
Flare, glare, ghosting, and sunstars
Catching a strong light-source shining directly into the lens is always a risky business: it could produce strange colorful ghost-images or reduce contrast considerably through flare and glare. The appearance of flare and ghosting depends on factors like the aperture and the angle of the light hitting the lens. So to judge the proclivity of the Viltrox AF 35mm f1.8 for these artifacts I went through a series of well calculated shots against a strong light source to provoke glare and ghosting. The lens hood was mounted in all shots. Following are some of the more extreme example results. The little bright square inset in the upper left shows the respective area with an exposure compensation of +3 EV to make it easier to see which levels of black the lens renders at that point:
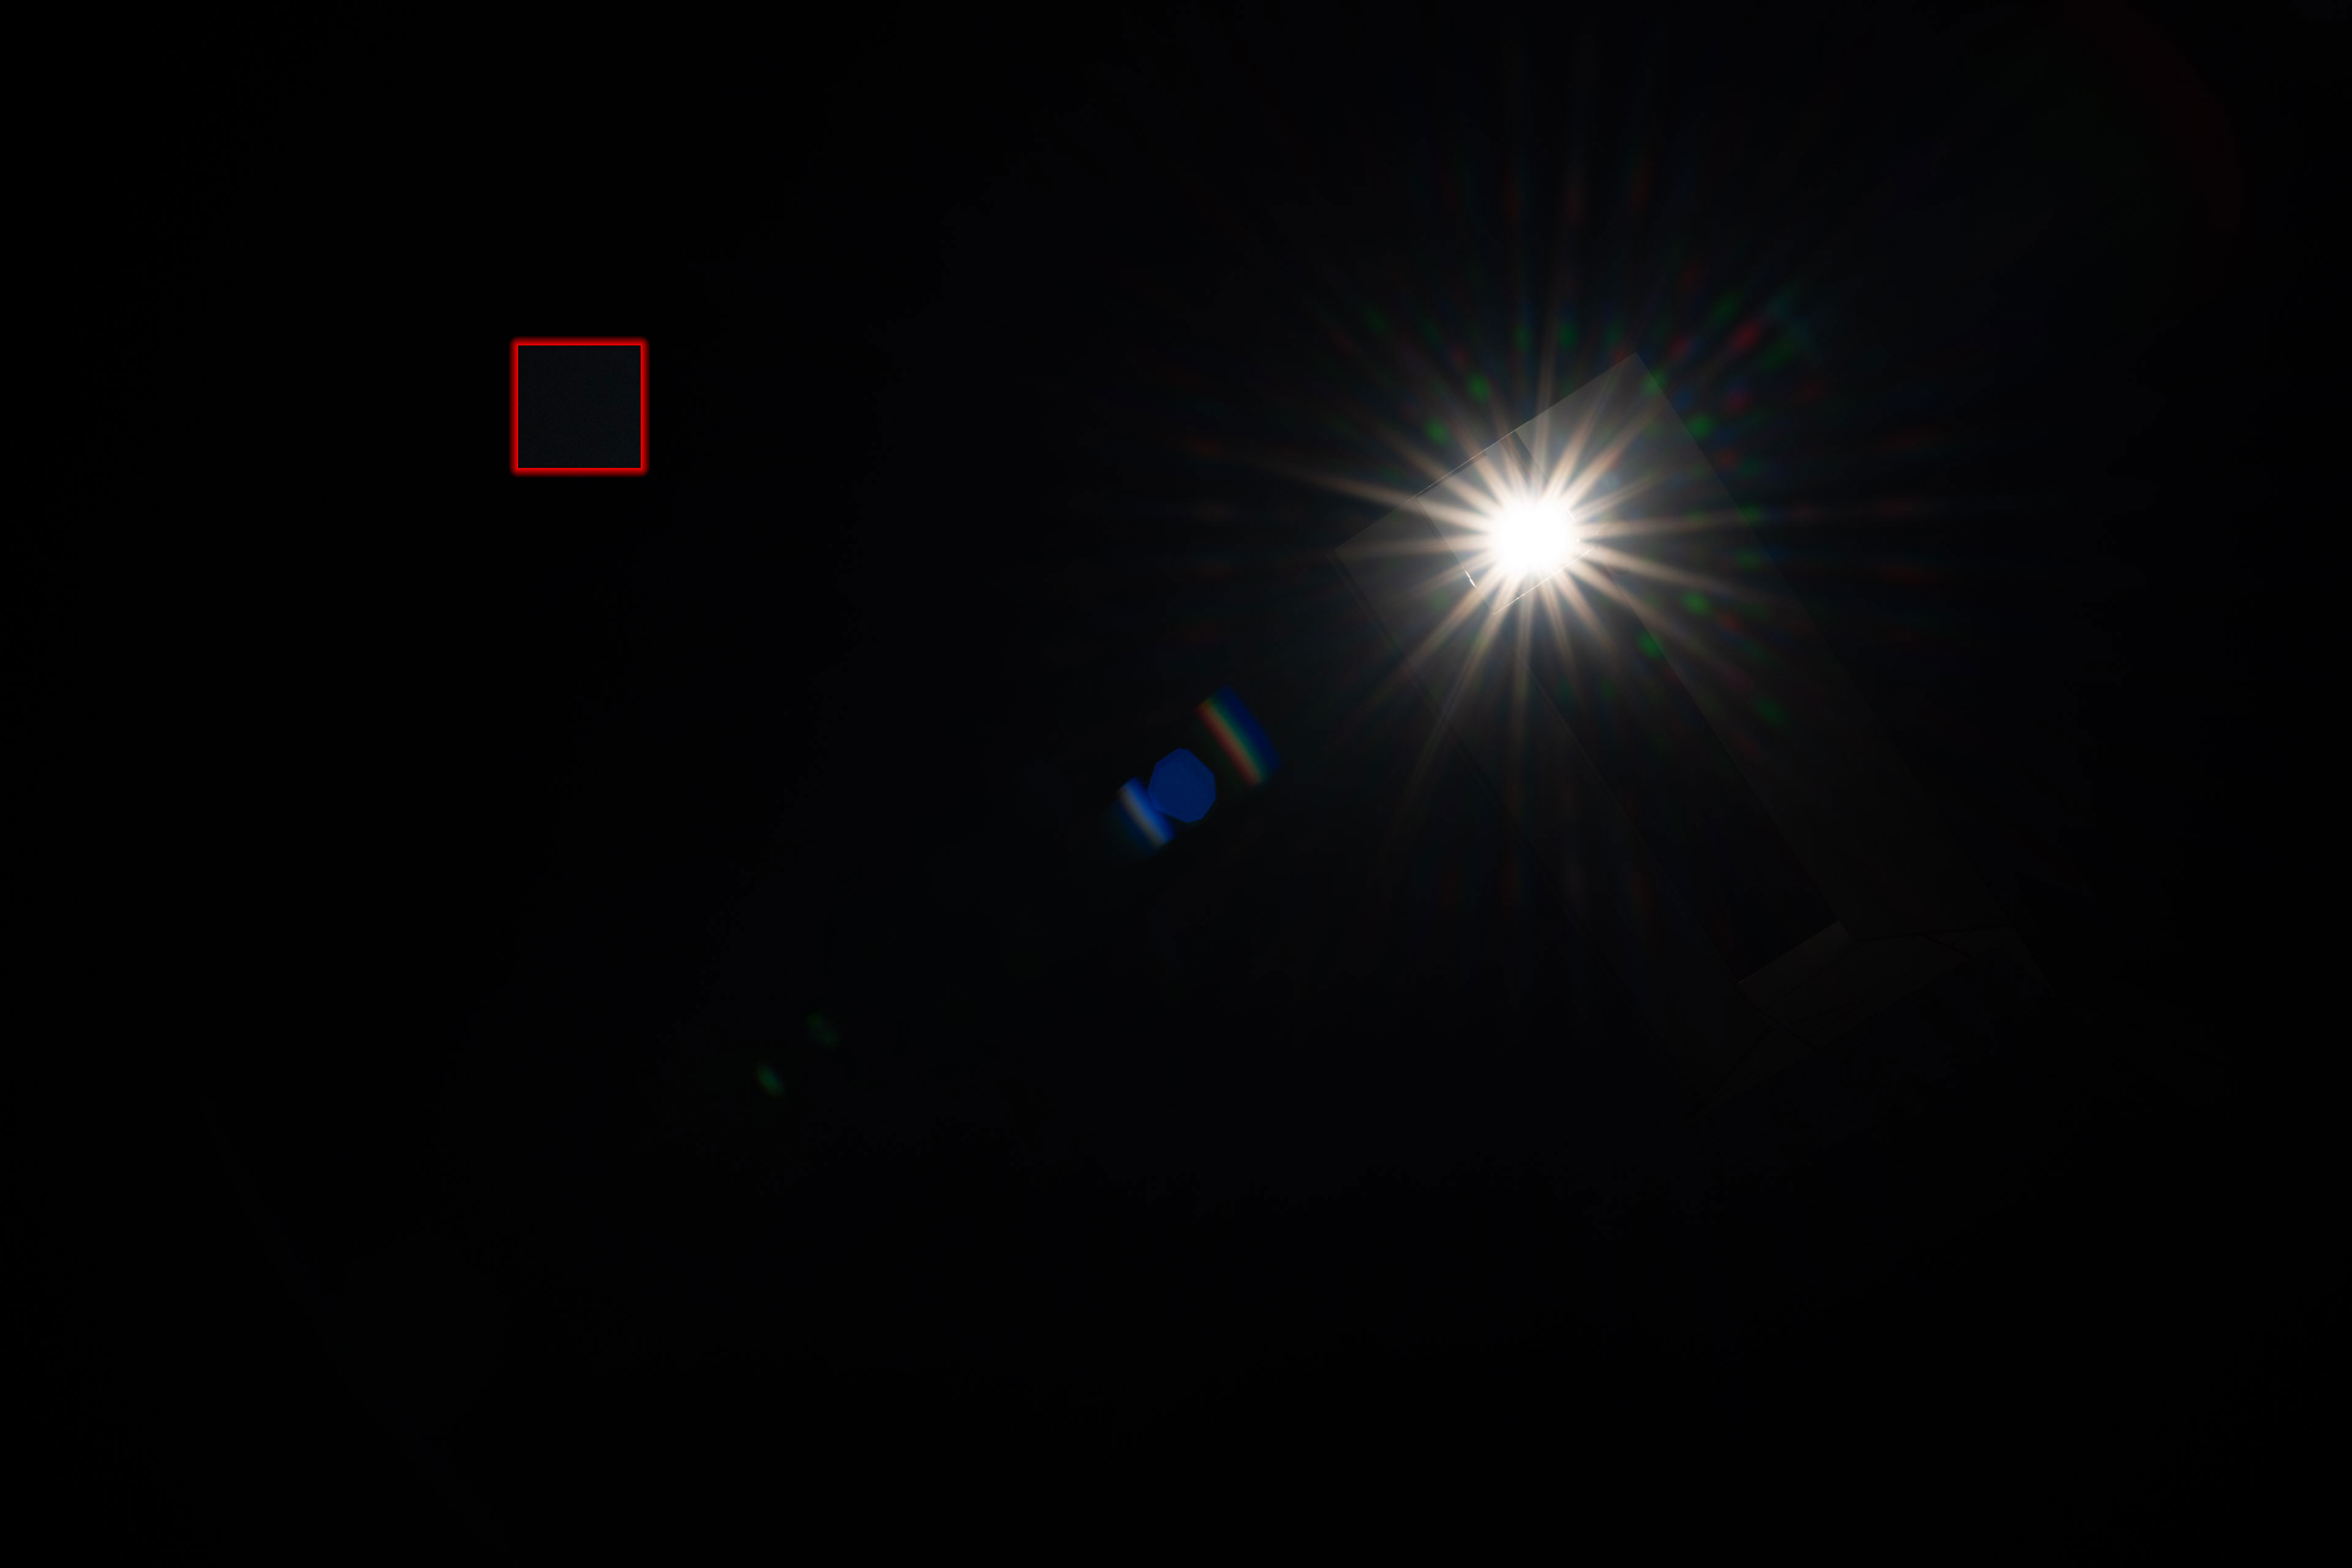
Above: Viltrox AF 35mm f1.8 at f11; click image for 4k version or here for +3 EV exposure compensation

Above: Viltrox AF 35mm f1.8 at f1.8 click image for 4k version or here for +3 EV exposure compensation
The Viltrox does produce some flare, glare and ghosting but the images still keep a good level of black outside the immediately affected areas. And you should try to avoid the sun just outside the corners of the full frame as it induces a pretty bold streak.
The Viltrox AF 35mm f1.8 does not produce very well defined and regular sunstars: f8 or f11 are probably the best apertures:
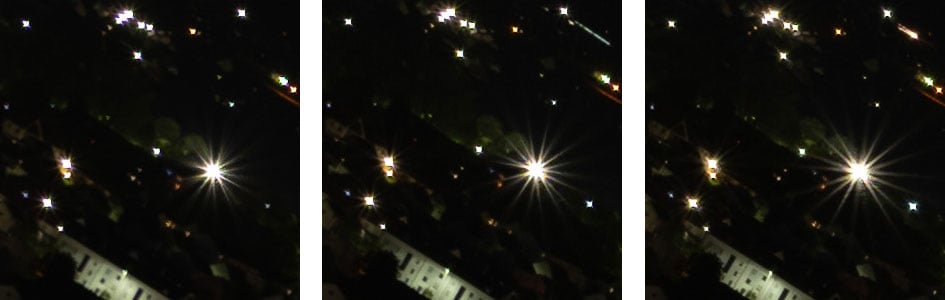
Above: Sunstars from the Viltrox AF 35mm f1.8 at f4.0, f5.6, f8.0, 100% crops
Next check out my sample images!
Check prices on the Viltrox AF 35mm f1.8 at B&H or Adorama. Alternatively get yourself a copy of my In Camera book, an official Cameralabs T-shirt or mug, or treat me to a coffee! Thanks!