Fujifilm XT1
-
-
Written by Gordon Laing
Intro
The Fujifilm X-T1 is a high-end mirrorless camera aimed at demanding enthusiasts. Announced in January 2014, it’s the sixth model to employ Fujifilm’s X-mount and its innovative X-Trans sensor, but rather than updating an existing model, the X-T1 kicks-off a new category. With its mini DSLR styling and centrally-positioned viewfinder hump, it’s the most traditional-looking of the X series although Fujifilm hasn’t forgotten the controls and technologies which have made it so successful in the mirrorless market.
Embracing retro even more so than previous models, the X-T1 sports no less than five analogue dials on the top surface, dedicated to the shutter speed, ISO, exposure compensation, drive mode and metering mode. These are complemented by front and rear soft dials along with six customizable function buttons. They all adorn the first body in the X series to be officially weather-proofed, so long as it’s paired with an appropriately sealed lens. Sadly there aren’t any in time for the body’s launch in early 2014, but three weatherproof and optically stabilized zooms are on the roadmap: an 18-135mm f3.5-5.6 for June and a 16-55mm f2.8 and 50-140mm f2.8 for Winter 2014.
In true Fujifilm style, the X-T1’s viewfinder is a highlight, an all-electronic design sporting an OLED panel with 2360k dots. This shares the same resolution as the OMD EM1 and Alpha A7(r) but with a larger magnification and what Fujifilm claims is a faster refresh. There’s also a 3in tilting screen with 1040k dots, 1080p video at up to 60p, built-in Wifi, and it’ll shoot up to 8fps with continuous AF. Finally, inside is the same 16 Megapixel APS-C X-Trans II sensor as the X-E2, including its embedded phase-detect AF system delivering what Fuji describes as the World’s fastest AF. It all adds up to an exciting high-end mirrorless camera, but it’s against tough competition from the likes of the Olympus OMD EM1 and Sony Alpha A7. In my review I’ll compare their handling and features, and take a detailed look at how the image quality measures-up against the EM1.

Fujifilm X-T1 design and controls
Fujifilm’s X-T1 represents a departure in design for the X-series, becoming the first X-mount with a DSLR-styled body and a viewfinder hump over the optical axis. I know the earlier X-Pro1, XE and XM models had their fans, but to me the X-T1 is by far the best-looking model in the range to date.
I reckon the body it most resembles is actually Sony’s A7 / A7r, but again to my eyes it ends up looking much better. Indeed I’d say it’s one of the most attractive cameras I’ve laid my eyes on for a while.
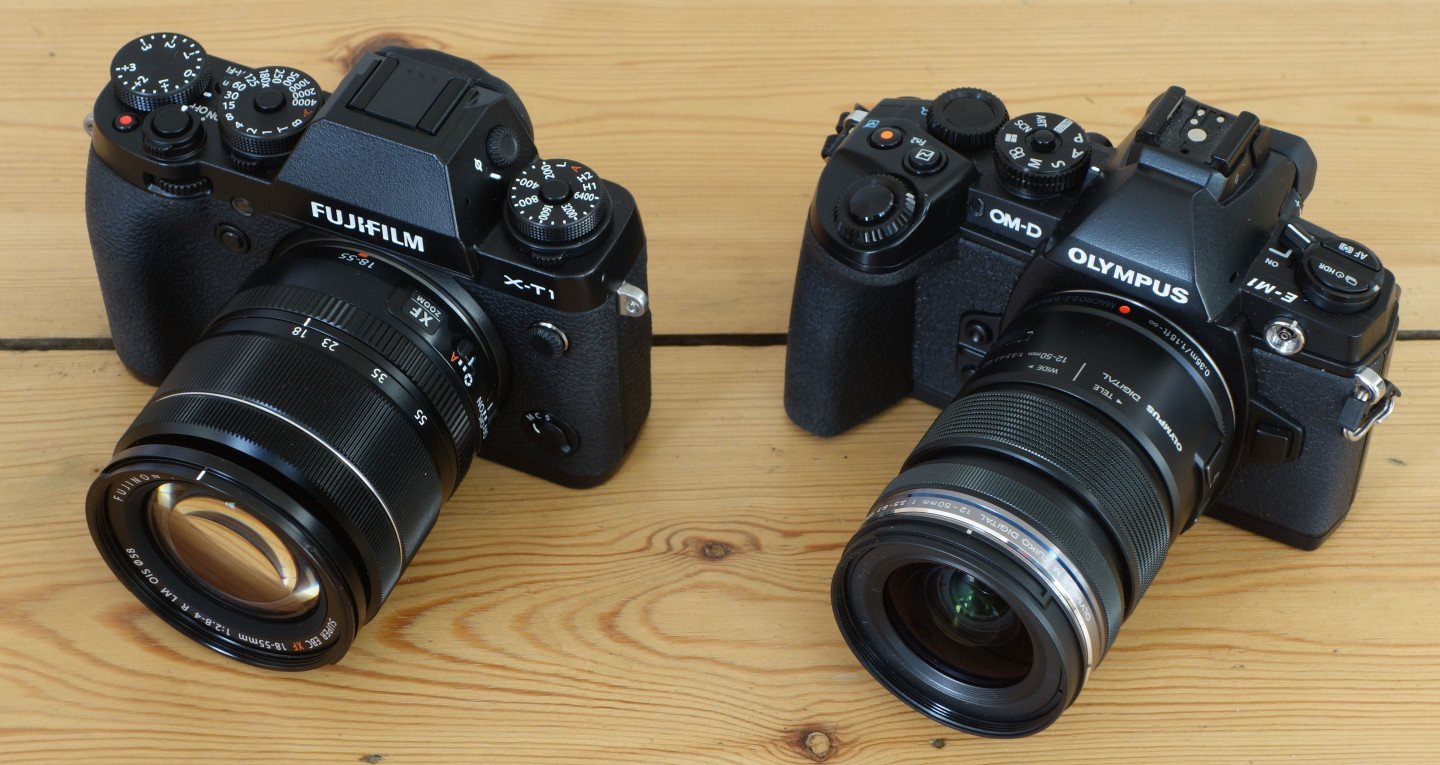
Measuring 129x90x47mm (slimming to 33.4mm at the thinnest point) and weighing 440g with battery, the X-T1 is almost exactly the same size as the Sony Alpha A7, and very similar to the Olympus OMD EM1 too, although the EM1 enjoys by far the deepest grip of the three. As such the OMD EM1 gives you the most to hold onto, and will be the most comfortable for anyone coming from a chunky DSLR, but in my view the X-T1 enjoys the most tactile grip surface of the three. I’m not sure what Fujifilm used to coat the X-T1’s grip, but it boasts the stickiest texture (in a good way) and made for a body I really enjoyed holding.
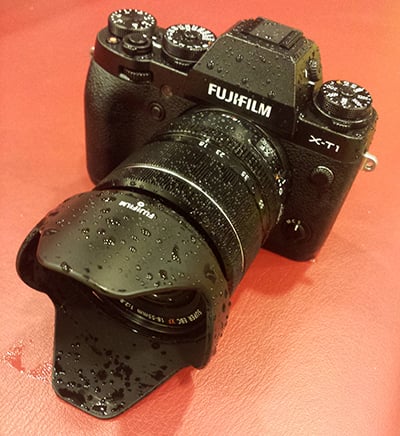 |
The overall build quality of the X-T1 is excellent. The camera feels very solid and dense, but never heavy in your hands. It’s also the first X-mount camera to officially enjoy weather-sealing: Fujifilm boasts there’s 80 points of sealing and that it’s dust and water-resistant, not to mention capable of working at temperatures down to -10 degrees Celsius. Like other weather-proof cameras though you’ll need a sealed lens to go with it, and unfortunately none of the X-mount lenses available at the time of launch offered it. Fujifilm’s announced three weather-proof zooms, but they’re not due until the middle and end of 2014. This doesn’t compare favourably with Olympus and Panasonic which both launched new weather-sealed lenses alongside their weather-sealed bodies in the past. That said, I did use the X-T1 with the non-sealed 18-55mm f2.8-4 kit zoom in steady drizzle without any ill effects.
Behind a door in the grip you’ll find a single SD memory card slot. Like its rivals, Fujifilm’s skipped the chance to equip the X-T1 with dual memory card slots, forcing people who want such a feature to seek out the handful of DSLRs which sport them. On the upside though the slot is one of the first to be UHS-II compatible, allowing it to write data very quickly to the latest cards.
On the opposite side of the body behind a small door are three ports: an external microphone jack which doubles as a connector for the optional RR-90 cabled remote control, a USB port, and a Type-C Mini HDMI port; annoyingly the microphone jack is only 2.5mm though, which means you’ll almost certainly need to use an adapter to connect the most common 3.5mm microphone accessories.
Returning to the battery, the X-T1 is powered by the same NP-W126 Lithium Ion pack employed by the X-Pro1, X-E1, X-E2, X-M1 and X-A1, allowing you to use spares from any previous X-mount body – thanks Fujifilm! It’s good for about 350 frames per charge and you’ll be recharging the pack in the separate supplied mains charger.
Personally speaking I’d have preferred it to be rechargeable in-body over USB, like the Alpha A7 and A7r, although I realize I’m in the minority in this regard. I just find it so much more convenient when travelling rather than carrying multiple proprietary mains chargers and not being able to recharge until I find a mains outlet.
A truly legitimate complaint though is the tripod thread which as I mentioned earlier is right next to the battery compartment, making it not only off-axis, but also blocking access when mounted on a plate. Fit the optional MHG-XT grip though and it’ll relocate the thread to the optical axis, while also providing a window to access the battery and a dovetailed base that slides right into Arca-Swiss quick release systems. Yes I know I mentioned this a couple of paragraphs earlier, but it’s so cool it deserves repeating.
There’s no built-in flash, but there is a hotshoe to mount the supplied EX-F8 mini flash or optional EF-X20, EF-20 or EF-42 flashguns, along with a PC Sync port on the front surface. Fujifilm nerds will notice there’s five small contacts in the shoe compared to the usual three on previous models. What’s going on there I wonder? Is it for some as-yet unannounced hotshoe-mountable accessories? Your guess is as good as mine. (Thanks to Hireacamera’s Guy Thatcher for spotting this).
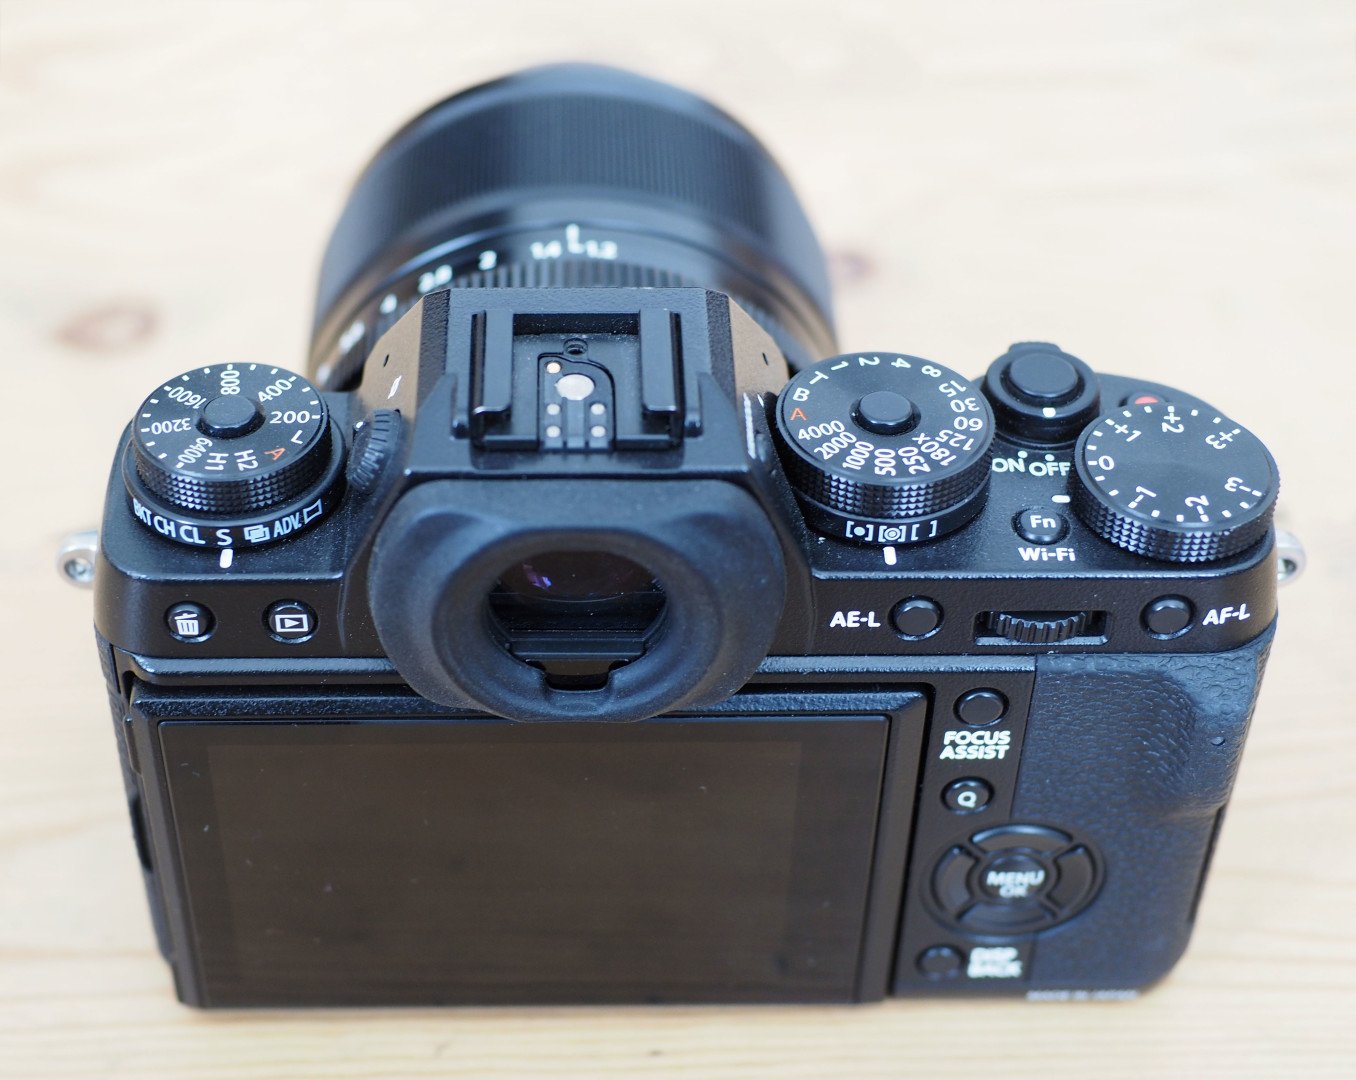
Moving onto the controls, the X-T1 embraces retro like no other modern camera, except perhaps the Nikon Df. The X-T1 is literally adorned with dials, with no fewer than five on the top panel alone, dedicated to the ISO, drive mode, shutter speed, metering mode and exposure compensation. The ISO and shutter speed dials are two-tiered with the drive and metering mode dials on the respective first floors; the ISO dial has a lock button which must be pushed to release it, while the shutter speed dial’s lock button only needs to be pressed when taking it out of A mode. In addition to these are front-finger and rear-thumb dials, along with a small dial on the front surface for the AF mode; I guess the collar around the shutter release to power the camera on and off could also qualify as a dial too, and of course the X-mount system also supports aperture rings on the lenses. Put it this way, there’s no shortage of things to turn.
What the X-T1 doesn’t have is an exposure mode dial. Like earlier models – and the much older film SLRs which inspired them – the exposure mode is defined by the position of the aperture ring (or a switch on the lens barrel) and the shutter speed dial. With both set to A, the X-T1 is put into Program mode and will set both the aperture and shutter speed automatically. Leave the shutter dial at A and turn the aperture ring and you’re in Aperture Priority. Leave the aperture ring at A and turn the shutter dial and you’re in Shutter Priority. Turn both away from A and you’re in Manual. As someone who used film SLRs for two decades prior to digital cameras, I find this way of working familiar, but even if you’re new to it, I still think it’s pretty intuitive. There’s even an A option on the ISO dial, which is self-explanatory.
But for me all is not well with the dedicated dials. The shutter speed dial offers exposures of 1 second to 1/4000 in 1EV increments, but what about finer increments or exposures longer than one second? No problem, in Aperture Priority the camera itself can deploy any shutter speed it wants from 30 seconds to 1/4000 (1/4 to 1/4000 in Program) in very fine increments. Meanwhile in Shutter Priority and Manual, you can use the front soft dial to fine-tune the shutter speed (from the value selected on the shutter speed dial) by +/-0.6EV in 0.3EV increments – so it’s like you get five different shutter options for every position on the dedicated dial. If you want longer exposures, either choose B for Bulb and keep the shutter pressed for up to 60 minutes, or select T and again turn the front soft dial to choose between 2 and 30 seconds with 12 steps in-between. But if you’re having to use the soft dial to adjust the shutter speed in some situations, why not just use it all the time? If I want to deploy exposures longer than one second in Shutter Priority or Manual, why do I have to first turn the dial to T, then use the soft dial to select the desired speed? I realize this will only impact those who want to use long exposures, but wouldn’t you agree it’s easier to just keep turning a single dial until you get the speed you want?
 |
The ISO dial has a similar problem. It offers 200 to 6400 ISO in third stop increments, plus L for 100 ISO and H1 and H2, which by default set the X-T1 to 12800 and 25600 ISO. So far so good, except that the X-T1 also offers a further extended sensitivity of 51200 ISO and no way to access from the dial it unless you reconfigure the H1 and H2 positions via a custom menu, thereby losing direct access to either 12800 or 25600 ISO. In short, the X-T1’s ISO dial is missing a notch, and even if you rarely or never use one of the extended sensitivities, it’s hard not to wonder why Fujifilm didn’t just squeeze in an H3 position on the dial. It’s like the design and sensor teams weren’t communicating properly.
Then there’s the exposure compensation dial which may offer quick access to this setting, but I found it had often turned after removing it from my (admittedly tight) bag; unlike the ISO and shutter speed dials, there’s no lock on this one. Or what about the drive mode dial which may give direct access to the continuous shooting, bracketing, multiple exposure, filter effects and panorama mode, but neglects to offer the self-timer, for which you’ll need to enter the menu unless you configure one of the function buttons. Actually I’ll cut the X-T1 some slack there as it means you can trigger the bracketing using the self timer – and better still, it’ll fire all the frames itself in a row – but with their various operational caveats I still feel the dials are more about style than function.
Now this is a very sensitive and personal issue. A camera is more than a tool, it can also be a very personal accessory for many photographers, so there’s nothing wrong in having controls that deliver on style and feel as well as actual function. But while the dials really do give the X-T1 a great look, I personally felt they were limited in function and sometimes forced me to complement them with an additional turn of a soft dial – at which point they’re slowing rather than enhancing my photographic experience. The bottom line is they simply didn’t work as well for me as a more modern mode dial coupled with front and rear dials for making adjustments.
I’m ducking right now from all the projectiles being flung in my direction from the Fujifilm fan club. I know there are some photographers for whom the X-T1’s controls are a dream come true, and one of the things I love about cameras is that we don’t all desire the same designs control systems. So you may love the X-T1’s controls, but I didn’t. It’s just my personal opinion, don’t shoot me!
I also realize the X-T1 sports front and rear dials, but these too didn’t feel right to me. They were too small and indented, forcing me to hold the camera with both hands to turn them comfortably, and even then they felt like something you’d find on an upmarket point-and-shoot rather than a flagship interchangeable lens camera. Try turning them with even thin gloves on and you’ll struggle. I shot with the X-T1 alongside the Olympus OMD EM1 and simply felt the EM1’s larger twin dials felt better and fell more naturally beneath my thumb and index finger, allowing comfortable and easy adjustment even one-handed. Do I think the EM1 looks as nice as the X-T1? No, but I do find it quicker and easier to control, even going back to when I first started testing it.
This extends to the size and feel of the buttons too. The OMD EM1 employs large chunky buttons that are tactile when pressed even when wearing thin gloves. But the X-T1’s buttons are small with shallow presses; the difference is particularly evident when comparing the cross keys on both cameras. They’re just too small on the X-T1, and real-estate shouldn’t be an excuse as the EM1 squeezes much larger ones into much the same body size. I’d urge you to pick up both cameras and compare the controls for yourself.
I will give credit to Fujifilm for its function buttons though: there’s six on the X-T1, one on the front, one on the top, and the four cross keys on the back. Yes they’re small, but in a triumph of user interfacing, if you press and hold any of them for more than a second, you’ll be presented with the menu to customise it. No need to delve into any custom menus, just push and hold, then reconfigure. Very neat, although you’ll still need a button press before you can adjust the AF area position, unlike the EM1 which can get straight onto it with the default configuration.
 |  |  |
I also liked the Focus Assist button which immediately magnifies the active AF area to fill the screen for confirmation – great for manual focusing and I’ll talk more about this later. I additionally liked the way the AF-L button could perform a quick AF in manual focus mode. Fujifilm’s engineers have clearly put a lot of thought into the control system, and even though I personally felt the dials were often retro for retro’s sake, there’s still a lot of great ideas on the X-T1.
I should however note that despite embracing retro styling, Fujifilm has sadly abandoned the threaded shutter release of the XE models, preventing you from using a cheap cable release with the X-T1. Instead you’ll need to buy an electronic cable release accessory.
Ultimately the ergonomics, styling and control system of a camera add up to a very personal choice. What works for me might not for you, and the X-T1 is certainly quite different from most rivals. Once again there was a lot I liked about the controls, but equally much that I didn’t for my style of photography and way of working. Unless you’re a fan of the retro dial system and aren’t bothered by the limitations I mentioned earlier, I strongly recommend you pick up and try and X-T1 in person to see how it feels in your hands. I’d love to hear what you think.
Fujifilm X-T1 lens mount
The X-T1 is fitted with Fujifilm’s X-Mount, which with the APS-C sensor applies a 1.5x field reduction factor to lenses. The X-Mount was only two years old when the X-T1 was announced, making it younger than several mirrorless rivals, most notably Sony’s E-mount and especially Micro Four Thirds, but Fujifilm has worked hard to build-up a highly compelling range of lenses which at the time of writing includes seven primes and five zooms. I tested the X-T1 with the ‘basic’ 18-55mm f2.8-4 kit zoom, but as owners of this lens will know it delivers a big step-up in quality over other manufacturer’s kit zooms. Here’s the coverage it delivers in practice.
Fujifilm X-T1 with 18-55mm coverage wide | Fujifilm X-T1 with 18-55mm coverage tele |
 |  |
| 18-55mm at 18mm (27mm equivalent) | 18-55mm at 55mm (83mm equivalent) |
Third parties also offer X-mount lenses, the classiest being the Zeiss Touit primes, which are available in three focal lengths; I tried the X-T1 with the Touit 12mm f2.8 and 32mm f1.8. The total number of X-mount lenses still may fall well below what’s available in the Micro Four Thirds catalogue, but Fujifilm’s range covers effective focal lengths between 15 and 345mm, with few significant gaps to mention apart from super-telephotos. Note stabilisation on the X-mount is provided optically by the lens, rather than physically in the body as with the Olympus models. This means if you want stabilisation on the X-T1 you’ll need to buy a stabilized lens, as oppose to the Olympus system which stabilizes any lens you mount.
Ultimately when choosing a new system, it’s important to consider the lens selection and whether it includes the options you want either now or in the near future. I should however note that like other mirrorless cameras, it’s possible to use adapters to mount a wide variety of other lenses to the X-T1 (still with the 1.5x field reduction of course). The camera’s superb manual focusing assistance also makes the use of adapted lenses much easier – see the focusing section later for full details.
 |
If you’re using Fujifilm’s own lenses though, the X-T1 offers a very neat enhancement first seen on the X-E2: Lens Modulation Optimiser, or LMO for short, attempts to counteract the blurring introduced by diffraction when shooting at smaller apertures, and also corrects softening towards the edges and corners of the image. As far as I understand it, Fujifilm has extensively profiled all of its own X-Mount lenses, and by default LMO is enabled on the X-T1 when you fit one of them – I can certainly confirm it works with the 18-55mm f2.8-4 lens I mostly tested the camera with. I can however also confirm that LMO was not available when I tried the Zeiss Touit 12mm f2.8 and 32mm f1.8 lenses on the X-T1, although this could be implemented in the future with a firmware update should Zeiss decide to take the plunge. Note LMO is only applied to JPEGs, so if you’re a RAW shooter you can move along – unless you’d care to take a look and perhaps rethink your workflow!
Enough talk! Does it work? Below are two 100% crops from the corners of an image taken without LMO on the left and with LMO on the right. I used the 18-55mm f2.8-4 lens for this shot at f16, where I’d expect diffraction to begin to soften the image visibly. The crops are taken from the areas marked by the red squares below left.
Fujifilm X-T1 with 18-55mm at 23mm f16 Lens Modulation Optimiser OFF | Fujifilm X-T1 with 18-55mm at 23mm f16 Lens Modulation Optimiser ON |
 |  |
| Above: full image resized | Above: full image resized |
 |  |
| Above: 100% crop from upper right corner | Above: 100% crop from upper right corner |
 |  |
| Above: 100% crop from lower right corner | Above: 100% crop from lower right corner |
As you can see there’s a visible benefit to the version with LMO, where the edges of the image viewed at 100% are crisper than the version without, but I don’t feel these crops are doing the technology justice. Throughout my testing with the X-T1 I was very impressed by the crispness of JPEG images across the frame when fitted with the 18-55mm kit zoom, and some of this is definitely attributable to LMO, especially as my images from the Zeiss Touits were comparatively lacking in bite. I’m also pleased to report the crispness with the 18-55mm – at least to my eyes – never looked over-sharpened nor suffered from undesirable artefacts. It just looked really good. You can see it for yourself in my Fujifilm X-T1 sample images, where all of the photos taken with the 18-55mm were with LMO enabled, and those with the Touits were not; it’s made the already decent 18-55mm look like an oustanding lens. I can’t wait to see it in action on the Fujifilm primes.
Fujifilm X-T1 viewfinder and screen
The Fujifilm X-T1 employs 100% electronic composition and is equipped with a large viewfinder and a 3in screen which tilts vertically. The viewfinder is without a doubt one of the highlights of the camera, delivering a huge, detailed image with a number of very clever ways to present shooting information and focusing aids.
The X-T1 employs a 0.5in OLED panel for its viewfinder, with 2360k dots (corresponding to 1024×768 colour pixels) and 0.77x magnification. The resolution and resulting detail matches that on other top-end mirrorless cameras including the Olympus OMD EM1 and Sony Alpha A7 and A7r, but it’s the magnification that immediately grabs you: at 0.77x, the X-T1’s viewfinder image is comfortably larger than the OMD EM1 at 0.74x or the A7 / A7r at 0.71x.
All three models employ 4:3 shaped panels, which means the EM1’s native image shape fills its viewfinder panel, while the wider 3:2 native shape of the Fujifilm and Sony images are displayed letterboxed with black bars. If all three shared the same viewfinder magnification, the EM1 would deliver the biggest image due to the shape, but thanks to its larger magnification, the X-T1’s active image height is actually the same as the EM1, making its image wider overall. This makes it comfortably larger than the view through a typical full-frame DSLR.
 |  |  |
As we all know though, size isn’t everything, it’s how you use it that really counts, and here again Fujifilm impresses. The X-T1 can display a vast amount of information in the viewfinder including detailed exposure information (using small but crisp fonts), a choice of alignment grids, a live histogram, a single axis leveling gauge, and a particularly neat distance scale which indicates both the current focusing distance along with a bar representing the depth of field. Suffice it to say you can completely customize what’s visible and what’s not. The images above are from the screen, but the layout is similar.
 |  |  |
Returning to the viewfinder size, it’s so big on the X-T1 that Fujifilm actually offers two shrunken versions. One reduces the main image so the focusing distance scale is no longer superimposed, but the view still remains large and crucially allows anyone who wears glasses to see the entire frame without vignetting. The second view shrinks the main image further so that a second, smaller view can be accommodated alongside it. This second window can then be devoted to focusing assistance, providing a magnified view with or without peaking or a digital split screen effect (more of which in the focusing section), while the full composition is visible to the side. The screenshots below show the three twin view options again taken from the actual screen, but they give you an idea of what it looks like through the viewfinder.
 |  |  |
It’s all clever stuff, but for me the best part is finding the shooting information reformats to remain upright when you turn the camera and shoot in the portrait aspect ratio. This is such a simple idea and one that any camera with electronic composition could offer, but I’ve never seen it done before. As someone who mostly shoots in the portrait aspect ratio it’s an absolute pleasure to read shooting details that aren’t turned by 90 degrees. Bizarrely though the X-T1 doesn’t extend this to shooting in portrait with the screen, where the information stays in line with the camera and doesn’t budge. Annoyingly portrait images are also played back without rotation to fill the screen or viewfinder which is a shame.
One other thing worth mentioning is the X-T1’s viewfinder refresh is very fast, and stays fast even in very low light. It stays fast however at the cost of a noisier viewfinder image than the OMD EM1, which under the same low light conditions slows down its refresh for a less responsive but cleaner image. You may prefer one approach over the other, but you can’t yet have a fast refresh and a noise-free image from an electronic viewfinder in very low light, and if this bothers you an optical viewfinder still can’t be beaten. Maybe a good compromise would be to let the owner choose from a menu if they’d like a fast viewfinder refresh with a noisy image in low light or a slower refresh with a cleaner image.
Like many electronic viewfinders, including on the OMD EM1, the X-T1’s refresh rate also reduces when the camera is set to continuous AF and your finger is half-pressed on the shutter release. Again like other 100% live view cameras to date, the fastest continuous shooting mode also only displays the last image captured rather than a live feed, forcing you to pre-empt any changes in motion. That said, neither the continuous refresh nor the live feed when shooting are any worse than the mirrorless competition, but it’s worth noting to avoid any surprises especially if you’re coming from a DSLR.
 |
Ultimately the X-T1’s viewfinder is an absolute triumph and should delight all but the most die-hard lovers of optical viewfinders. The shooting information, focusing aids, rotating information and sheer image size are also enough to have owners of rival mirrorless cameras looking with envy, although it would be nice to have an option to slow down the refresh to reduce noise in low light.
As someone who’s shot with Live View cameras for several years, I’m very comfortable using the screen for composition, but the X-T1’s viewfinder was so good I found myself using it for most of my time with the camera. But of course there’s still a screen if you’d prefer to use it.
It’s a 3in LCD with 1040k dot resolution and a 3:2 aspect ratio which means images fill the screen during composition and playback – and as such all shooting information and guides are superimposed. There’s the same wealth of information available as seen in the viewfinder, and again you can customize what details are visible if preferred.
In a first for a Fujifilm X-mount camera, the screen can tilt vertically, and like rivals, can face 90 degrees upwards for waist-level shooting or tilt back down by about 45 degrees for shooting at high angles. I welcome the move, although I equally know others distrust articulated screens. If it reassures you, I’ve been using them for years and have never had a breakage, but then I’m not too rough with my cameras. I do however wish Fujifilm had equipped the X-T1 with a touch-screen as it’s so much easier for repositioning an AF area. This is an area where Olympus and Panasonic, not to mention Canon with its suitably-equipped models, really take a lead over Fujifilm and Sony. That said, if you’re desperate for some touch-focusing with the X-T1, you can at least do it when remote controlling the camera with a smartphone or tablet, which I’ll discuss in the Wifi section later in the review.
 |  |  |
Just before wrapping-up, the X-T1 also offers a Q menu view for both the viewfinder and screen which presents 15 settings, and offers the chance to customize and save up to seven alternative combinations. The ‘BASE’ default offers the AF mode, Dynamic Range, White Balance, Noise Reduction, Image Size, Image Compression, Film Simulation, Highlight Tone, Shadow Tone, Colour Saturation, and Sharpness. The cross keys let you highlight the desired setting, while turning either the front or rear soft dials will adjust it. It’s a quick and easy way to adjust a wide variety of settings, the selection of which can again be customized.
Fujifilm X-T1 shooting modes
The Fujifilm X-T1 doesn’t have an exposure mode dial. Instead, like earlier X-mount cameras, it adopts the same technique used by older film SLRs for many years. The body has a shutter speed dial and (most of) the lenses have aperture rings, and both offer an A position. Set both the shutter speed dial and the lens to A and the X-T1 enters Program mode. Set the shutter dial to A, but turn the aperture ring and you’ll be in Aperture Priority. Set the lens to A, but turn the shutter speed dial and you’ll be in Shutter Priority. And finally if you turn both the shutter speed dial and aperture ring away from A, you’ll be in full Manual. If you’ve used this system before it feels natural, but even if you’re coming from a system with a PASM mode dial, it’s easy to get to grips with.
The X-T1 offers exposures from 1 second to 1/4000 in 1EV increments on its shutter speed dial. If you’re in Shutter Priority or Manual mode, it’s possible to fine-tune these values using the front soft dial by +/-0.6EV in 0.3EV increments. If you set the shutter speed dial to T, you can use the front dial to choose an exposure between two and 30 seconds with 12 steps. There’s also a B option on the shutter dial for Bulb exposures which can last up to 60 minutes so long as the shutter release is kept pressed by hand or using the optional cable release; sadly it’s not possible to trigger exposures longer than 30 seconds remotely using the smartphone app. The X-T1’s fastest flash sync speed is 1/180.
| |
 |
The shutter speed range is unremarkable on the X-T1. For a flagship camera designed to tempt high-end enthusiasts or the semi-pro market, it’s disappointing not to have a top speed of 1/8000. This makes it less useful when shooting the quickest action or attempting to open the aperture on fast lenses under bright conditions.
At the other end of the scale I’d have also liked it a lot more if the slowest shutter speed had been 60 seconds rather than 30. In my personal work with long exposure landscape photography I’ve found 30 seconds just isn’t quite enough to enjoy a decent amount of blur or smoothing, but 60 seconds can deliver a decent result without having to invest in cable releases.
At this point I should note the Olympus OMD EM1 offers both 1/8000 and 60 seconds, not to mention longer built-in timers allowing you to shoot for several minutes without any accessories. Maybe I’m unusual but I spend a lot of time at the extremes of the shutter speed scale, taking portraits outdoors at fast focal ratios or making long exposures of landscapes, so I really felt the limitations of the X-T1 in this regard. If you’re happy with a range of 1/4000 to 1 second and using a second dial to extend to 30 seconds though it won’t be an issue. Opposite is a 25 second shot I took with a Lee Big Stopper 10 stop ND filter in late afternoon conditions.
Exposure compensation is offered in a +/-3EV range in 0.3EV steps using a dedicated dial on the upper right surface. As I mentioned in the design section, the dedicated dials are nice to have, but if you’re into long exposures or fine-tuning in Shutter Priority or Manual, you will be using the front soft dial and perhaps wondering why you need to use it and the shutter dial to dial-in the desired exposure.
As for the shutter sound, it’s a fairly quiet double-click on the X-T1, a tad quieter than the OMD EM1, but not by a significant margin; both are however more discreet than the louder shutter sound of the Sony A7 and especially the A7r. None of these cameras offers a completely silent electronic shutter option though – for that you’ll need to go for something like one of Panasonic’s Lumix G mirrorless cameras.
There’s no Intelligent Auto on the X-T1, nor any scene presets. Program is as automatic as it gets, but the drive dial does offer some effects and other options.
 |  |  |
Auto Exposure Bracketing is available but surprisingly modest with just three frames at 0.3, 0.6 or 1EV increments, making it little more capable than a point-and-shoot for HDR fanatics. There’s also no in-camera HDR for those who prefer an automatic life. The only positive aspect is that the entire three frame AEB sequence can be triggered with a single press of the shutter release or the self-timer, allowing the camera to grab all the frames without further presses. This makes it all the more annoying there isn’t five or seven frame bracketing, or broader increments available. ISO, Film Simulation, Dynamic Range and White Balance bracketing are also available. Strangely when using ISO, Film Simulation, Dynamic Range or White Balance bracketing though, the X-T1 switches off any RAW recording and becomes JPEG only. This is odd since each of the modes allows RAW or RAW+JPEG shooting in the non-bracketing modes.
The Multiple Exposure option on the dial lets you take two shots and have the camera combine them into one. If you don’t like the shots as you take them, you have the chance to retry, but other than that there’s no other options.
 |  |  |
Turn the drive dial to ADV and you can deploy one of eight Advanced Filter effects: Toy Camera, Miniature, Pop Colour, High Key, Low Key, Dynamic Tone, Soft Focus and Partial Colour (with six sub-options to pass red, orange, yellow, green, blue or purple, leaving the rest of the image in monochrome). The effects deliver the usual results, but sadly you can’t apply them to video – they’re just ignored as soon as you press the red record button, so no chance of capturing a miniature movie with the X-T1. Annoyingly the X-T1 also won’t record a RAW file when using the Advanced filters – I’d have preferred the Olympus approach where in RAW+JPEG mode, the effect is applied to the JPEG, leaving an untouched RAW as a backup to the JPEG with the effect applied.
Fujifilm X-T1 Advanced Filter Effect Toy Camera | Fujifilm X-T1 Advanced Filter Effect Miniature |
 |  |
Fujifilm X-T1 Advanced Filter Effect Pop Colour | Fujifilm X-T1 Advanced Filter Effect Low Key |
 |  |
Fujifilm X-T1 Advanced Filter Effect Dynamic Tone | Fujifilm X-T1 Advanced Filter Effect Soft Focus |
 |  |
At the end of the drive dial is the Panorama mode, which lets you choose from medium and long, with panning in any of four directions; the maximum size for horizontal pans is 9600×1440 or 2160×9600 for vertical pans. Like Sony and Panasonic, but unlike Olympus, the X-T1 will capture multiple images during the pan and stitch them together in-camera for you. The stitching works quite well, although as I discovered the panoramas can suffer from banding in areas of flat colour like blue skies – this would imply the camera is using different exposures as it pans, which is one of the cardinal sins of panorama capture.
|

Delve into the menus and you’ll find an interval timer, with up to 999 frames captured at intervals between one second and 24 hours. You can also set a delay up to 24 hours before the sequence begins, although the camera won’t assemble them into a timelapse video afterwards. Note Olympus and Panasonic can assemble a timelapse movie from an interval sequence, although the EM1 does so at a slow frame rate.
 |  |  |
A further set of picture effects are available with the X-T1’s Film Simulation control which attempts to emulate classic Fujifilm film stock. The default setting is Provia, and that’s what you’ll see in all my sample images unless otherwise stated; it delivers a good balance of contrast and colour without being too punchy or saturated. If you fancy something more vivid, then choose Velvia, which coincidentally was always my favourite colour film for shooting landscapes. If you prefer a more subdued look, go for Astia, while portrait photographers may like Pro Neg Hi and Standard. After these are four monochrome modes, three of which feature yellow, red and green filters, and finally there’s a Sepia option. I enjoyed using the Monochrome Red option which really darkened blue skies and brought out cloud detail. I’m also pleased to report that Adobe now allows you to apply each of the Film Simulations on RAW files in ACR 8.4.
Fujifilm X-T1 Film Simulation Provia | Fujifilm X-T1 Film Simulation Velvia |
 |  |
Fujifilm X-T1 Film Simulation Astia | Fujifilm X-T1 Film Simulation Pro Neg Hi |
 |  |
Fujifilm X-T1 Film Simulation Monochrome | Fujifilm X-T1 Film Simulation Sepia |
 |  |
The X-T1 also offers a choice of Dynamic Range options: 100%, 200% and 400%. The 200 and 400% options help retrieve tonal detail which may otherwise have been lost at 100%, but are only available above 400 and 800 ISO respectively. I tried them on a selection of scenes and didn’t notice a great deal of difference, but your mileage may vary. Here’s the three settings in action on the same scene.
 |  |  |
Fujifilm X-T1 using Fujifilm 18-55mm f2.8-4 Dynamic Range 100% | Fujifilm X-T1 using Fujifilm 18-55mm f2.8-4 Dynamic Range 200% | Fujifilm X-T1 using Fujifilm 18-55mm f2.8-4 Dynamic Range 400% |
 |  |  |
 |  |  |
DR 100%, f8, 0.5 secs, 800 ISO | DR 200%, f8, 0.5 secs, 800 ISO | DR 400%, f8, 0.5 secs, 800 ISO |
Fujifilm X-T1 focusing
The Fujifilm X-T1 is equipped with a hybrid AF system employing both contrast-based and embedded phase-detect technologies. The AF system is split into 49 areas arranged in a seven by seven array which stretches to almost the edge of the frame, although I’m confirming how much of it is covered by the phase-detect sensors. The X-T1 can also display a useful distance scale across the screen or viewfinder with the focused subject distance marked by a bar which changes length to indicate the effective depth of field depending on distance, focal length and aperture. It’s really fun to use.
 |  |  |
Under the AF Setting menu you can choose between Multi (where the camera chooses one of the 49 AF areas by itself) or Area (where you can manually select the AF area). If you have the latter selected you can either then choose Focus Area from the AF Setting menu or from a function button (the down arrow by default), then use the cross keys to move it around the frame to the desired position; you can also choose one of five different sizes using the front or rear dials.
 |  |  |
What you can’t do though is move the AF area by pressing the cross keys without first entering the Focus Area mode, and since the X-T1 doesn’t have a touch-screen you can’t simply tap to reposition the AF area either. Admittedly the Sony A7 and A7r don’t have touch-screens either, but the Olympus and Panasonic bodies do, and for me they make selecting the AF area so much quicker and easier.
The X-T1 also offers Face Detection, enabled again from the AF Setting menu. Once this is selected you cannot manually move the AF Area – if a face is detected, it’ll be surrounded by the usual frame, and if not, the camera will revert either to a fixed central point (if the AF mode is set to Area) or to an automatic area (if the AF mode is set to Multi). Unfortunately you can’t manually reposition the AF area if the face detection fails to recognize the subject, instead you’re either locked to the centre or relying on the camera guessing.
This approach caught me out on a few occasions when the Face Detection system didn’t recognize a face and the camera either guessed a backup area incorrectly or was locked to the centre. In such cases you could find yourself having to recompose with the shutter half-pressed, which runs the risk of missing the shot or the subject not falling within the selected depth of field. In contrast, the Olympus and Sony Face Detection systems are not only more reliable, but also offer eye detection to lock onto the closest eye on the subject. This lets you quickly and easily focus on a subject even if they’re off-centre or you’re using a bright lens. And if the system fails to recognize a face on the Olympus or Panasonic cameras, you can simply over-ride it and tap on the subject to reposition the AF area as desired.
If you’ve never used a system like this, then you may wonder why I’m getting all hot and bothered. After all many of us relied (or continue to rely) on the old recompose while half-pressing for many years. But the fact is new technology allows me to quickly and easily nail portraits of restless subjects like kids using lenses with a very shallow depth of field on Sony, Panasonic and especially Olympus cameras, but I found it more of a challenge with the X-T1.
In terms of AF modes, a small dial on the front surface switches the X-T1 between Single, Continuous and Manual modes. In Single AF using the 18-55mm f2.8-4 zoom, the X-T1 felt quite swift, generally locking-onto the subject in good light with only a minimal pause; in lower light it searched a little but normally found the focus within a second. I’m not quite sure where or how Fujifilm measured the AF in order to claim the ‘World’s fastest AF’ statement though. It’s certainly much faster than the first X-mount models, and also felt a tad quicker than the Sony A7 and especially the A7r. Used in isolation it feels fairly snappy, but it’s not as fast as the Single AF modes on the Olympus and Panasonic models. I should also note the Zeiss Touit 12mm and 32mm primes I had during the test period focused more slowly than the Fujifilm 18-55mm f2.8-4 zoom.
With all this in mind I didn’t have high expectations for the continuous AF capabilities of the X-T1, especially since this is a task which traditionally defeats mirrorless cameras. But I’m delighted to report the X-T1 is actually a great success when it comes to continuous AF, delivering a higher hit rate than any other mirrorless camera I’ve tested, apart from the Nikon 1 which of course has a smaller sensor and shorter focal length lenses which are more forgiving on focus.
 |
Using the 18-55mm f2.8-4 zoom at 55mm f4, I photographed bursts of marathon runners approaching a finishing line, along with my own kids legging-it towards me across a distance of about 50m. I also repeated the tests under a variety of conditions.
In all cases the X-T1 delivered at least an 80% success rate, and in many cases higher still. Indeed on some occasions all of my shots in a continuous burst were in sharp focus, and all when using the camera’s top shooting speed of 8fps too. I’ve since been impressed by my former colleague Guy Swarbrick who’s used the X-T1’s continuous AF to shoot professional track cycling with reasonable success. Note when shooting at 8fps, you can only autofocus with the nine central AF areas (see screenshot left), which implies a concentration of phase detect action in that region.
Finally here’s a mirrorless camera with a decent-sized sensor that I can actually recommend for mild action photography. A semi-pro or pro DSLR will still out-perform the X-T1 for fast action, but I remained impressed by its ability to confidently grab a nice sequence of images where the subject’s in continuous motion.
Moving on, the manual focus mode is arguably even better, offering a wide choice of focusing aids which really allow you to nail the shot. These are all based around the dedicated Focus Assist button on the rear. Press it once and the X-T1 magnifies the selected AF area to fill the screen for immediate confirmation – this also works in the AF modes, and the view remains magnified until you press it again.
 | |  |
Press and hold the Focus Assist button for a moment and you can choose one of two display views enhanced for manual focusing. One is Focus Peaking, which surrounds subjects in focus with a highlight – this is especially useful when used in combination with a magnified view, again by pressing the Focus Assist button. The second enhanced view offers a digital split image, which draws inspiration from the split image focusing screens employed by most manual focus film SLRs. On the X-T1, a small window in the middle of the frame is turned black and white and split into five strips. When the image is out of focus the strips shift in relation to each other, showing the subject chopped-up a little. As the image comes into focus, the strips shift back into place, and when the subject is no longer disjointed in the window, you know it’s sharp.
 |  |  |
The digital split image is a very clever way of presenting focusing, and will delight anyone who used similar systems on older film cameras, but like those it works best when the split image crosses well-defined lines. Direct it at more organic shapes and it’s often hard to see whether the strips are aligned or not. I personally found the focus peaking more useful, again especially when used in conjunction with a magnified view.
But wait, there’s more. With the X-T1 set to manual focus, a new display option appears when pressing the DISP button: a dual view which shows two windows on the screen or in the viewfinder, one with the full image and the other showing a magnified area alongside it. This means you can adjust and confirm focus with the magnified window, while still keeping an eye on the full composition to its left. This works best of all when shooting through the viewfinder where the image area is so large it’s not too much of a compromise to split it into two. And once again you can choose if the magnified area is enhanced with focus peaking, or a digital split image, albeit with two sections this time.
| | |
And if at any time while manually focusing you think, ‘oh sod it, I wish the camera could just autofocus this one’, you can simply press the AF-L button and it’ll do the job for you, assuming of course you’re using a lens with AF.
Overall the focusing on the X-T1 is a triumph. The Single AF may not be quite as quick as the latest Olympus and Panasonic models, but it’s at least as fast or faster than other rival cameras. The Continuous AF meanwhile is the best I’ve used on any mirrorless camera with a decent sized sensor, finally allowing us to confidently track a subject approaching or receding at reasonable speed. And finally the manual focusing aids work so well that even die-hard autofocusers will look forward to using them. Certainly when I was getting frustrated by the limitations of the face detection system, I’d switch to manual focus and generally nail the shot much faster.
Fujifilm’s really thought the focusing through on the X-T1 and again while Olympus beats it for single AF speed, touch-focus and slick face detection, there’s still so much to enjoy here as a whole. It’s one of the highlights of the camera.
Fujifilm X-T1 movie mode
There’s so much to talk about with the X-T1 that it comes as a bit of a shock when you reach the movie mode – as there’s very little to mention. The camera can record either 1080p or 720p at 30 or 60fps. Exposure is fully automatic with no manual override other than exposure compensation. No effects can be applied while filming and there’s no slow motion or time-lapse options either. You can attach an external microphone if you like, but it’ll almost certainly need an adapter to fit into the 2.5mm jack. And finally you can adjust the audio recording levels to one of four steps with level meters to help gauge the volume.
 |
In terms of focusing you can choose continuous or manual, but with the former there’s no way of knowing exactly where or when the camera will make any adjustments. It’s also not always quick off the mark. When repositioning the camera it sometimes refocused quickly on the new subject, but at other times could just sit there for several seconds, seemingly distracted by another task before eventually making the adjustment.
As for dolly moves where the camera is shifted continuously towards or away from a subject, forget it. The admirable continuous AF performance I enjoyed when shooting stills does not extend to moving subjects in video, and as you’ll see in the clip below, the X-T1 was not happy in this environment.
And the quality? Below par for a camera of its class with some undesirable artefacts marring the footage. I used to think Olympus had one of the most lackluster movie modes, but it feels quite advanced compared to the X-T1. The X-T1 may offer 1080p at 60fps, but there’s nothing much else to get excited about here and if you’re into video there are much better choices out there, particularly from Panasonic, Canon and Sony. If I haven’t put you off yet, here’s a few clips to show what is and what’s not possible when it comes to movies on the X-T1.
| |
|---|---|
| |
| |
| |
|---|---|
| |
| |
| |
|---|---|
| |
| |
| |
|---|---|
| |
| |
| |
|---|---|
| |
| |
Fujifilm X-T1 Wifi
The Fujifilm X-T1 is equipped with Wifi, allowing you to wirelessly transfer images and remote control the camera with an iOS or Android smartphone, or transfer images to a Windows or MacOS computer via a mutual router. I tested the free Camera Remote app on my Samsung Galaxy S4. Upon starting it offers four main options: Remote Control, Receive, Browse Camera and Geotagging. I’ll cover each in turn.
 |  |  |
The Remote Control option shows a live image from the camera, surrounded by shooting information and a selection of buttons underneath. A slider at the bottom lets you choose between shooting stills or filming video, after which pressing the big red and silver release button above will trigger your choice. Once you’re recording a movie, the live image changes to 16:9, but annoyingly it won’t do this prior to filming for composition.
 |  |  |
Gratifyingly you can tap anywhere on the live image to reposition the AF area, and the X-T1 will refocus straightaway. This makes up in some small part for the absence of a touch-screen on the camera itself. Sadly you can’t tap to refocus when filming video though, or even when composing prior to filming video – it only works when the app slider is set to take still photos.
A button to the right of the release lets you choose the ISO, while one on the opposite side lets you change the Film Simulation, White Balance, Macro Mode, Flash mode, Self timer, and, er, ISO again. If you’re in Aperture Priority you can adjust the aperture on-screen by tapping the value below the live image. Same for the shutter speed in Shutter Priority, or indeed either of them in Manual, but you can’t change the actual exposure mode remotely, nor can you effectively hold down the release button for Bulb exposures. You also can’t change the image quality or the exposure compensation remotely, although the current setting for each is shown on your device. This makes it more basic than the Olympus and Panasonic remote apps, but still more advanced than Sony’s.
The remote control view also has a play button which presents a series of thumbnails with the chance to tick the ones you’d like to import into your handset. Bucking the trend for remote control apps, the choice of quality is actually set within the camera, not the app – you can choose the original image size or a reduced one at 3 Megapixels. Like rivals, you’ll only be transferring JPEGs, not RAW files.
 |  |  |
This leads me to the second option of the app, named Receive. This initiates playback on the camera, with the option to send a photo as you browse through them. Received images are graphically shown on your handset’s screen like stacked paper photos. An option to Receive may seem redundant when you have various thumbnail views for importing on the app, but it’s actually very useful. There’s many times I’ll have gone through a series of almost identical images on the camera in playback, then got completely lost when viewing them all as thumbnails on a remote control app – which was the one I liked best? Was it third or tenth along from the end of that sequence? But Fujifilm’s Receive mode solves this by letting you initiate the transfer from the playback mode of the camera and push them to the handset.
 |
The third option is Browse Camera, which presents exactly the same thumbnail view as tapping play in the Remote Control option described earlier. Like that option, you can view thumbnails in two different sizes, tap to enlarge for a closer look and choose to import if desired. You can import JPEGs at either 3 Megapixels or the original size, but again not RAW files. The app would also appear to let you import movies, but I couldn’t find them on my phone afterwards.
The fourth and final option on the app is Geotagging which as its name suggests, uses your handset’s GPS to deliver co-ordinates which are embedded on your photos. However Fujifilm goes about this in a different way to rivals. Rather than having your handset store a GPS log which is later synced with the images in the camera, the X-T1 actually imports the co-ordinates as you compose and take the photo, so there’s nothing for you to do afterwards.
Choosing Geotagging on the app presents an almost bare page indicating that it will now make GPS co-ordinates available for the next 60 minutes; returning to it during this time shows how long you have left. If you now initiate Wifi on the X-T1 it’ll connect to your handset and a few seconds later report that its searched your device and (hopefully) knows where it is in the World. Returning to composition on the camera, you’ll now see the actual GPS co-ordinates can be displayed on-screen, while a small icon of the World indicates a successful and active connection. You’re now free to put your phone in your pocket and shoot as normal on the X-T1; you can even turn the camera off and on again, and it should quickly re-establish the connection with your phone by itself. Meanwhile every image you take is automatically embedded with the GPS co-ordinates delivered by your phone.
After the 60 minutes are up – or if you cancel the process manually on the app – the World icon turns red and flashes on the camera to indicate it’s no longer receiving positional data. If you want to continue shooting with GPS data, just start the Geotagging process again within the app and you’re good to go. Here’s an image I took with the X-T1 in Honfleur in Northwest France, with the GPS co-ordinates synced from my Galaxy S4 phone; I entered the co-ordinates into Google Maps and took a screenshot of the position below, which is extremely accurate.
| |
 | |
 | |
In practice it works very smoothly, and I loved the fact my images were already tagged the moment I took them, eliminating the syncing process later. As always the accuracy was also good so long as your handset had a decent view of the sky. The downside to Fujifilm’s implementation is there’s regular Wifi communication between the camera and phone and while I don’t know how clever they are about power saving, I can tell you that the batteries on both definitely depleted faster than normal when Geotagging was in operation – so be warned.
Fujifilm also offers PC Autosave software for both PCs and Macs which allows the camera to connect to a computer or laptop and wirelessly transfer images as you take them. Annoyingly though like most camera to computer software I’ve come across, it requires a wireless router / hub in the middle which limits it to office, home or studio environments and rules out ad-hoc connections in the field. It’s also not possible to remote control the camera from a computer or laptop.
In this respect Fujifilm’s Wifi implementation is a lot like its rivals, where remote control and ad-hoc image transfer is mostly limited to smartphones and tablets. If transfer to a computer or laptop is available, it’s never ad-hoc and instead requires an existing network to connect into. Unfortunately this means in my current mobile environment, I’m unable to test the camera to laptop functionality of the X-T1, but I hope to try it out in the future at which point I’ll update this section of the review. At least the option is there if you want it and don’t mind connecting through a shared hub / switch.
Fujifilm X-T1 continuous shooting
The Fujifilm X-T1 offers two continuous shooting modes, Continuous Low at 3fps and Continuous High at 8fps. Continuous AF is available for both shooting speeds, but in both cases you’ll be looking at the last image captured in the viewfinder or on-screen as oppose to a live image. This is par for the course for a mirrorless camera at the top speed, but disappointing the X-T1 couldn’t squeeze out a live feed for the slower 3fps mode. The 8fps mode also has an additional limitation in that AF is only supported for the nine central AF areas.
However all is forgiven once you discover the X-T1 is the only mirrorless camera with a decent sized sensor that can actually keep a subject in motion in sharp focus even at 8fps with a very high success rate. The only other one is the Nikon 1, but its 1in type sensor is considerably smaller than the APS-C sensor in the X-T1; see the AF section for more details.
So the X-T1 can successfully track subjects in motion, but what about the actual continuous shooting speed? To measure its performance I fitted it with a Toshiba 16GB SDHC II card and fired-off a series of bursts with the shutter speed set to 1/500 and the sensitivity to 400 ISO.
With the quality set to Large Fine JPEG and the shooting speed set to 3fps, the X-T1 fired-off 20 shots in 6.55 seconds, corresponding to a speed of 3.05fps; the camera seemed happy to continue shooting at this speed while memory remained. Keeping the quality the same but bumping the speed up to High allowed me to capture 34 shots in 3.95 seconds, corresponding to a speed of 8.6fps; after 43 frames, the camera slowed to about 3fps.
Switching to RAW at the slower speed allowed me to capture 20 shots in 6.53 seconds, corresponding to a speed of 3.6fps, and again the X-T1 seemed happy to keep shooting while memory remained. Bumping the speed to High allowed me to capture 22 RAW frames in 2.54 seconds, corresponding to a speed of 8.7fps; after 22 frames the speed fell considerably.
So in practice the X-T1 delivered its quoted speed, and while Fujifilm’s specifications suggested you could capture 47 JPEGs in the High speed mode, I didn’t quite attain that, at least with the mildest compression setting. But I’m perfectly happy with a 34 shot JPEG burst at 8fps, especially considering the continuous AF delivered a high success rate for moving subjects. It makes the X-T1 the most usable mirrorless camera for action and sports photography since the Nikon 1 system.
Just for the record, I measured the Olympus OMD EM1 shooting at just over 10fps for up to 55 Large Fine JPEGs or 38 RAW files; it shares the same 16 Megapixel resolution as the X-T1. Meanwhile the Sony A7 managed a fraction over 5fps for what seemed like an unlimited number of Large Fine JPEGs or for 30 RAW files, although remember it’s recording larger 24 Megapixel files. I should however add that neither the EM1 or A7 could continuously autofocus as convincingly as the X-T1 despite both sporting embedded phase detect AF points on their sensors.
Fujifilm X-T1 sensor
The X-T1 is equipped with Fujifilm’s Advanced X Trans II CMOS sensor, an APS-C sized sensor with 16 Megapixels; I believe it’s the same sensor employed by the X-E2. Like earlier X Trans sensors, this employs a unique colour filter array which avoids moire and eliminates the need for an optical low pass filter. This allows the sensor to deliver very crisp images, while the APS-C size and sensibly modest resolution means it also enjoys low noise at high sensitivities. The version II refers to embedded phase-detect AF points, first seen on the X-E2 and which, as detailed earlier in my review, allow the X-T1 to successfully track subjects in motion even when shooting at the top speed of 8fps.
The Olympus OMD EM1 also offers 16 Megapixel resolution but with a smaller Micro Four Thirds sensor. To put their sizes into perspective, the APS-C X Trans II measures 23.6×15.6mm compared to 17x13mm for Micro Four Thirds. You can see exactly how the image quality, resolution and noise levels of the X-T1 compares to the Olympus OMD EM1 across my results pages, but if you can hang on a little longer, there’s a few extra things you may find useful.
You can choose to record JPEG images in three different resolutions, each available in three aspect ratios, 3:2, 16:9 and 1:1; note all but 3:2 are cropped. You can then save these images with the choice of two JPEG compression levels, or as a RAW file, either by itself or accompanied by a JPEG at any quality or aspect ratio; note RAW files are always recorded at the full image size. Large Fine JPEGs typically ran between 4 and 7MB each, while RAW files, clearly uncompressed, weighed-in at a hefty 33MB each.
 |  | |
The sensitivity runs from 200 to 6400 ISO with extended options offering 100 ISO at the Low end, and 12800, 25600 or 51200 at the High end. The dedicated ISO dial offers the base range, along with L, H1, H2 and A for auto (with user selectable upper limits), but eagle-eyed readers will already have noticed the dial is missing a notch. Yep, it only has H1 and H2, but there’s three extended ISO options. The menus let you configure H1 and H2 to deliver 12800, 25600 or 51200 ISO, but with only two positions on the dial for them, you can’t have all three within a turn of each other – one always has to remain neglected. Since the default has H1 and H2 configured as 12800 and 25600 ISO respectively, many owners of the X-T1 may not even realize there’s a 51200 ISO option waiting to be deployed. If only there was one more notch on the ISO dial. Then again 51200 ISO is so noisy, it’s no great loss if no-one finds it.
While the absent notch on the ISO dial is a bit silly, there’s an additional peculiarity to the extended sensitivities you may find annoying. If you’re using 100, 12800, 25600 or 51200 ISO, the X-T1 only lets you record JPEGs, not RAW files. This is particularly frustrating if you want to better manage noise reduction on the high settings, or perhaps make easy adjustments to the White Balance or compression on any of them. And now that Adobe Camera RAW supports application of the Fujifilm Film Simulations, you’ll miss out on the chance to adjust these too.
As a long exposure photographer, I frequently deploy the lowest ISO even if it results in a reduced tonal dynamic range, but doing so on the X-T1 means missing out on recording a RAW file and the subsequent adjustments it offers. You may not notice the on-screen quality indicator dropping the RAW either when switching into the extended range, which could result in a nasty surprise later when you discover you didn’t record a RAW file. On the upside if you previously had RAW+JPEG selected for the quality, the camera will at least revert to this setting once you return to the base ISO range.
 |  |  |
Finally, there’s a wide variety of image processing parameters you can adjust. Along with Film Simulation and Dynamic Range which I covered earlier, the X-T1 lets you adjust the colour saturation, sharpness, highlight tone, shadow tone and noise reduction each in a +/-2 step range; you can also set up the Q Menu to deliver direct access to each if desired. I used the default 0 settings for each of the parameters during my tests and as I’ve noted throughout the review found the image quality to be very pleasing indeed. Crisp, colourful, detailed, natural, just right. Now it’s time to see how the quality compares to the Olympus OMD EM1 in my Fujifilm XT1 quality and Fujifilm XT1 noise results pages, each of which include comparisons in JPEG and RAW. Alternatively check out my Fujifilm XT1 sample images or skip straight to my verdict.