Panasonic Lumix DMC-LX5
-
-
Written by Gordon Laing
Intro
The Panasonic Lumix DMC-LX5 is a high-end compact camera aimed at enthusiasts. Announced in July 2010, exactly two years after the classic LX3, the new LX5 takes the same concept of packing a high-sensitivity sensor, bright and wide lens, flash hotshoe and a wealth of manual control into a small and light body. Note there wasn’t an LX4, so the LX5 is the direct successor to the LX3.
Externally, the LX5 shares essentially the same appearance as its predecessor, although the new model enjoys a more generous grip along with a handful of control tweaks. The hotshoe has also been raised to accommodate an accessory port which supports the optional electronic viewfinder first seen for the Lumix GF1.
The biggest difference concerns the lens, with Panasonic upgrading the basic 2.5x range of the LX3 to a broader 3.8x. Crucially the new LX5 maintains the wide 24mm equivalent coverage of its predecessor, along with its bright f2.0 aperture, but instead of topping-out at a modest 60mm, it zooms 50% longer to 90mm. While many lenses suffer from much slower apertures when zoomed-in, the LX5 boasts an impressive f3.3 at its longest focal length. Panasonic also claims to have improved the AF speed with its new Sonic Speed system boasting gains of up to 40% in certain conditions.
Internally there’s been a number of enhancements. The CCD sensor remains 10 Megapixels, but Panasonic claims improved dynamic range, saturation and sensitivity. Alongside is a new Venus FHD processor which allows quicker startup times and image processing, along with extending the battery life by over one third – although this is in conjunction with a new battery pack.
The best quality movie mode remains 720p, but like most current Panasonic models, the existing Motion JPEG mode is now complemented by an AVCHD option which allows smaller files and longer recording times. The LX5’s movie mode also now allows manual control over exposures along with optical zooming while filming – neither of which were possible on the LX3.
Other additions over the old model include an HDMI port, thumb wheel, 1:1 aspect ratio option and a play button instead of a switch, which means you can go directly from playback to shooting with a half-press of a shutter release.
The enhancements of the LX5 over its predecessor may not be revolutionary, but bring a popular classic up-to-date while addressing a number of concerns. The digital camera market has however moved-on significantly in the two years since the LX3, with a number of mirror-less compacts packing DSLR sensors and interchangeable lens mounts into small bodies, including Panasonic’s own Lumix GF1. These may be pricier than the Lumix LX5, but many enthusiasts are willing to pay the extra for their performance and flexibility.
The question then is not only how well the LX5 performs against other small-sensor premium compacts, like Canon’s PowerShot S95 and G12, but whether it’s still relevant in today’s market. Is there still room for a high-end enthusiast’s compact with a small sensor and fixed lens? Find out in our Panasonic Lumix DMC-LX5 full review where we’ll pitch it against both types of cameras to see how it measures-up. If you’re shopping for a premium compact, you’ve come to the right place.
Testing notes
We tested a final production Lumix LX5 running firmware version 1.0. Unless otherwise stated, the LX5 was set to Program mode with Auto White Balance and its Standard Film mode. Optical Image Stabilisation was enabled for all handheld images and disabled for tripod-based tests. We used the default processing settings for our sample images gallery, so Intelligent Resolution was set to Low; we have comparisons of its different settings in our review.
Panasonic Lumix DMC-LX5 design and controls
The Panasonic Lumix DMC-LX5 greatly resembles its predecessor from the outside, with only minor changes to tell them apart. With its main body measuring 110x66x26mm (WHD), or 43mm thick if you count the protruding lens barrel, the LX5 is essentially the same size as the LX3, but with a taller hotshoe to accommodate the new accessory port. The weight at 271g including battery and card is also within a few grams of the LX3.
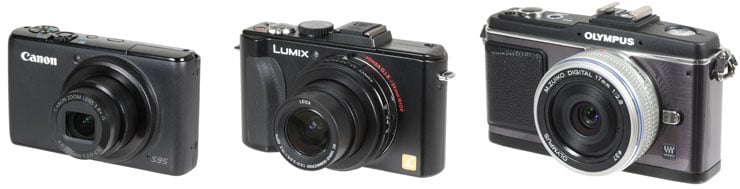
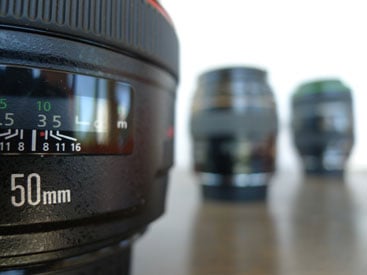
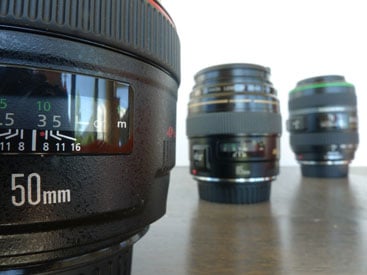
So like its predecessor, the LX5 may be chunkier than a typical point-and-shoot compact, but it remains smaller and lighter than most enthusiast models – with one exception. To put it in perspective we’ve pictured it below, flanked by the Canon PowerShot S95 on the left and the Olympus E-P2 on the right. With a main body measuring 100x58x22mm (WHD), or 30mm thick with its lens housing, the S95 is a little shorter, narrower and crucially thin enough to squeeze into a trouser pocket, whereas the LX5 is better-suited to a larger coat pocket. The S95 is almost one third lighter too at 193g including battery and card. The S95 has a 28-105mm (equivalent) lens with an f2.0-4.9 focal ratio.
 |
|---|
The Olympus E-P2 pictured above is clearly larger than the Lumix LX5, and to be fair is also shown with a fixed ‘pancake’ lens rather than a zoom, but remember this model also features a considerably larger sensor and the ability to change lenses. Indeed the latest mirror-less ‘EVIL’ compacts are now important rivals for the LX5 and other enthusiast models as they potentially deliver much lower noise, higher dynamic range and greater flexibility in a body that’s not a great deal bigger.
The latest Olympus E-PL1 body measures 115x72x42mm and weighs 343g; add Panasonic’s excellent 20mm f1.7 lens and the thickness increases by 26mm and the weight by 100g to 443g. Panasonic’s own Lumix GF1 measures 119x71x36mm and weighs 341g, with the same 20mm lens adding 26mm to the thickness and increasing the total weight to 441g. Sony’s NEX-5 is the smallest and lightest of all the EVIL compacts to date – not to mention boasting the biggest sensor – with a body measuring 111x59x38mm and weighing 287g. Sony’s 16mm f2.8 pancake lens adds 23mm to the thickness and increases the total weight to 354g.
 |
|

Once again each of these comparisons is for a fixed lens, but it’s certainly revealing to see what you can get from a body that may only be a little larger. Once again the Lumix LX5 body measures 110x66x26mm or 43mm thick including the lens housing, and weighs 271g including battery. The Sony NEX-5 body measures 111x59x38mm or 61mm thick including the 16mm lens, and weighs 354g in total. Sure the NEX-5 is thicker, and in this comparison has a fixed 24mm (equivalent) f2.8 lens compared to the 24-90mm (equivalent) f2.0-3.3 zoom of the LX5, but there’s actually not much between them in weight and pocketability.
Before moving on, we should also mention that other enthusiast compact, the Canon PowerShot G12, which is actually larger and heavier than many of the EVIL bodies at 112x76x48mm and weighing 401g. This particular model features a 28-140mm (equivalent) f2.8-4.5 lens.
We’d say this puts models like the Lumix LX5 and PowerShot G12 is a slightly uncomfortable position in today’s market, as they’re roughly comparable in transportation size and weight to models with much bigger sensors. Again once you fit a zoom to an EVIL body, they do become much larger (not to mention losing the bright focal ratio), but many enthusiasts will find themselves willing to accommodate them for their superior performance and flexibility in other regards. In the meantime, the smaller dimensions and lighter weight of the Canon PowerShot S95 really now differentiates it from the pack.
Returning to the Lumix LX5’s design, the new model features a slightly larger bulge on the grip than its predecessor, while round the back your thumb rests on a new control wheel rather than the raised dots of the LX3. It’s always a personal choice, but we found the LX5 more comfortable and secure to hold than its predecessor, not to mention the smooth surface of the Canon PowerShot S95. As before, the build quality of the LX5 is excellent, although on-par with the S95. The LX5 is available in black or white finishes.
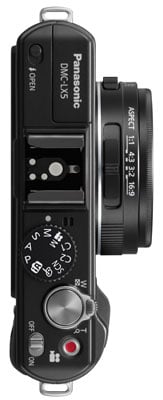
Viewed from above, the Lumix LX5 greatly resembles its predecessor with only a few minor tweaks. The top of the lens housing still features a rotary switch to select the aspect ratio, but now includes a new 1:1 option alongside the previous 4:3, 3:2 and 16:9 settings. It’s nice to have physical controls for settings like these, but we did find the aspect ratio switch could be inadvertently nudged when the camera was taken out of a pocket, so beware. That said, the impact can be seen immediately on the screen, so there’s unlikely to be any surprises.
Staying with the lens housing, a second switch on the left side as you hold the camera switches between AF, Macro AF and Manual focusing modes; while similar in stiffness to the aspect ratio switch, we found the AF control generally stayed in-place during our tests.
 |
Like its predecessor, the flash is manually popped-up using a small lever control in the left corner – unlike the PowerShot S95, there’s no way for the LX5 to raise the flash itself in the auto modes, so with it pushed down, you can be sure there’s no chance of it firing. Alongside the popup flash is a fully-functional flash hotshoe onto which you can mount the optional DMW-FL220, DMW-FL360 or DMW-FL500 flashguns for considerably longer reach than the built-in model. Obviously the bigger the flash, the more ungainly it will feel on the relatively compact body of the LX5, but the ability to accommodate external flashguns is a key advantage it has over smaller models like the PowerShot S95. The LX5 comes with a cover which slides onto the hotshoe to protect both it and the new accessory port below it.
To the right of the hotshoe is the main mode dial, which shares the same PASM, SCN, Intelligent Auto and two Custom options as the LX3. Since you can now start filming video at any point with the LX5, there’s now no need for a dedicated movie mode position on the dial, although there is one for the new Creative mode which offers control over the aperture and shutter speed, more of which lower on this page. Completing the options is a new My Colours mode which applies one of 11 filters or a custom option – these give you quick access to grainy black and white, pinhole or ageing effects. We’ll have full details of the exposure modes later in the review.
To the right of the mode dial is a generous shutter release with a rotary zoom control; again it’s personal, but we preferred the DSLR-sized shutter release on the LX5 over the unusual smaller cylinder button of the Canon S95.
As before, there’s a power switch in the lower right corner of the top panel, but the dedicated focus button of the LX3 has been switched for a red button which starts and stops recording video in any mode.
 |
 |
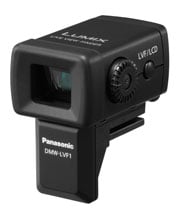
Turning to the rear of the camera, the basic layout remains similar to its predecessor, but with a number of key changes. Arguably most important is the addition of a new accessory port located just below the hotshoe and protected by the same sliding cover. This allows you to mount the same DMW-LVF1 electronic viewfinder accessory as the Lumix GF1 which replicates the view from the screen, while also tilting upwards by up to 90 degrees if desired. This is another key advantage the Lumix LX5 has over the competition: there’s only an optical viewfinder on the larger PowerShot G12 and no viewfinder option at all on the PowerShot S95.
Switching to the EVF on the LX5 allows you to view the image more easily in bright light, while holding the camera close to your face for greater stability; tilting it upwards also makes shooting at lower angles more comfortable. The LVF1 may have a relatively coarse resolution and cost roughly one quarter of the LX5 itself, but it’s a nice option to have; using it won’t however extend your battery life.
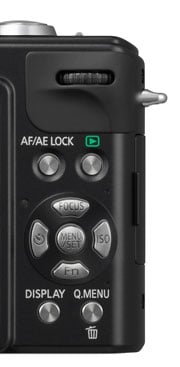
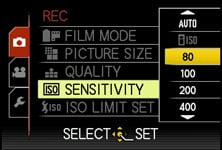
In the lower right corner of the rear you’ll find the usual four cross-keys with a Menu Set button in the middle. Pushing left still adjusts the self-timer while the down button remains a programmable function control. Pushing right now presents welcome direct access to the ISO sensitivity rather than the flash options, while pushing up now accesses various focusing options depending on the mode.
In the upper right corner there’s more significant changes, all of which are for the better in our view. The tiny fiddly joystick of the previous LX3 has been replaced with a much more ergonomic thumb wheel with a push-action for making selections or switching function – so for example in the Manual exposure mode you can push the dial to switch between adjusting the aperture and shutter speed without ever moving your thumb to another control.
The AF / AE lock button is still present (although nudged to the side), but to its right is a new play button rather than the record / play switch of its predecessor. Opinions will vary on this change, but we much prefer the new approach where you can exit play and start shooting with a half-press of the shutter release. On earlier Panasonic compacts it was too easy to leave the switch set to Play, then be delayed as you powered-up the camera to take a photo, only to wonder why you couldn’t. The only downside to Panasonic’s implementation on the LX5 is that you can’t power-up the camera into playback by just pressing and holding the play button alone. Instead you frequently find yourself switching the camera on just to view an image and having it chastising you for leaving the lens cap on before the play button becomes active. Panasonic has anticipated this being an issue and allows you to set the camera to power-up into play rather than record mode, but while this avoids the lens cap message and can subsequently enter record with a half-press of the shutter release, it’s obviously neither quick nor convenient. Alternatively you can press and hold the play button while you flick the power switch to power-up directly into playback, but again it would be easier if you could just do it by pressing and holding the play button alone. That said, the play button and especially the thumb wheel are very welcome improvements over the LX3.
Moving onto the right side of the body you’ll find the ports behind a small flap. The previous LX3 featured a combined USB / AV output, an analogue component output (for use with an optional HD cable) and a DC input. The new LX5 keeps the USB / AV output, but sensibly ditches the proprietary analogue component output for a standard Mini HDMI port. There’s no longer a DC input port, with the LX5 instead accepting mains power via an optional adapter which slots into the battery compartment.
Speaking of which, the LX5’s battery compartment takes a new pack: the DMW-BCJ13, rated at 1250 mAh and good for around 400 pictures under CIPA conditions when composing with the screen or optional EVF. This is approximately one third more than its predecessor from a pack with only 100 mAh extra capacity. We can’t comment on compatibility of third party batteries for the LX5, although be aware Panasonic has prevented the use of many on previous models, often following a firmware update. We can however tell you that 400 shots from a single charge is around double what you’ll get from the Canon S95.
The compartment is also home to the LX5’s SD memory card slot, and is compatible with SD, SDHC and SDXC formats; the camera comes with 40MB of built-in memory to get you started, but you won’t be able to record HD video with it. Class 4 cards are required to support video recording in the AVCHD mode, but you’ll need quicker Class 6 cards to support the more memory-hungry Motion JPEG options. We tested the LX5 with both Class 6 and Class 4 cards and found affordable SanDisk Ultra II cards were fine for the AVCHD mode – albeit too slow for Motion JPEG thanks to their Class 4 rating.
Finally there’s a metal tripod thread located towards the left side of the body; the position may allow you to access the battery compartment when mounted on smaller tripod heads, but inevitably involves some rotation as you tighten the thread. We prefer the tripod thread on the Canon S95 which is in line with the optical axis of the lens.
Panasonic Lumix DMC-LX5 lens and stabilisation
The lens has always been a highlight on previous LX cameras, offering wide angle coverage and a bright focal ratio. The new Lumix LX5 continues that tradition while upping the game over its predecessor. The earlier LX3 featured a 2.5x zoom with an equivalent range of 24-60mm and a focal ratio of f2.0-2.8. The new LX5 keeps the 24mm wide angle coverage with its maximum aperture of f2.0, but usefully extends the range to 3.8x with a longest equivalent focal length of 90mm. Unsurprisingly the aperture when fully zoomed-in is a little smaller than the LX3, but at f3.3 is still not to be sniffed at.
The benefit of a large aperture (small f-number) is the ability to gather more light while also minimising the depth-of-field. A lens at f2.0 will gather twice as much light as one at f2.8, allowing it to use half the sensitivity or a shutter speed that’s twice as fast – in turn, this means either better quality (especially on a compact) or less chance of visible camera shake.
The lens extends by 23mm from the housing when powered-up, with the LX5 ready for action in about 1.5 seconds. The motorised zoom control is pretty fine with 18 steps between the shortest and longest focal lengths. Activate the new Step Zoom option and the LX5 will jump between preset focal lengths of 24, 28, 35, 50, 70 or 90mm as you nudge the zoom control – this may be nice for anyone wanting to match classic 35mm focal lengths, but we preferred having the finer increments in normal operation. In a very considerate move though, the LX5 can be set to memorise the focal length and even focusing position and resume either or both when powered-off and on again – perfect for anyone who’s been frustrated to find the ideal lens settings have been lost during power save.
Panasonic Lumix DMC-LX5 coverage wide |
Panasonic Lumix DMC-LX5 coverage tele | |
 |  | |
| 5.1-19.2mm at 5.1mm (24mm equiv) | 5.1-19.2mm at 19.2mm (90mm equiv) |
The images above illustrate the coverage of the Lumix LX5 in practice and it’s immediately apparent how much more useful the longer range is over its predecessor. Having 24mm wide angle coverage on the LX3 was certainly very nice, but the maximum focal length of 60mm just wasn’t quite long enough for classic portraits. The 90mm coverage of the LX5 may still be way too short for capturing distant subjects in any decent detail, but by zooming half as close again as its predecessor gives you much more flexibility in practice. Crucially it means the LX5 is now equally suited to head-and-shoulders portrait work as its predecessor was for expansive landscapes or architecture.
The optical quality is also very good with crisp details and minimal aberrations to worry about – although the camera may of course be performing some corrections itself. In our tests at three focal lengths, the LX5 delivered very respectable results even with its aperture wide-open. At the maximum apertures there was some softening in the extreme corners, but the rest of the image looked pretty good. Closing the aperture by one stop resulted in a boost in contrast and sharpness across the frame with a reduction in corner softness. Closing the aperture to f4 produced a fractionally less contrasty image due to diffraction beginning to kick-in, but it was often worth it for better corner performance. At apertures of f5.6 and smaller though the image visibly softens due to diffraction. As such we’d say the optimum apertures are between f2.8 and f4, although again if you can accept a little corner softness, it isn’t at all bad at its maximum aperture.
At this point it’s important to compare the LX5’s optics against the competition. Arguably its biggest rival is the Canon PowerShot S95 and to a lesser respect, the PowerShot G12; these employ lenses with 28-105mm and 28-140mm equivalent ranges, and f2.0-4.9 and f2.8-4.5 focal ratios respectively. Looking at the coverage first, the Lumix LX5 zooms a little wider than both Canons, but doesn’t zoom as long. There’s not a massive difference between it and the S95, but the G12 will get noticeably closer than either. Note the LX5 also offers Intelligent Resolution which digitally extends the LX3’s range to 5x – we’ll take a look at how it performs later in this review.
Looking at the focal ratio, the PowerShot S95 shares the same f2.0 setting as the LX5 when both are zoomed-out. This allows both cameras to gather twice as much light as the G12 or other cameras at f2.8. At the other end of their zoom ranges the LX5 would seem brighter at f3.3 compared to f4.9 and f4.5 for the S95 and G12 respectively, but it’s important to compare like with like and note at which focal lengths the aperture values change.
The Lumix LX5 only offers its maximum f2.0 aperture when fully zoomed-out to 24mm. It closes a fraction to f2.1 at 26mm, f2.2 at 30mm, f2.3 at 35mm, f2.4 at 37mm, f2.5 at 40mm, f2.6 at 47mm, f2.7 at 50mm, f2.8 at 55mm, f2.9 at 65mm, f3.0 at 70mm, f3.1 at 75mm, f3.2 at 80mm and finally f3.3 at 90mm.
The PowerShot S95 only offers it maximum f2.0 aperture when fully zoomed-out to 28mm. It closes to f2.2 at 33mm, f2.8 at 42mm, f3.2 at 51mm, f3.5 at 61mm, f4.0 at 70mm, f4.5 at 84mm and finally f4.9 at the maximum focal length of 105mm.
Looking at some of those cross-over focal lengths, the LX5 and S95 operate at a maximum of f2.7 and f3.2 at around 50mm and at f3.3 and f4.5 at 90mm This may only give the LX5 an advantage of around one third of a stop at 50mm, but a whole stop when both cameras are at 90mm. So while both the LX5 and S95 start their focal ranges at an impressive f2.0, the LX5 maintains a relatively bright aperture throughout its range whereas the S95 becomes quite average beyond the halfway mark.
Where the LX5 also scores over the S95 is the ability to mount optional lens accessories. Fit the DMW-LA6 adapter and you’ll be able to mount a variety of filters or the DMW-LWA52 wide-angle converter which multiplies the range by 0.75x to deliver maximum coverage equivalent to 18mm. Like most adapters and converters though, they greatly add to the size of the camera. The thread on the adapter measures 52mm, but not having used this accessory, we can’t confirm whether it will take standard filters of this diameter or only Panasonic’s options.
It’s equally important to note the LX5, like its predecessor, employs a separate lens cap. This clips on and off easily enough and can dangle from a cord attached to the body, but it’s neither as quick nor convenient as the built-in sliding lens covers on the PowerShot S95 or G12. Leave the cap attached as you switch the camera on and you’ll be told to remove it before pressing a button to continue. Annoyingly you’ll also have to remove the cap or ignore the chastising message if you’re powering-up the camera simply to enter playback.
 |
The cap also adds extra thickness to the lens barrel, making it quite a bit chunkier than the S95 when powered-down, but the counter-argument is the cap will offer better protection than the sliding shutter on its rivals. Swings-and-roundabouts, but if you use the cap, you’ll find the LX5 is noticeably slower to get ready and put away again than the S95 and G12.
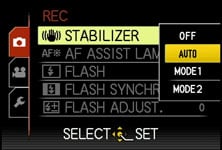
Like all Panasonic cameras, the Lumix LX5 employs optical image stabilisation. With this new model though, Panasonic has updated the stabilisation from Mega OIS to Power OIS, claiming nearly double the compensation of the previous system.
There’s still the same stabilisation options as its predecessor though: Mode 1 which stabilises constantly for a reassuringly steady view when composing, or Mode 2 which only stabilises as you take the photo – potentially more effective, but with visible wobbling as you compose. The default Auto option switches between them depending on conditions.
Panasonic Lumix DMC-LX5 Image Stabilisation off / on (Continuous) | ||
 |  | |
100% crop, 5.1-19.2mm at 19.2mm, 1/3, 80 ISO, OIS off |
100% crop, 5.1-19.2mm at 19.2mm, 1/3, 80 ISO, OIS on | |
Above are examples taken with and without the default Auto stabilisation using the Lumix LX5 fully zoomed-into its maximum equivalent of 90mm, and at a shutter speed of 1/3. Traditional photographic advice would recommend a shutter speed of at least 1/90 to eliminate camera shake, but the stabilised LX5 allowed us to capture sharp handheld shots at 1/3 or even slightly below. In contrast under the same conditions we required 1/50 without stabilisation to achieve the same degree of sharpness; this corresponds to around four stops of compensation, confirming Panasonic’s claims that Power OIS is roughly twice as effective as Mega OIS on the earlier LX3. It’s a pretty impressive capability, although remember like all stabilisation systems it’ll only iron-out wobbles, not freeze a subject in motion.
Panasonic Lumix DMC-LX5 screen and menus
The Panasonic Lumix LX5 is equipped with a 3in screen with 460k pixels. Like its predecessor, the screen shape is 3:2, which is a little wider than the 4:3 shaped screens on most other compacts including the Canon PowerShots S95 and G12. Panasonic doubtless chose the 3:2 shape as the best compromise for a camera which could find itself shooting in a variety of narrower or wider aspect ratios, but it is important to note for the maximum pixel count, the LX5 should be set to 4:3, in which case there’ll be think vertical strips running down either side of the image and the diagonal measurement reduces to 2.7in. When shooting in 4:3, the image on the Canon S95 certainly looks larger, but again the advantage of the LX5 is when switching to wider aspect ratios at which point more of the screen is wasted on the PowerShots.
 |
The 460k specification corresponds to a display resolution of 480×320 pixels, which allows the LX5 to display finer on-screen detail than average 230k (320×240) pixel screens. It’s not in the same league as the 920k (640×480) pixel displays found on many higher-end DSLRs these days, but it certainly looks very nice in use. That said, a 460k screen is now par-for-the-course on a high-end compact and this resolution is shared on the Canon PowerShots S95 and G12, not to mention Panasonic’s own Lumix TZ10 / ZS7.
We tested the Lumix LX5 alongside the PowerShot S95 and found both screens looked great in most conditions, but both could become hard to view in harsh direct sunlight, especially if viewed off-axis with the cameras held at high or low angles. Under these conditions, the Lumix LX5 potentially has the advantage over the S95 with its optional electronic viewfinder, but it’s worth remembering the Canon G12 features an articulated screen as standard which could be tilted both for greater comfort at unusual angles and to minimise glare.
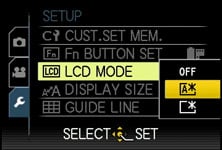
Like most Lumix compacts, the LX5 offers a Power LCD Mode which boosts the screen brightness. There’s also an auto option which can switch between Normal and Power modes depending on the conditions. The increased brightness helps under stark conditions, but again with sunlight shining on the screen, you’ll still need to shade it somehow.
 |
 |
 |
While shooting, the Display button switches between three modes: a clean view of the image, one with alignment guides (switchable between a grid, cross or adjustable intersecting lines), and shooting information with either the remaining shots or the remaining video recording time depending on which has been selected in a Setup menu. A live histogram can also be enabled in the Setup menus if desired, as can a mask indicating the coverage should you start filming a video.
 |
Like previous Panasonic models, the Lumix LX5 offers quick access to common shooting options via a drop-down menu that’s super-imposed along the top of the screen when you press the Q.Menu button. Pressing the left and right buttons highlight particular headings, after which you use the up and down buttons to select the desired option from a drop-down list.
This allows you to quickly and easily adjust common settings and is one of the highlights of using a Lumix camera, although interestingly the new thumb dial isn’t used here. In the Program mode, the Q.Menu lets you adjust the Film Mode, Flash settings, Burst Shooting, Metering, AF mode, White Balance, Still photo resolution, Movie recording quality, and finally the LCD screen mode.
 |
 |
 |
During playback, the DISP button cycles between a clean view, followed by one with basic shooting details and one with more advanced details, the latter including a brightness histogram if it’s been enabled in the menus. Sadly unlike Canon’s compacts, the LX5 still doesn’t employ its orientation sensors to automatically rotate portrait images to fill the screen when the camera’s turned to the side during playback – it’s also now lacking the dual display option of its predecessor which could show two images at once. It does however maintain the ability to apply fine rotation to images in playback.
It’s additionally worth noting the Canon S95 has raised the bar in playback by offering the option of brightness or RGB histograms like a DSLR. As mentioned above, the LX5 can also be a little frustrating to enter playback as despite having a dedicated playback button, it can’t be used to power-up the camera. Instead you’ll need to flick the main power switch and ensure the lens cap is either removed or accept the chastising message before then pressing play. Or configure the camera to power-up automatically in play, in which case getting to record mode becomes laborious. It’s much nicer on the Canon PowerShots to simply press and hold the play button to power-up the camera and view your images.
 |
 |
 |
Pushing the LX5’s Menu button in Program mode presents a whopping seven pages of recording options and seven setup pages; many of the common options like sensitivity and white balance are duplicated in the Q.Menu system. The varied menu options give you plenty of opportunity to tweak and customise the camera and we’ll detail several options throughout this review.
Panasonic Lumix DMC-LX5 exposures modes
Like its predecessor, the Lumix LX5 offers a broad range of manual and fully automatic exposure modes, allowing you to take precise control or simply leave the camera to work it all out for you. The traditional PASM modes will be of greatest interest to enthusiasts and we’re pleased to report they work essentially in the same way as a DLSR.
 |
 |
 |
In Program mode the exposure is calculated automatically, but the LX5 lets you shift the value using the thumb dial; click the dial and you can adjust exposure compensation instead. In Aperture Priority, the LX5 lets you choose from 13 values when fully zoomed-out between f2.0 and f8.0, or nine values from f3.3 to f8.0 when zoomed-in. Once again the aperture value is easily adjusted using the thumb dial and pushing it inwards switches to exposure compensation.
In Shutter Priority you can select speeds of 1/4000 to 8 seconds in 1/3EV increments, and again the thumb dial can be used to adjust these or exposure compensation with a push-click. Impressively the flash can sync even at the maximum shutter speed, although note speeds faster than 1/2000 are only available with an aperture of f4 or smaller. That said, you could shoot at 1/2000 / f3.3 with a flash for portraits under bright conditions, and we have an example at 1/1600 / f3.3 with a fill-in flash in our Gallery.
 |
 |
 |
In full Manual you can choose almost any combination of aperture or shutter speed, with the latter now available down to 60 seconds. As with shutter priority, speeds above 1/2000 demand an aperture of f4 or smaller, but stick to 1/2000 or slower and you can choose any aperture you like – so you could have f2.0 at 1/2000 or 60 seconds, or anywhere in-between. This time, the thumb dial controls both the aperture and shutter speed – just push-click the dial to switch between them.
While it’s impressive to have such control over exposures, there are caveats involving the usefulness of aperture adjustments on a compact with a small sensor and short actual focal length. Most notably, the inherently large depth-of-field in most compacts, including the LX5, means it’s hard to achieve a significantly blurred background on portraits even with the aperture wide open. Your best bet is to zoom all the way-in and select the smallest f-number available, before positioning the subject close and the background as far away as possible, and you can see an example under these conditions in our Gallery. Macro shots allow a shallower depth-of-field, and the f2.0-3.3 maximum aperture of the LX5 is certainly a step-up from average compacts, but you still won’t be getting close to the blurred background effect you can enjoy with a DSLR or mirror-less EVIL compact. Below is a ‘best-case’ scenario taken close to the LX5’s minimum focusing distance.
Panasonic Lumix DMC-LX5: Depth-of-field in Aperture Priority | ||
 |  | |
| Aperture Priority: f2, 5.1-19.2mm at 5.1mm (24mm equiv) | Aperture Priority: f8, 5.1-19.2mm at 5.1mm (24mm equiv) | |
On a more positive note though, Aperture Priority does allow you to select the optimum f-number to avoid diffraction. Shutter Priority also lets you choose deliberately slower-than-normal exposures to blur moving action, such as waterfalls or racing vehicles. You can find out how to achieve these effects in our Blurring Action and Photographing Water tutorials. Meanwhile, full Manual lets you choose combinations of aperture and shutter which go way beyond normal metering or compensation ranges, allowing you to achieve massive under or over-exposures. You can also choose very long exposures with ease.
 |  |
If you prefer an easier life you can opt for the LX5’s Intelligent Auto mode which delivers a pretty foolproof experience. The LX5 exploits Scene Detection, Intelligent ISO, Face Detection, Quick AF, I.Exposure, Red-eye correction, Backlight Compensation, I.Resolution and Intelligent Zoom. Scene detection can choose from portrait, landscape, macro, night portrait, night landscape, sunset or baby presets, or fall-back on plain auto for general shots. Intelligent ISO detects subjects in motion and increases the sensitivity to allow a sufficiently fast shutter speed to eliminate blur.
In practice it all comes together very well even under demanding conditions. Suffice it to say the LX5 easily switches into macro mode when placed very close to subjects and automatically activates face detection with the portrait preset when pointed at people. But where it gets really impressive is when photographing kids in action. In our tests the LX5 managed a high success rate taking photos of kids on swings or running around, even when the photographer was also in motion. Sure it’s not infallible, but we remained impressed with the hit rate which was consistently higher than other compacts including the PowerShot S95. The focus tracking is certainly very good and it’s fun to see all the technology automatically activate as required in the iA mode.
If you like the automatic life, but prefer a little extra control, turn the mode dial to SCN and choose from 23 presets on the screen. Alternatively for easy special effects, turn the dial to the new My Colours mode which applies one of 11 filters or a custom option – these give you quick access to grainy black and white, pinhole or ageing effects.
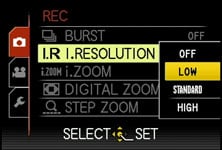 |  |
New to the Lumix LX5 over its predecessor is Intelligent Resolution, which applies selective sharpening to images, and if i.ZOOM is also enabled, allows the camera to digitally extend its zoom from 3.8x to 5x. To put this to the test, we photographed the same scene fully zoomed-in with the normal settings, followed by Intelligent Resolution, then with i.ZOOM extending the range to 5x – you can see 100% crops from the same area of each photo below. Technically speaking the i.ZOOM extension inevitably doesn’t record any greater detail, but does a fair job of scaling in-camera and providing a little extra reach when ultimate image quality isn’t paramount.
Lumix LX5 normal shooting |
Lumix LX5 with Intelligent Resolution (High) |
Lumix LX5 with IR (High) and i.ZOOM | ||
 |
 |
 | ||
100% crop, 5.1-19.2mm at 19.2mm, 80 ISO |
100% crop, 5.1-19.2mm at 19.2mm, 80 ISO |
100% crop, 5.1-19.2mm at 19.2mm, 80 ISO |
Finally, the Lumix LX5 offers exposure bracketing with three frames up to 3EV apart. It’s a broader than average range, but there’s nothing clever like automatic HDR available, unlike its rivals from Canon and Sony.
Panasonic Lumix DMC-LX5 focusing and face detection
The Lumix LX5 offers broad control over focusing. First of all there’s the switch on the side of the lens barrel which lets you choose from AF, Macro AF and Manual AF, the latter showing a horizontal distance scale with an enlarged portion in the middle for confirmation. The upper of the four direction buttons also doubles-up to provide access to additional options depending on the focusing mode.
 |  |
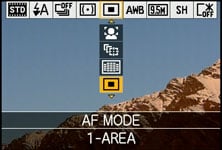
As for the AF modes, the Lumix LX5 offers four main options which can be manually selected in the PASM modes, or left to the camera to choose from in auto. First is Face Detection, which can detect and track human faces. This now works alongside Face Recognition, which can memorise up to six people (using one to three poses) along with their names and birthdays if desired. Once registered, these faces can have focusing priority over ‘strangers’, and it’s also fun to see their name popup under the tracking frame. If the subject’s age is less than three years old, the camera will also automatically switch to its Baby scene preset in auto modes. In practice it really works too, and is fairly tolerant of accessories like hats, although sunglasses can fool the system.
The second AF mode is AF Tracking, which is kind of like face detection for non-human subjects. This allows you to place a target over a subject, after which the LX5 will track it across the frame and adjust its focus as required.
Next up comes the standard 23-area AF system, which the LX5 defaults to in the absence of recognisable faces in the auto modes. The fourth AF mode is single-area, which as its name suggests, just uses one area for quicker response. New to the LX5 though is the ability to move this area anywhere on the frame and adjust its size if desired.
 |
 |
 |
Panasonic also claims the Lumix LX5 is now quicker at focusing than before thanks to its Sonic Speed AF system. Impressively this bore-out in practice with the LX5 often locking-onto the subject a split second after half-pressing the shutter release. Tested side-by-side against the PowerShot S95 in a variety of conditions, the Lumix LX5 was consistently quicker at focusing on and keeping track of the subject; it also gives the camera a very responsive feel.
Panasonic Lumix DMC-LX5 Movie mode
The Lumix LX5 takes a similar approach to other recent Panasonic compacts when it comes to its movie capabilities. As such, the LX5 resists the temptation to offer 1080p recording and instead sticks with the best-quality 720p option of its predecessor; a little disappointing when the LX5 features a ‘Full HD ‘FHD’ image processor.
 |  |
 |  |
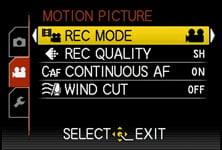
What’s new though is the choice of encoding it in either AVCHD Lite or Motion JPEG formats, along with manual control over exposures, a dedicated record button and the chance to adjust the optical zoom while filming, although the microphone remains mono and you still can’t take a photo without stopping the recording.
Note to support AVCHD Lite, you’ll need to use a memory card rated as Class 4 or quicker, while to support Motion JPEG, you’ll need Class 6 or faster. For the record, AVCHD Lite is the same as AVCHD, but only operating at 720p.
Like other Panasonic compacts, the choice of encoding formats for HD video seems a little odd at first, but there’s compelling reasons for having both. As before, Motion JPEG has the advantage of easier editing, while AVCHD Lite allows smaller files, longer recording times and the possibility of playback on compatible Panasonic TV sets.
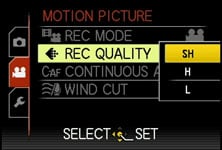
With the camera set to AVCHD Lite, the resolution is fixed at 720p (1280×720 / 16:9), but with the choice of three compression settings: SH (17Mbit/s), H (13Mbit/s) or L (9Mbit/s). If you have a ‘PAL’ model (Europe / Aus / NZ), the sensor outputs 25fps and the AVCHD files are recorded at 50p. If you have an ‘NTSC’ model (North America), the sensor outputs 30fps and the AVCHD files are recorded at 60p.
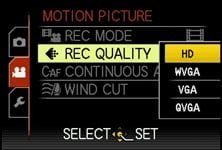
Switch the camera to Motion JPEG, you have the choice of four resolutions: HD (1280×720 / 16:9), WVGA (848×480 / 16:9), VGA (640×480 / 4:3) and QVGA (320×240 / 4:3), all recorded at a fixed quality setting and at a frame rate of 30fps regardless of geographic region.
To put them in perspective, the LX5’s AVCHD Lite mode (even in its best quality SH setting) consumes almost half as much memory as Motion JPEG, allowing you to squeeze around double the footage into the same space, while delivering roughly the same image quality. Given an 8GB card, you’re looking at around half an hour of footage in Motion JPEG as opposed to one hour with AVCHD, again even when the latter is set to its best quality SH mode.
Beyond more efficient compression though, the really important feature of AVCHD is potentially longer recording times per file. Motion JPEG files on the LX5 are restricted to 2GB in size, which limits the HD mode to clips lasting about 8 minutes and 20 seconds each. In contrast, switching to the AVCHD Lite mode allows you to keep recording uninterrupted until you run out of memory or battery life. Fit an 8GB card and you could record for an hour in the best quality setting.
There is however one important caveat for the European Lumix LX5 version, which has a maximum recording time of 29 minutes and 59 seconds per file to comply with tax regulations. But that’s still much longer than the 8 minute maximum of Motion JPEG.
Another difference worth noting between the two formats is their location on the card itself. Motion JPEG ‘MOV’ files may be found alongside your still photos in the DCIM folder, but the AVCHD ‘MTS’ files are buried away in various nested folders which start with one unhelpfully labelled PRIVATE on your card. This is to ensure compatibility with Panasonic’s TVs, and to play them on your computer, simply point your software at this folder and it’ll work out the rest; we had no issues playing back in Cyberlink’s PowerDVD 8 which ‘saw’ them as a Blu-Ray disc, or opening them directly into VLC Player (although the latter suffered from visual artefacts with the LX5 files in our tests). Either way, just remember to copy the MTS files out of this folder before reformatting your card.
Let’s now move onto a series of sample clips, which registered members of Vimeo can download from the links below; all were filmed in the AVCHD Lite mode with the best-quality SH setting. The first clip demonstrates the LX5 for handheld filming outdoors with stabilisation enabled and the mode dial set to Program.
| |
|---|---|
|
The first thing you’ll notice on the clip above are some vertical streaks where the sunlight reflections have saturated the sensor, which is a common issue with CCD sensors; this is only really avoided with CMOS sensors. The handheld pan also suffers from the stabilisation system catching up with itself at times, but at least there’s no fine wobbling. Finally you’ll see the LX5 zoom through its full optical range, gently, smoothly and without any focusing issues or audible motor operation – at least when there’s some ambient sound.
Now we’ll move onto our second clip, filmed outdoors again with the mode dial set to Program, but this time tripod-mounted and with stabilisation disabled. This time the pan is much smoother, and there’s also no undesirable artefacts to mention.
| |
|---|---|
|
Next we’ll try the LX5 in low light with a handheld pan in a dimly-lit bar. Here the benefit of having an f2.0 lens is being able to use as low an ISO as possible to minimise noise. It’s not as clean as a camera with a big sensor, but it’s an improvement over a typical compact.
| |
|---|---|
|
 |  |
Finally we’ll show you a clip filmed with the LX5’s new Creative Movie mode, which lets you film in Program, Aperture Priority, Shutter Priority or full Manual. Below we’ve chosen f2.0 in Aperture Priority with the lens zoomed out and manually focused only a few cm away. As the camera pans upwards and the focus is kept close, it’s clear how the lens can deliver a relatively shallow depth-of-field with the background out of focus. As described above, this effect works much better for macro subjects than typical portraits, but proves you can achieve shallow depth-of-field effects in the LX5’s movie mode.
| |
|---|---|
|
So far so good, but in addition the LX5 can film movies with all the automatic modes offered for stills. Turn the dial to Intelligent Auto before pressing the video record button, and you’ll notice the camera still seamlessly switches between scene presets and focusing modes. Start filming a person in iA mode and you’ll see the familiar face detection frames tracking them. Likewise for subjects in motion, and while there’s occasional times when you may prefer to manually intervene (such as disabling continuous AF to absolutely ensure no drifting), the iA mode for movies really works very well in practice. Again it passed the test of kids running around and even playing on swings in playgrounds, which is challenging for any camera.
The Film Mode and My Colours modes can also be applied to movies for special effects. It’s nice to have access to most of the still capabilities for video.
Beyond the absence of a 1080p mode, the only real disappointment is continued use of mono audio when the PowerShot S95 and even Panasonic’s own TZ10 / ZS7 have built-in stereo mics. The LX5 also had an opportunity here to stride ahead of rivals by offering an external microphone input, but sadly there’s none present. We, like existing Lumix GF1 owners, can only hope the accessory port below the viewfinder might support an external microphone in the future.
Panasonic Lumix DMC-LX5 drive modes
 |
 |
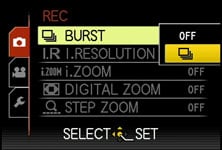
The Lumix LX5 offers one Continuous shooting mode at the camera’s full resolution, which captures up to five standard or three fine images at 2.5fps. We fitted the LX5 with a formatted SanDisk Ultra II card and fired-off five standard JPEGs in 2.8 seconds. Switching to Fine compression allowed us to take three frames in just over one second; likewise for RAW mode.
So in practice the LX5 captured the quoted number of frames, but only at the quoted speed for the Fine or RAW modes; the Standard mode was a little slower. Either way, 2.5fps is hardly quick, and worse, the restriction of only capturing three or five frames means you’ll need to grab your action sequence within a very short timeframe. In this respect, the LX5 is no different to its predecessor and not suited to capturing serious action sequences at its full resolution.
Like most Lumix compacts though, the LX5 alternatively offers a High Speed Burst Scene Preset which can take up to 100 images at 6.5fps in image priority mode or 10fps in speed priority. This kind of speed and buffer size is much more useful, although the caveat is a considerable reduction in image quality. The High Speed Burst preset records images at just 3, 2.5 or 2 Megapixels for the 4:3, 3:2 and 1:1 or 16:9 aspect ratios respectively. In practice it really can fire-off quick bursts, but the reduced resolution, not to mention relatively high sensitivities employed, mean it’ll only ever be a novelty. Those serious about fast continuous shooting in a compact need to look at a model with a CMOS sensor, such as Sony’s Cyber-shot HX5.
Note the LX5 also offers a flash burst option which can quickly fire the flash five times, but again the resolution operates at the same speed as the High Speed Burst mode above. Moving onto the self timer, Panasonic’s also resisted the temptation for the face, smile, wink and custom timers of rival models and implemented basic two and ten second countdowns.
Panasonic Lumix DMC-LX5 sensor
The Lumix LX5 is equipped with a 11.3 Megapixel CCD sensor measuring 1 /1.63in, although captures images with a maximum effective resolution of 10.1 Megapixels. Like the LX3 and several other Lumix compacts before it, the extra pixels around the edges of the frame are used to maintain the angle of view and avoid cropping at different aspect ratios.
 |
So with the camera zoomed-out, you’ll enjoy 24mm coverage whether you’re shooting in 4:3, 3:2 or 16:9 aspect ratios. Shoot the same scene with each aspect ratio and you’ll see the wider modes may capture less vertically, but more horizontally. To illustrate this we took our standard outdoor real-life resolution composition with the LX5’s Aspect Bracketing option which takes images at the 4:3, 3:2 and 16:9 aspect ratios, along with the new 1:1 option. The latter obviously crops the image horizontally, but it’s clear from the others how the coverage grows horizontally as it’s reduced vertically. This innovative approach is unique to Panasonic and in contrast to most compacts which simply crop strips from the top and bottom at wider aspect ratios, thereby losing resolution and coverage. Below are the images taken at, from left to right, 1:1, 4:3, 3:2 and 16:9.
 |
|---|
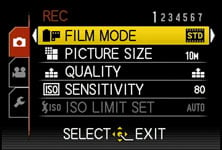
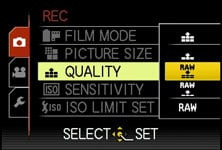
That said, the LX5’s maximum pixel-count comes when shooting in 4:3 mode, where the 10.1 effective Megapixels deliver images with 3648×2736 pixels. Switch to 3:2, 16:9 or 1:1 aspect ratios and the resolution falls to 9.5, 9 or 7.5 Megapixels respectively. Each aspect ratio is also available at four lower resolutions, and in the choice of two JPEG compression levels. As a high-end model, the LX5 can also record its files in the RAW format, either by themselves or accompanied by a JPEG at either of the two compression levels.
 |
 |
 |
Set to 10M Fine mode, images typically measure around 5MB each, and as before Panasonic includes around 40MB of built-in memory to get you started. Once again the camera is compatible with SD, SDHC and the latest SDXC cards, although for a smooth HD movie recording experience go for at least Class 4 (for AVCHD files) or at least Class 6 (for Motion JPEG files).
 |
Like its predecessor, the sensitivity ranges from 80 to 3200 ISO at full resolution, although you can now select 6400 and 12800 ISO modes, albeit at a greatly reduced resolution. Noise reduction, along with sharpness, contrast and saturation can be adjusted using the various Film modes.
So far, so similar to the earlier LX3, which shared the same sized sensor and same 10 Megapixel effective resolution. Panasonic however claims to have improved the on-tip-lens design to achieve a higher dynamic range with 31% greater sensitivity and 38% greater saturation. The proof of the pudding is in the eating, so let’s now move onto our results and sample images pages.
To see how the quality of the Lumix LX5 measures-up in practice, take a look at our real-life resolution and high ISO noise results pages, browse the sample images gallery, or skip to the chase and head straight for our verdict.